background image

Manual-

+12

-12

+12

-12

10

OL

0

2

4

8

6

10

0

6

4

2

8

MIC LOW

MIC HIGH

MIC LEVEL

AUX IN

MIC ON

10

0

10

0

6

4

2

8

6

4

2

8

10

0

6

4

2

8

10

0

6

4

2

8

OUTPUT

LEVELS

MAIN

BOOTH

AUX OUT

PHONES

PGM 1

CUE

PGM 2

MASTER
CUE

AUX IN

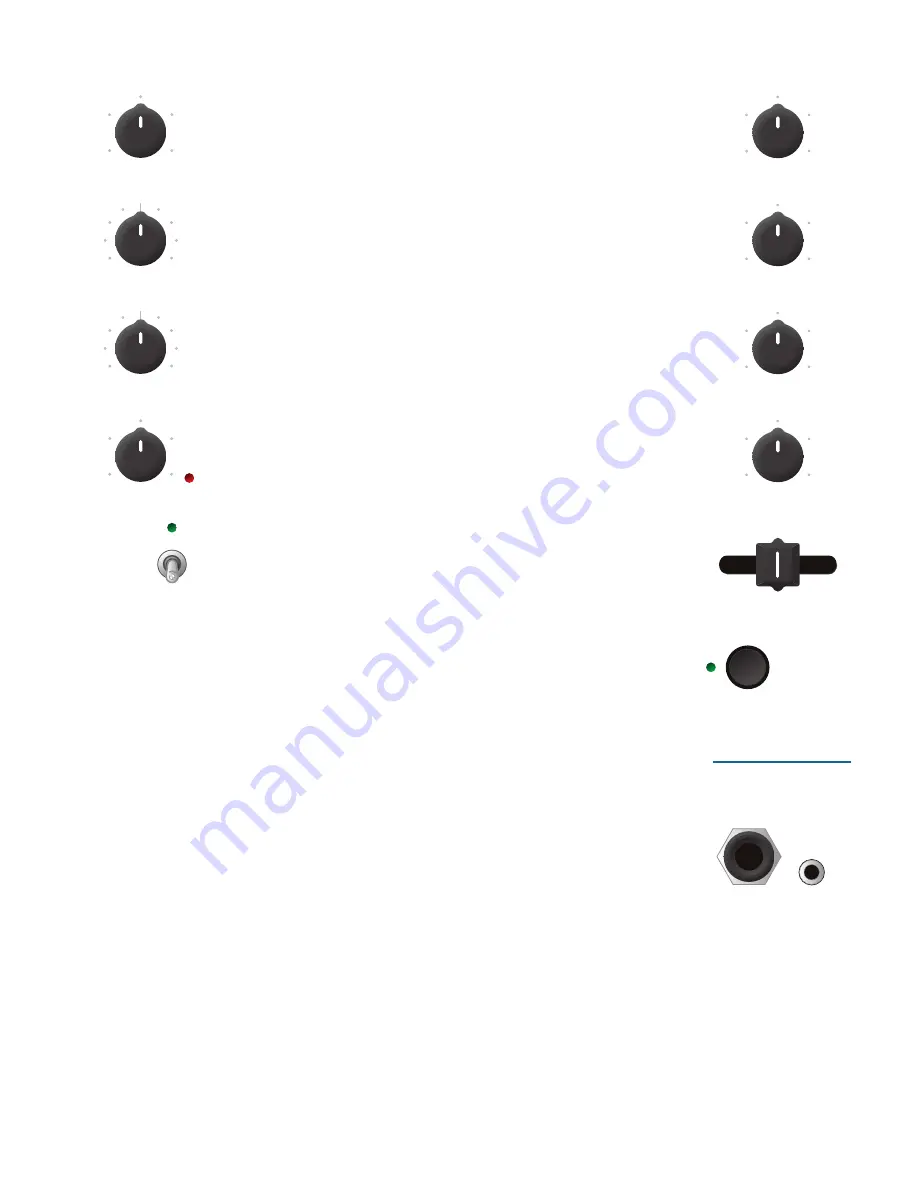
This level adjusts the level of the Auxiliary Input signal. This is a 

full-range control providing Off to +6 dB gain adjustment.

MIC LEVEL and EQ

The 

MIC ON

 switch engages the Mic. The green indicator is lit 

when the MIC is engaged.

MIC LEVEL

 adjusts the Mic gain over a range of Off to +50 

dB. Set the gain where you want it and use the MIC ON switch 

to turn the MIC on and off.

The 

OL

 indicator lights when the signal reaches clipping. If 

this lights red, turn the MIC LEVEL down.

MIC HIGH

 and 

MIC LOW

 tone controls allow you to 

adjust the bass and treble of the MIC Input signal.

OUTPUT LEVELS

Output Level controls are provided for 

MAIN

BOOTH

 and 

AUX

 Outputs. All three outputs have the same Main Mix 

source. As shown previously in Analog Outputs, the Main out-

put is a balanced output on XLR connectors, the Booth output 

is a balanced signal on TRS connectors and the AUX output is 

an unbalanced signal on RCA connectors. This combination of 

jacks allows you to hook into other equipment regardless of the 

connector type.

Headphone Cueing

The Cueing system allows users to Pan the Cue from PGM 1 to 

PGM 2 or select the Master Mix. Cueing is also provided for the 

internal digital effects, covered on page Manual-9.

Both 3.5 mm and ¼" jacks are provided. These can be used 

simultaneously, but using only one at a time yields more power 

to the headphones.

PHONES

The headphone output can deliver very high volume to some 

headphones. To avoid pain, 

never put headphones on your head be-

fore plugging them in

. Always start with the Phones Level turned 

down, and then turn it up to the desired level.

CUE

This slider allows you to pan between PGM 1 and PGM 2 in the 

headphones when the Master Cue light is 

off

. When Master Cue 

is 

on

, this control has no effect. The cue signals are post-EQ and 

pre-fader.

MASTER CUE

Press this switch (green light 

on

) to hear the Main Mix in the 

headphones. When this light is 

off

, the Cue slider takes over.

HEADPHONES

(XLR)

(TRS)

(RCA)

Содержание TTM 57SL

Страница 1: ...15645 TTM 57SL MIXER USB MAC WIN Version 1 6...

Страница 2: ...eat and degrade the performance of this equipment 8 Do not install near any heat sources such as radiators heat registers stoves or other apparatus that produce heat 9 Do not defeat the safety purpose...

Страница 3: ...21 Organizing your music 22 Grouping tracks into crates 22 Sorting your files 22 Using the song browser 23 Searching 23 Prepare window 24 Review window 24 Editing file information 24 Status icons 24...

Страница 4: ...ffects processing Magnetic faders Rane s legendary patented magnetic faders are the fastest most accurate and longest lasting on the planet The TTM 57SL uses the same faders and performance oriented l...

Страница 5: ...been selected for vinyl emulation control by the Scratch LIVE software the number is back lit as a reminder that the source is selected for control The Aux input has an independent Level control as d...

Страница 6: ...These controls have a built in Limiter that prevents signal clipping regardless of the Gain setting If increasing the Gain does not increase the signal level then the signal is already at maximum and...

Страница 7: ...OUSE When the green indicator is lit the Meter displays Stereo Mix output When the green indicator is off the Meter displays Dual Mono Cue The red OL indicator lights at 0 dBFS clipping The Meter disp...

Страница 8: ...is a balanced output on XLR connectors the Booth output is a balanced signal on TRS connectors and the AUX output is an unbalanced signal on RCA connectors This combination of jacks allows you to hook...

Страница 9: ...AUX BUS and then assigning PGM 1 and or PGM 2 to the FlexFX Loop Internal digital effects are covered on page Manual 8 USB USB Streaming Audio There are up to eight channels of stream ing audio over t...

Страница 10: ...what controls are assigned to what functions the Effects are very usable without the software The function of the controls has been standardized for stand alone operation to help keep stand alone oper...

Страница 11: ...le rotary encoder with a Tap function In this mode of operation the green mode indicator is normally off and lights only while the push switch is pressed indicating a Tap is being read There is no sec...

Страница 12: ...in BPM by tapping the beat on P1 The TAP may set the BPM over a range of 24 to 240 beats per minute with a resolution of 0 1 BPM Resonance filter Q is adjusted using the primary function of P2 green m...

Страница 13: ...Your new hardware is installed and ready to use proceed to install the Scratch LIVE driver Installing the Scratch LIVE driver 4 With the Scratch LIVE installation CD in the drive run Scratch LIVE 5 W...

Страница 14: ...not ground your turntables properly the control signal will be noisy and the tracking of the record position will be erratic See signal threshold on the next page Tip We recommend Shure M44 7 needles...

Страница 15: ...ld slider to the left will make Scratch LIVE more sensitive to slow record move ment but also more sensitive to background noise Tip If the slider jumps to the far right then you have a problem with n...

Страница 16: ...dle on the record and start the turntable The track will start playing from the position dictated by the placement of the needle on the record if you place the needle at the beginning of the record th...

Страница 17: ...matically This feature is available to CD users Go to track 2 on the control CD to access Vinyl Scroll Find the track you want to load and go back to track 1 The track you selected will be loaded and...

Страница 18: ...ync Track Overview display This view provides a complete overview of the waveform of the track and includes a marker to show the current position within the track This view is useful for finding trans...

Страница 19: ...um Snare Drum Beat Matching display This view shows the position of beats within the track When beat matching this view helps align the downbeats of the two tracks The markers are matched up when the...

Страница 20: ...of all tracks played Note for best results set the master gain to the 12 o clock position and adjust the volume of individual tracks using the track gain adjustment Playing tracks direct from audio CD...

Страница 21: ...ts of a song or use as a special effect When you press the censor button the track starts playing backwards from that point When you release the censor button the track plays forward from the point yo...

Страница 22: ...f the small pitch slider to make fine pitch adjustments or click on either side of the small slider to pitch bend There is a temporary cue point that can be used like the Cue button on many DJ CD play...

Страница 23: ...rl comma for left and ctrl dot for right to place cue points The stripe is a solid color at the cue point The stripe grows a fifth by each rotation closer to the cue point Looping You can save up to 9...

Страница 24: ...Hop Hip Hop LPs To make a new crate click the button To rename a crate double click the crate name You can change the order of tracks within a crate by dragging them up or down Tip The protect librar...

Страница 25: ...Use the keyboard shortcut ctrl f to jump to the search box This keyboard shortcut will also take you out of any crate or playlist that you might be in and into your main library so you can find any tr...

Страница 26: ...lick on the attribute within the main library to edit the attribute Filename length size bit rate and sampling cannot be edited This information is saved in the file itself Note that the protect libra...

Страница 27: ...7 To start a new recording without saving simply click the record button again Recordings can be loaded onto the decks renamed and man aged like other files Recordings are saved in MyDocuments My Musi...

Страница 28: ...delete the file ctrl shift del and ctrl shift backspace Delete the file from your library and send to the recycle bin Note to iTunes users files in your iTunes library cannot be deleted this way ctrl...

Страница 29: ...second This setting applies to the entire screen i e the Virtual Decks the Waveforms the library and the setup screen Playback Instant doubles This allows you to quickly match the playhead position o...

Страница 30: ...ou are using control records from a later batch with Scratch LIVE version 1 2 or greater you do not need to have drift correction enabled The new corrected vinyl label reads CV02 with second edition o...

Страница 31: ...your tracks before you play USB dropout indicator The USB dropout indicator on the main screen is a useful trouble shoot ing tool if you have problems with audio dropouts Such dropouts are caused by a...

Страница 32: ...led P1 and P2 on the mixer has two states The LED next to P1 and P2 on the mixer indicates the state the control above applies when the LED is off the control below applies when the LED is on Some con...

Страница 33: ...s to suit your needs see page Manual 34 The next four groups contain other functions ordered by category To access a group press the GROUP button on the mixer then press B1 general Custom group 1 with...

Страница 34: ...jump ahead with timing intact Play the track reverse from the current position Rewind Fast forward Group B2 library custom group 2 In this second custom group many of the functions can be applied to e...

Страница 35: ...can select your input source start and stop recording and load this new recording to either Virtual Deck Previous loop Jump to Cue points Loop on off toggle Next loop Control looping from the footswit...

Страница 36: ...MAIN Tap right Deck BPM Cue effect Effect on off Echo BPM multiplier Wet Dry control more dry more wet up all wet down all dry Echo Effect DECK 1 Group B6 effects Echo The TTM 57SL has two built in ef...

Страница 37: ...joystick down as if you were trying to push it down into the mixer you ll here a click and hold it down until the green LED lights The 8 check boxes around the joystick image show the direc tions you...

Страница 38: ...rmal 7 Flick the reverse input control switch 8 Load a track on the left deck and mix moving the cross fader the wrong way 9 Flick the reverse input control switch and repeat Swapping the turntables m...

Страница 39: ...maged MP3 files in the future Scratch LIVE freaks out when I use the master tempo key correction function on my CD player Scratch LIVE interprets the signal coming out of the CD player and uses this i...

Страница 40: ...Connect your turntables directly to the TTM 57SL Bad Turntable Vibration Bass is reaching the stylus Try to isolate the turntable from the speakers Dusty Needle Dust is preventing the stylus from tra...

Страница 41: ...L Check the cable and cartridge connections Left Channel is Noise Left signal has been lost with a noisy loose connection Bad Record Burn Your record is very badly worn and the TTM 57SL is unable to t...

Страница 42: ...dB max gain CMMR 40 dB 1 kHz max gain S N 76 dB Re 0 dBFS max gain 20 kHz BW Tone Controls 2 Band Master Booth Outputs Stereo balanced XLR TRS jacks Frequency Response 15 Hz to 20 kHz 0 3 dB THD N 0...

Страница 43: ...ader ch fader ON OFF EFFECTS SEND EFFECTS RETURN ON OFF EFFECTS SEND EFFECTS RETURN GAIN BLOCK xfader ch fader ON OFF EFFECTS SEND EFFECTS RETURN ON OFF EFFECTS SEND EFFECTS RETURN ON OFF EFFECTS SEND...

Страница 44: ...MIX OUT L R AUX INPUT L R DSP USB RIAA ANALOG 1 PHONO LINE ADC ANALOG 1 L R RIAA ANALOG 2 PHONO LINE ADC ANALOG 2 L R RIAA ANALOG 3 PHONO LINE ADC ANALOG 3 L R RIAA ANALOG 4 PHONO LINE ADC ANALOG 4 L...

Отзывы: