D8B CPU MEMORY UPGRADE INSTRUCTIONS
INTRODUCTION
To find out how much memory your D8B has, connect a video monitor
and a keyboard, turn on the D8B CPU and quickly press PAUSE on the key-
board. The memory should show up as either 32 MB or 16 MB. Press ESC to
continue the boot-up sequence.
If your D8B has 32 MB, then no memory upgrade is required.
If your D8B has 16 MB and you wish to install two or more UFX cards, you
must first increase the memory to 32 MB in order to support the extra
automation and graphics requirements. Follow the instructions below.
If you’re an old hand at upgrading computers (there’s a conventional PC
motherboard at the heart of your D8B) then you probably already know
what to do. If you’re new to this, please take time to read through these
instructions and follow them.
WARNING:
Your new memory, as well as components inside the D8B
CPU case, are sensitive to electrostatic discharge! Be sure that you are ad-
equately grounded before touching static-sensitive components.
Memory is usually packaged in a bag that protects it from being zapped
by static electricity. Do not open the bag until you are ready to install the
memory. We strongly recommend that you wear a grounding wrist strap
when working inside your CPU. These can be purchased at most computer
stores or electronic parts shops. Some commercially packaged memory
includes a disposable paper one. Use it. The lip along the top of the
power supply or the bracket that supports the disk drives are good places
to attach the grounding clip. If you’re using the CPU chassis as an anti-
static ground, be sure to leave the power cord attached and plugged in to
a grounded (and turned off) outlet. This will connect the chassis to actual
earth ground.
At minimum, touch a grounded object, like the grounded CPU case, imme-
diately before handling electrostatic-sensitive components. Keep one
hand grounded when handling electrostatic-sensitive components.
IMPORTANT SAFETY WARNING:
Shut off power to the
Digital 8•Bus’s remote CPU before installing or removing memory.
INSIDE THE CPU
Two different motherboards have been used in the D8B. If your D8B is
from before November 1999, you probably have the first generation
motherboard with two 8 MB SIMM memory modules. The later
motherboard uses a single 16 or 32 MB DIMM memory module. We
strongly recommend that existing memory below 32 MB be removed and
replaced with a single 32 MB memory module. This is easier to obtain to-
day (and often less expensive) than the older 16 or 8 MB modules. Since
the older motherboard has sockets to accommodate both styles of
memory, one size fits all.
If you insist, you can add two additional 8 MB SIMMs to the old
motherboard, or one additional 16 MB DIMM to the new motherboard.
It’ll probably work, but if it doesn’t, we can’t promise to make it work for
you. The two types of memory are incompatible, however, so you cannot
upgrade an old motherboard by adding one 16 MB DIMM. If this is all
gobbledygook to you, skip down to the next section and we’ll tell you
what to get that will definitely work.
While you may be tempted to install even more than 32 MB of memory,
there is no advantage in doing so. We have tested the D8B with 64 MB of
memory but this is not a supported configuration.
WHAT YOU’LL NEED
One 32 MB 100 MHz or faster, 168 pin, DIMM SDRAM memory module
A Phillips screwdriver
An electrostatic grounding wrist strap is strongly recommended.
OPENING THE CPU CASE
First, turn off the power, but leave the power cord plugged in to the CPU
and connected to a grounded electrical outlet. If it’s plugged into a
switched power strip, it’s OK to switch off the power strip, as this does
not disconnect the electrical safety ground. The power supply is covered
so that you won’t be exposed to high voltage, and the safety ground con-
nection will provide a ground for safe electrostatic discharge.
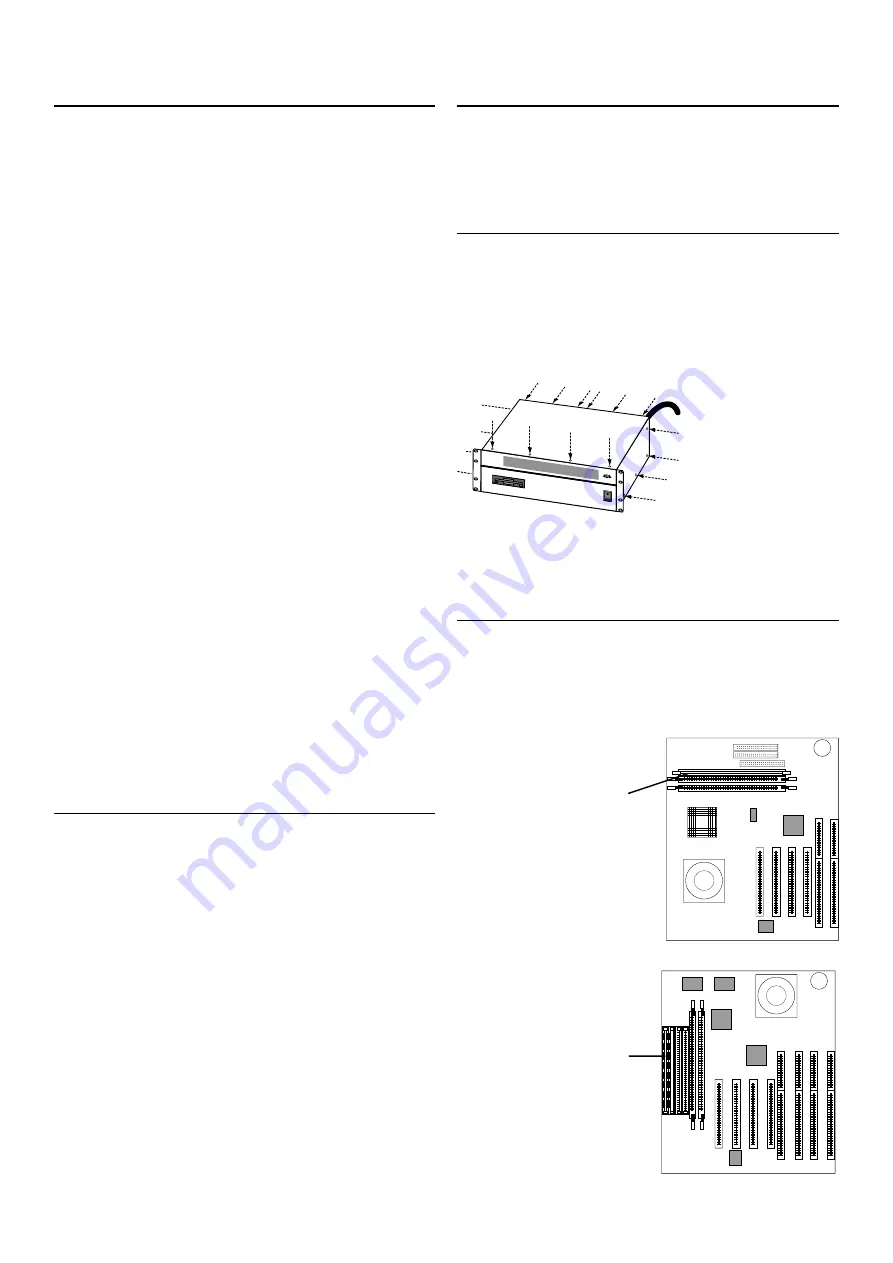
1.
Remove the four
screws from each side of
the bulletproof cover, the
four screws from the top
along the front, and the six
screws from the rear lip. It
is not necessary to remove
the screws that secure the
rack mounting “ears”.
2.
Slide the cover back
and upward, and remove it.
IDENTIFY YOUR MOTHERBOARD
Look at the illustrations to determine which motherboard you have. The
instructions for each board are shown on the next page.
Note: If you have the older motherboard, there is no need to upgrade to
the new type, as the performance of the D8B is the same for either.
ON
OFF
POWER
NEW MOTHERBOARD
NEW MOTHERBOARD
NEW MOTHERBOARD
NEW MOTHERBOARD
NEW MOTHERBOARD
OLD MOTHERBOARD
OLD MOTHERBOARD
OLD MOTHERBOARD
OLD MOTHERBOARD
OLD MOTHERBOARD
Rear Edge
Rear Edge
Memory location
Memory location


