Manual-
(Group B1) general controls (custom group 1)
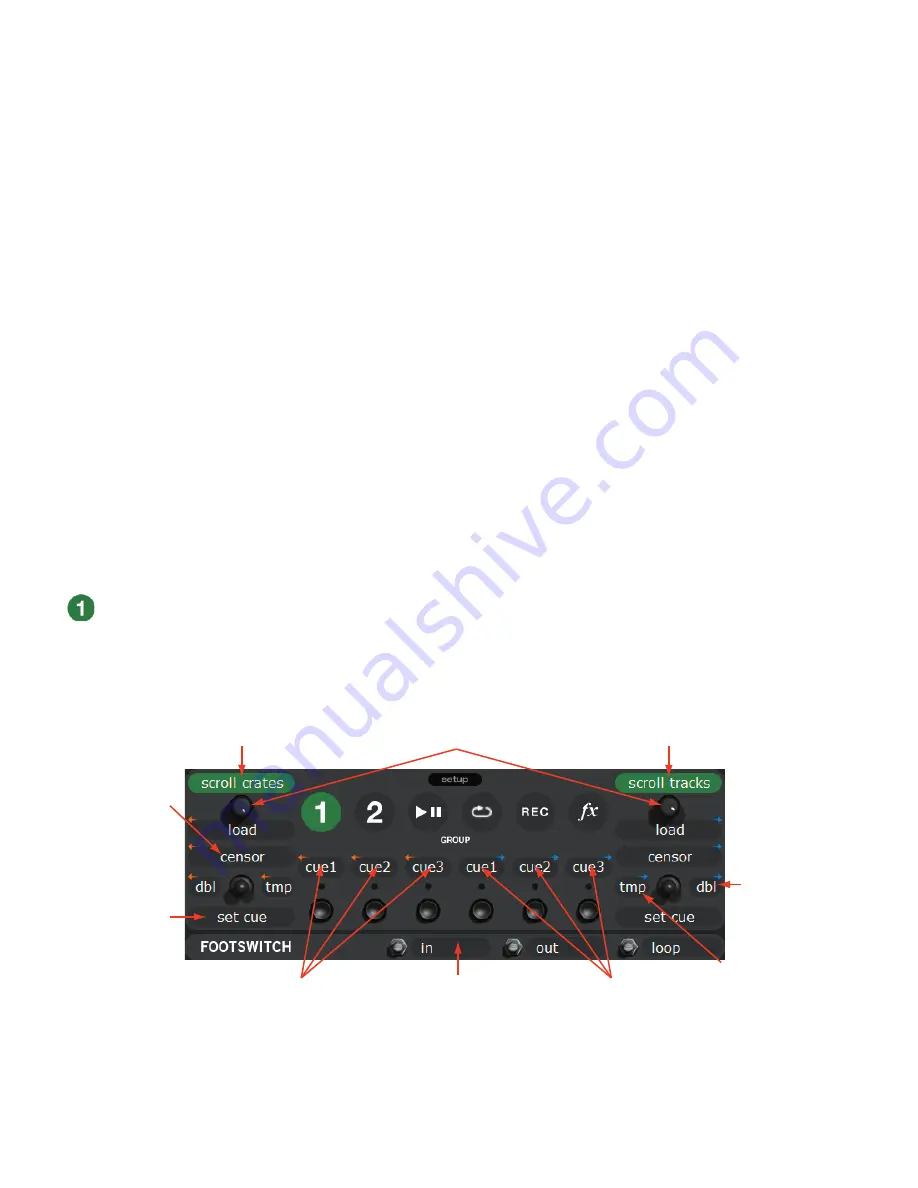
This is the first group shown below with default commands when you first start Scratch
LIVE
. These give you basic playback controls
and up to three cue points per Virtual Deck. The orange arrows (left) control the left Virtual Deck and the blue (right) arrows control
the right Virtual Deck. The joysticks default to transform mode (LEDs off). Press the joystick
in
(LED on) to activate its controls as
shown here.
Scroll through your crates and library.
Push to load track on right Deck.
Hold the joystick
down and press a
B
button to set a
cue point on the
left Deck.
Joystick left to jump to
the temporary point on
the right Deck.
Jump to Cue points on the
left Deck.
Jump to Cue points on the
right Deck.
Joystick right to
‘Double’ : Copy the
track from the left
Deck to the right
Deck.
Control looping
from the footswitch.
Push to load track on left Deck.
Hold the joystick
up to play the
track backwards
momentarily then
release to jump
ahead with timing
intact.
Groups
Functions are organized in a series of groups. Each group con-
tains a bank of software controls. The first two groups are cus-
tom groups, designed to contain the commands you need most
often during a set. You should customize these groups to suit
your needs (see page Manual-34). The next four groups contain
other functions ordered by category.
To access a group, press the
GROUP
button on the mixer,
then press:
B1 – general:
Custom group 1, with the most common com-
mands.
B2 – library:
Custom group 2 — move through library, make
new recordings.
B3 – playback:
Control all playback functions directly from the
mixer.
B4 – cue/loop:
Full control over all cue points on both Virtual
Decks and looping.
B5 – recording:
Select source and start / stop / save / play
recordings.
B6 – effects:
Select and insert effects. Adjust effect parameters.
Customizing the control assignments
You can customize almost all of the software control assign-
ments. To change what a button, parameter knob or joystick
does to Scratch
LIVE
,
right-click on the control label
. A list ap-
pears, and you can choose the new function you wish to have
associated with that control.
Some software functions can be assigned to either the left
or the right Virtual Deck. If you choose a function that can be
assigned to a Deck, after you select the function from the menu,
you will be presented with another list. Choose
selected deck
to have the function controlled by the
DECK
button on the
mixer, or
left deck
or
right deck
to have it always apply to one
of the decks.
Any customization resides in the computer, not in the mixer.
This means that if two different DJs, each with their own laptop,
use the same mixer, each DJ can have their own custom groups.


