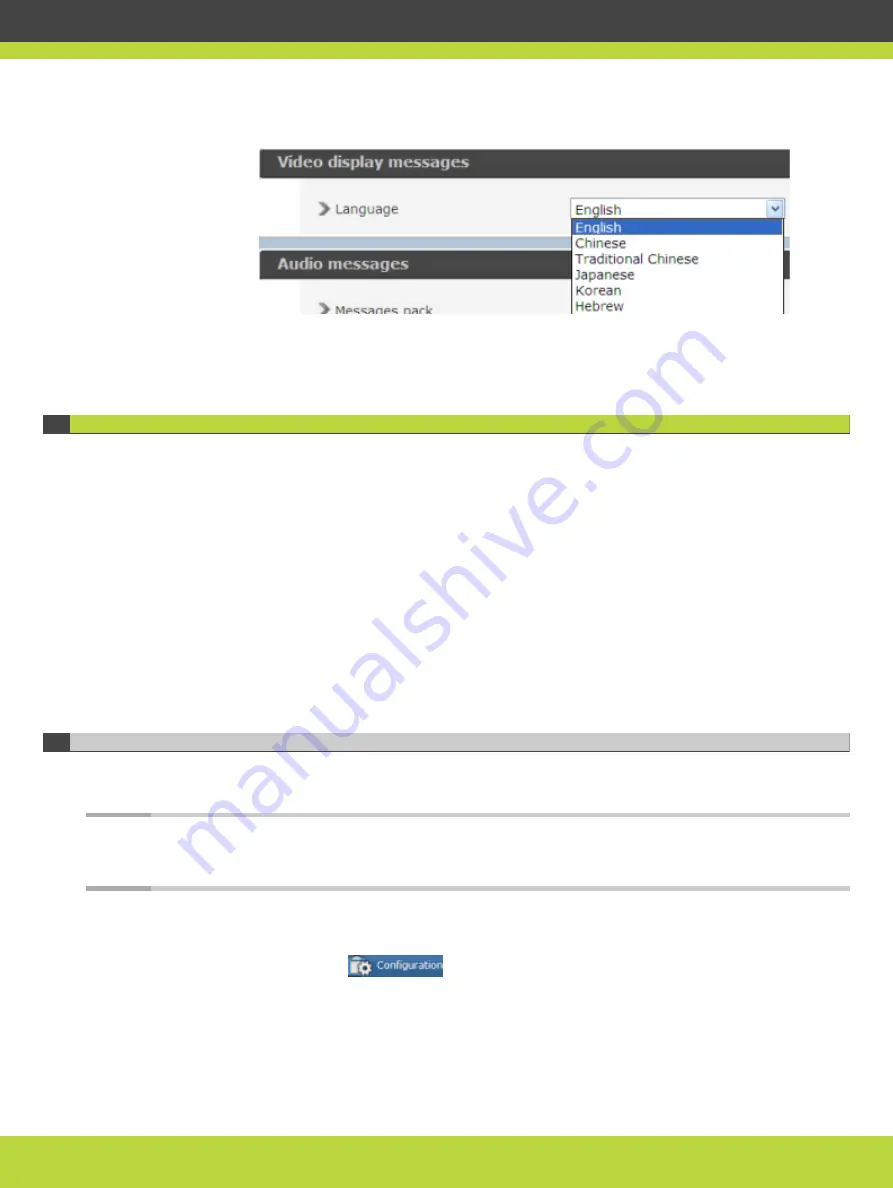
background image

Figure 5-2

Setting text overlay language

Step 4

Select Apply.

Configuring Network Protocols for the MCU


Before setting the protocols, ensure the network switch and the MCU have the same
throughput. We recommend setting the network switch to 1Gbps Auto Negotiation full duplex,
if it can support this configuration. The throughput of the network switch should always be
the same as the setting in the MCU, whose default value is also 1Gbps.
You can change the default value from the MCU web administrator interface by navigating to
Configuration > Setup > Network > Port Settings.
Set the MCU protocols by configuring it to work either with the H.323 gateway or with the SIP
Proxy Server, or both. You can change the protocol-related settings at any time without
resetting the MCU.

Connecting the MCU to the Gatekeeper .................................................  page 33

Configuring SIP Server Settings ...........................................................  page 34

Connecting the MCU to the Gatekeeper


You can configure the H.323 protocol settings to determine how the MCU and the gatekeeper
interact.


Note

Changing gatekeeper settings does not reset the MCU, but might disconnect active calls.
Disabling the H.323 protocol in the MCU requires the device to restart.


Procedure

Step 1

Select Configuration 

.

Step 2

Select Protocols.

Step 3

Locate the H.323 section.

RADVISION | Installation Guide for Scopia Elite 6000 Series MCU Version 8.0

Performing the MCU Initial Configuration | 33

Содержание Scopia Elite 6000 Series

Страница 1: ...Installation Guide Version 8 0 For Solution 8 0 Scopia Elite 6000 Series MCU ...

Страница 2: ...eserves the right to revise this publication and make changes without obligation to notify any person of such revisions or changes RADVISION Ltd may make improvements or changes in the product s and or the program s described in this documentation at any time If there is any software on removable media described in this publication it is furnished under a license agreement included with the produc...

Страница 3: ...y with Video Switching 11 Ports to Open for the Scopia Elite 6000 Series MCU 12 3 Preparing the MCU Setup Checking Site Suitability 15 Unpacking the Device 15 Inspecting for Damage 16 4 Setting up the MCU Adding a Power Supply Unit to the MCU 18 Mounting the MCU onto the Rack Using Rails 20 Mounting the Rails 20 Mounting the MCU onto the Rails 22 TableofContents RADVISION Installation Guide for Sc...

Страница 4: ...nfiguring Ports on All Models of the Scopia Elite MCU 37 Defining the UDP Port Ranges for RTP RTCP on the Scopia Elite MCU 37 Configuring the TCP Port Range for H 245 on the Scopia Elite MCU 38 Configuring the HTTP Port on the Scopia Elite MCU 39 Configuring the UDP Port for RAS on the Scopia Elite MCU 40 Configuring the UDP Port for the Gatekeeper on the Scopia Elite MCU 41 Configuring the TCP Po...

Страница 5: ...ia Elite MCU each videoconference participant receives a quality experience optimized to their individual capabilities and environment from wireless mobile devices to HD room and immersive telepresence systems Informational video overlays and easy conference creation and entry make attending conferences simple while the industry leading management interface makes seemingly complex administrative t...

Страница 6: ...er conference Each user connects using unique optimized audio and video settings to enjoy the best audio and video quality supported by their endpoint and network without affecting the other participants in a conference Seamless interoperability The Scopia Elite MCU is built on the solid foundation of Radvision s H 323 and SIP software ensuring full compliance and unmatched interoperability with I...

Страница 7: ... using the BFCP standard and H 323 using the H 239 standard A user can connect to a meeting from a SIP or H 323 endpoint to share content such as presentations spreadsheets documents and movies Video quality The Scopia Elite MCU delivers high quality video and audio processing using latest industry standards and upgradeable DSP chip software This state of the art video quality is supported by H 26...

Страница 8: ...red and dynamically modified through an intuitive web based interface that offers easy high level conference control and administrative flexibility for an enhanced user experience In meeting indicators A range of messages and icons are displayed on the endpoint monitor during conferences when certain events occur For example conference participants are notified when a participant joins or leaves a...

Страница 9: ... Desktop deployment includes the recording option Technical Specifications This section details the system specifications of the Scopia Elite 6000 Series MCU you purchased Refer to this data when preparing system setup and afterwards as a means of verifying that the environment still complies with these requirements Table 1 1 on page 5 refers to the physical details of the device Table 1 1 Physica...

Страница 10: ... 245 tones and RFC2833 Video support High Definition Continuous Presence video with a resolution of 1080p at up to 60fps Codecs H 263 H 263 H 264 H 264 SVC H 264 High Profile Note H 263 is supported as video switching only Live video resolutions QCIF up to 1080p Presentation video resolution VGA SVGA SXGA XGA 720p 1080p WUXGA Video bandwidth up to 12Mbps for 1080p resolutions and up to 6Mbps for 7...

Страница 11: ...arters and several branches Scopia Solution offers a unique method of cutting video bandwidth costs Administrators can choose whether to place all MCUs centrally in the headquarters Figure 2 1 on page 8 or they can opt for a distributed deployment where multiple MCUs are spread over multiple sites Figure 2 2 on page 9 Centralized MCU deployments can be expensive for frequent conferences between br...

Страница 12: ...en the MCUs using a fraction of the bandwidth compared to the centralized deployment Users of distributed MCU deployments do not need to choose a specific MCU The powerful functionality of virtual rooms enables you to dial the same number anywhere in the world while the Scopia Solution infrastructure transparently directs you to the correct meeting on the correct MCU RADVISION Installation Guide f...

Страница 13: ...um bandwidth threshold is breached the system would attempt cascading with a different MCU Note Telepresence endpoints in cascaded meetings must always connect to the master MCU The priorities of cascading can be customized in a number of ways Default to using a local MCU first and only cascade conferences if required Prioritize cascading wherever possible to keep bandwidth costs to an absolute mi...

Страница 14: ... 20 ports Scopia Elite MCU 6140 offers 40 ports The above port numbers are for 1080p resolution at 30fps or 720p at 60fps or 720p at 30fps You can increase the video quality to 1080p at 60fps but this would require two ports per participant Table 2 1 on page 10 Table 2 1 Ports available at different video quality settings Scopia Elite 6000 Series MCU Model 1080p at 60fps 1080p at 30fps 720p at 60f...

Страница 15: ...ity through a reduction in the number of frames per second fps or the pixel resolution of the video For more information see Increasing MCU Capacity by Changing Resolution on page 10 Quadruple capacity x4 by enabling video switching without compromising on resolution or frame rate This section details the second option enabling video switching on specific meeting types Switching is the process of ...

Страница 16: ...ching Switched Video x4 Audio Only x8 Scopia Elite MCU 6105 3 ports 10 ports 20 ports Scopia Elite MCU 6110 5 ports 20 ports 40 ports Scopia Elite MCU 6120 10 ports 40 ports 80 ports Scopia Elite MCU 6140 20 ports 80 ports 160 ports For more information about enabling video switching on a meeting type MCU service see Administrator Guide for Scopia Elite MCU 6000 Series Ports to Open for the Scopia...

Страница 17: ...Cannot connect H 323 calls Mandatory To configure see Configuring the TCP Port Q 931 on the Scopia Elite MCU on page 42 3336 XML TCP Conference Control web client endpoint Scopia Management or third party controlling applications Enables you to manage the MCU via the XML API Cannot use MCU Conference Control web user interface Cannot use XML API to control MCU Mandatory if deployed with Scopia Man...

Страница 18: ...s for RTP RTCP on the Scopia Elite MCU on page 37 Table 2 4 Inbound Ports to Open to the Scopia Elite 6000 Series MCU Port Range Protocol Destination Functionality Result of Blocking Port Required 21 FTP TCP FTP Server Enables audio stream recording Cannot record audio streams Optional 22 SSH TCP SSH Client Enables you to view logs Cannot view logs in real time logs are collected on the compact fl...

Страница 19: ...ements Ensure to make necessary changes in case you find that the site does not meet any of the requirements described in that section Unpacking the Device We strongly recommend that you follow safety guidelines described in this section during unpacking Procedure Step 1 Inspect the shipping box to verify that it is not seriously damaged during shipping Step 2 Place the shipping box on a horizonta...

Страница 20: ...t out of the shipping box Step 7 Take the device out of the shipping box Step 8 Carefully open the additional boxes remove the packing material and remove the drives and other contents Note We recommend that you keep the packaging materials in case you need to repack the device Step 9 After opening the shipping box check the shipment is complete Compare the contents of the shipment with your packi...

Страница 21: ...he ordered parts are present and in good condition Keep a record of the parts and serial numbers If any parts are missing or damaged contact your sales representative RADVISION Installation Guide for Scopia Elite 6000 Series MCU Version 8 0 Preparing the MCU Setup 17 ...

Страница 22: ...200 Series MCU see the Administrator Guide of Scopia Elite 5200 Series MCU version 7 7 If one of the PSUs fails the remaining PSU takes the full load of the system to enable continued operation without interruption PSUs can be hot swapped enabling you to replace the power unit without powering down the device To remove an existing PSU from the device see Removing a Power Supply Unit from the MCU P...

Страница 23: ...ert the new PSU into position and secure it by pressing it firmly into place until the release tab clicks Figure 4 2 Adding a PSU in Scopia Elite MCU 6140 Step 3 Reconnect the power cord RADVISION Installation Guide for Scopia Elite 6000 Series MCU Version 8 0 Setting up the MCU 19 ...

Страница 24: ... to correspond to the depth of the rack For that purpose each rail has two parts that slide one inside the other Procedure Step 1 Adjust the length of the rail and align the rail holes with the left front and rear posts see Figure 4 3 on page 20 Ask someone to hold the rail while you extend it Figure 4 3 Adjusting rail length and attaching to rack Step 2 Attach the rail to the posts using the scre...

Страница 25: ...4 Attaching the rails to the rack Step 3 Attach the inner rails to the rear of the device see Figure 4 5 on page 22 RADVISION Installation Guide for Scopia Elite 6000 Series MCU Version 8 0 Setting up the MCU 21 ...

Страница 26: ...fety Guidelines described in the Safety Guide Caution The MCU is heavy Ask someone to help you lift it Procedure Step 1 Ensure the rack breaks are locked or the rack is stabilized Step 2 Slide the MCU onto the rails until the holes on the MCU front panel align with the front posts See Figure 4 6 on page 23 RADVISION Installation Guide for Scopia Elite 6000 Series MCU Version 8 0 Setting up the MCU...

Страница 27: ...s kit Caution Do not connect a network cable to the MCU at this stage The device is shipped with a static IP address which may clash with an existing address on your network To define a new MCU IP address see Setting the IP Address of the Device on page 24 Procedure Step 1 On the rear side of the device connect the power cable to the AC power connector see Figure 4 7 on page 24 RADVISION Installat...

Страница 28: ...ck panel of the device to connect it directly to a PC to assign an IP address You must assign the IP address before you connect the device to the network Caution The device is shipped with a static IP address which may clash with an existing address on your network Only connect the MCU to the network at the end of this procedure Before you begin Make sure you have these items Dedicated IP address ...

Страница 29: ...t this stage Step 3 Start the terminal emulation application on the PC Step 4 Set the communication settings in the terminal emulation application on the PC as follows Table 4 1 Configuring the communication settings Field Name Value Baud Rate 9600 Data bits 8 Parity None Stop bits 1 Flow Control None Step 5 Press the On Off switch on the front side of the device see Figure 4 8 on page 26 to power...

Страница 30: ...eboot is not required S Set Board Security Level Q Quit If you do not see this output contact customer support Step 7 Enter N at the prompt to configure network port values The terminal displays the following message Configure network port values 1 Show current network configuration 2 Change network configuration 0 Return to main menu Select Step 8 Enter 2 to change the network configuration Step ...

Страница 31: ...ice see Figure 4 7 on page 24 Note We recommend setting the network switch to 1Gbps Auto Negotiation full duplex if it can support this configuration The throughput of the network switch should always be the same as the setting in the MCU whose default value is also 1Gbps You can change the default value from the MCU web administrator interface by navigating to Configuration Network Port Settings ...

Страница 32: ...MCU page 37 Configuring Security Access Levels for the Scopia Elite MCU page 43 Verifying the MCU Installation page 44 Accessing the MCU Administrator Interface The MCU interface is available in these languages English Chinese Japanese Portuguese Spanish Russian The default language of the MCU interface is English When you access the MCU interface the login screen is in English unless you choose a...

Страница 33: ...highly recommend that you change the default user password for security You can change a user password at any time Procedure Step 1 Access the MCU Administrator interface Step 2 Select Users Step 3 Select the Review button for the user profile you want to modify Step 4 Enter the new password in the Password and the Confirm Password fields Step 5 Select Apply Changing the MCU Service Prefix The MCU...

Страница 34: ... user interfaces Administrator interface The web based interface used by administrators for configuration and maintenance tasks Conference Control interface The web based interface used by administrators and operators for conference moderation and video layout control Note This interface is not available when the MCU is registered to Scopia Management Text overlay on conference video The set of me...

Страница 35: ...nterfaceMCU By default the interface language is set to English Note To view Chinese or Japanese fonts properly in the Administrator interface the computer on which the web browser is running must support the relevant languages On a Microsoft Windows operating system you can set the default language in Control Panel Regional and Language Options Procedure Step 1 Select Configuration in the MCU use...

Страница 36: ...cedure in this section to set the language of the text overlay messages The text overlay feature is set to English by default Procedure Step 1 Select Configuration Step 2 Select Customization Step 3 Select the required language RADVISION Installation Guide for Scopia Elite 6000 Series MCU Version 8 0 Performing the MCU Initial Configuration 32 ...

Страница 37: ...protocols by configuring it to work either with the H 323 gateway or with the SIP Proxy Server or both You can change the protocol related settings at any time without resetting the MCU Connecting the MCU to the Gatekeeper page 33 Configuring SIP Server Settings page 34 Connecting the MCU to the Gatekeeper You can configure the H 323 protocol settings to determine how the MCU and the gatekeeper in...

Страница 38: ...connection Step 9 Verify the MCU is connected to the Ethernet Step 10 Verify the MCU is connected to the Gatekeeper Configuring SIP Server Settings You can configure settings for SIP server profiles which set how the MCU and the registrar interact Depending on connection types supported by the SIP server MCU supports these transport connection types for sending messages to SIP server UDP TCP TLS P...

Страница 39: ...efault port is 5060 The protocol from the Type field The default is UDP Note The Locate automatically option works only if you have configured a valid IP address at Configuration Setup Network DNS server1 or DNS server2 Step 6 To instruct the MCU to register with a SIP registrar and to send service information to the registrar perform these steps a Select Use registrar b Enter the following inform...

Страница 40: ...performed as defined in RFC 2617 This field is disabled by default Enter the MCU user name and password They must match those defined on the SIP server Step 11 Select Use Empty Invite when sending Invite messages to endpoints to enable the remote endpoint to indicate preferred audio and video channels Step 12 Select Apply Step 13 Check the MCU status using the MCU Administrator interface a Enter t...

Страница 41: ... Configuring the UDP Port for the Gatekeeper on the Scopia Elite MCU page 41 Configuring the TCP Port Q 931 on the Scopia Elite MCU page 42 Configuring the TCP UDP TLS Port for SIP on the Scopia Elite MCU page 42 Defining the UDP Port Ranges for RTP RTCP on the Scopia Elite MCU The Scopia Elite 6000 Series MCU has designated UDP ports 12000 13200 for video and 16384 16984 for audio for RTP RTCP Wh...

Страница 42: ...Elite MCU The Scopia Elite 6000 Series MCU has designated TCP ports 1024 1324 for H 245 You can set the base port which is the lower end of the port range H 245 is a Control Protocol used for multimedia communication that enables transferring information about the device capabilities as well as opening closing the logical channels that carry media streams The Scopia Elite 6000 Series MCU uses 300 ...

Страница 43: ...pia Elite 6000 Series MCU has designated port 80 for HTTP You can configure a different port to use HTTP if necessary in your environment Procedure Step 1 Navigate to the MCU Advanced Commands section by doing the following a Select the icon b Select Advanced parameters c Locate the CLI section and select More see Figure 5 10 on page 39 Figure 5 10 CLI Section RADVISION Installation Guide for Scop...

Страница 44: ... Scopia Elite 6000 Series MCU has designated port 1719 for RAS You can configure a different port to use RAS for example if port 1719 is busy Port 1719 is also used to communicate with the gatekeeper to configure the UDP port for the gatekeeper see Configuring the UDP Port for the Gatekeeper on the Scopia Elite MCU on page 41 Note If you close port 1719 you must configure another port for both RAS...

Страница 45: ...r RAS see Configuring the UDP Port for RAS on the Scopia Elite MCU on page 40 Note If you close port 1719 you must configure another port for both the gatekeeper and RAS If you configure a different port for the gatekeeper you do not need to configure a different port for RAS Procedure Step 1 Navigate to the MCU H 323 Protocol section by selecting Configuration Protocols Step 2 Locate the Enable H...

Страница 46: ...gure 5 13 H 323 Signaling Port Configuration Step 2 Select the icon in the Review column Step 3 Enter the port value in the H323 SIG port number field Step 4 Select Apply Step 5 Select Close Configuring the TCP UDP TLS Port for SIP on the Scopia Elite MCU The Scopia Elite 6000 Series MCU has designated ports 5060 and 5061 for SIP You can configure a different port to use SIP for example if port 50...

Страница 47: ...p 4 Select Apply Configuring Security Access Levels for the Scopia Elite MCU The Scopia Elite MCU offers configurable security access levels that enable and disable SSH FTP SNMP and ICMP ping protocols By default the security access level is set to High It is recommended to set your security access level to Maximum which disables these protocols except for the following situations If you are perfo...

Страница 48: ...section Step 3 Select the access level from the Security Mode list see Figure 5 15 on page 44 Table 5 2 on page 44 lists the protocol status when each security access level is applied Figure 5 15 Security Access Level Settings Table 5 2 MCU Security Access Levels Security Access Level SSH FTP SNMP ICMP ping Standard Enabled Enabled Enabled Enabled High Disabled Disabled Enabled Enabled Maximum Dis...

Страница 49: ... conference a From an endpoint dial the MCU IP address The MCU auto attendant service plays the video and audio prompts b Press 0 to create a new conference c At the prompt enter the meeting ID followed by The MCU creates the conference opens the Conference window d Exit the conference by disconnecting the call Step 5 Access the MCU Administrator web interface to verify all status icons are green ...

Страница 50: ...on video conferencing systems innovative converged mobile services and highly scalable video enabled desktop platforms on IP 3G and emerging next generation networks For more information about RADVISION visit www radvision com USA Americas T 1 201 689 6300 F 1 201 689 6301 infoUSA radvision com EMEA T 44 20 3178 8685 F 44 20 3178 5717 infoUK radvision com APAC T 852 3472 4388 F 852 2801 4071 infoA...

Отзывы: