


Configuring the MVI56-PDPMV1 Module
MVI56-PDPMV1 ♦ ControlLogix Platform
User Manual
PROFIBUS DPV1 Master
Page 94 of 251
ProSoft Technology, Inc.
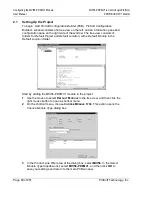
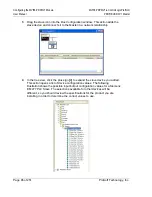
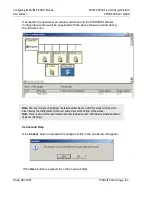
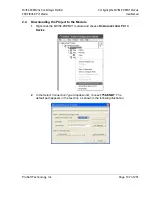
To be able to adopt a slave with address 126 the user must first assign a valid
address by clicking the icon next to the node address. By doing so the
Set Slave
Address
dialog box is started.
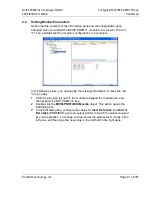
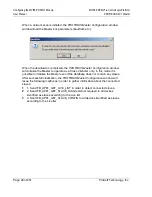
Note:
The
Old slave address
is preset to a value of 126 that is not editable (grayed out).
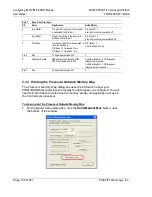
The
PROFIBUS Master Configuration
window will prevent the user from selecting
a
New slave address
that is already occupied by another device; this includes
detected Master stations as well. If the user selects an occupied address, a
message similar to the one shown here will open.
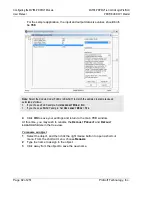
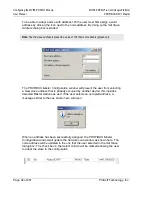
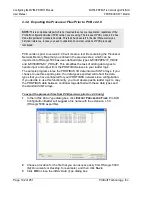
When an address has been successfully assigned, the
PROFIBUS Master
Configuration
window will update the
Network scan
window as shown here. The
node address will be updated to the one that the user selected in the
Set Slave
dialog box. The check box in the
Select
column will be marked allowing the user
to adopt the slave to the configuration.
Содержание MVI56-PDPMV1
Страница 1: ...MVI56 PDPMV1 ControlLogix Platform PROFIBUS DPV1 Master August 5 2021 USER MANUAL...
Страница 4: ......
Страница 174: ...MVI56 PDPMV1 ControlLogix Platform User Manual PROFIBUS DPV1 Master Page 174 of 251 ProSoft Technology Inc...
Страница 196: ...MVI56 PDPMV1 ControlLogix Platform User Manual PROFIBUS DPV1 Master Page 196 of 251 ProSoft Technology Inc...
Страница 246: ...MVI56 PDPMV1 ControlLogix Platform User Manual PROFIBUS DPV1 Master Page 246 of 251 ProSoft Technology Inc...


