background image

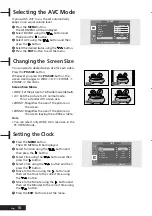
Quick!

Pressing the 

M/S

button.

Whenever you press this button, the mode
changes to Stereo/Mono mode, in this order.
- If the receiving conditions deteriorate, listening

will be easier if the mode is set to the Mono
position using the 

M/S

button.

- If the stereo signal is weak( or if intermittent

Stereo-Mono) and automatic switching occurs,
then switch to the Mono mode.

- When receiving mono sound in the AV mode,

connect to the ‘L’ input jack on the panels.

- If the mono sound comes out only from the left

speaker, then press the 

M/S

button.

CAUTION

: If stereo mode is set to mono, the

output is mono even though the broadcast is in
stereo.

17

- Eng

Eng

lish

Œ

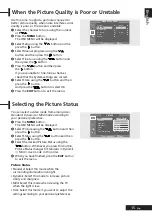
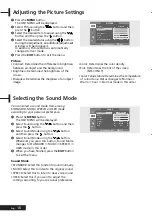
Press the 

MENU

button. 

The OSD MENU will be displayed.

´

Select Sound using the 

/

button and then

press the 

button.

ˇ

Move to the item using the 

/

button and

then press the 

button.

¨

Select the desired status using the 

/

button. During the adjustment, an additional
adjustment window will be displayed. 
Also, the Sound Status is automatically changed
to User mode.

ˆ

Press the 

EXIT

button to exit the menu.

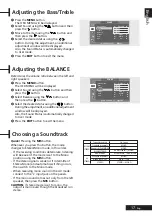
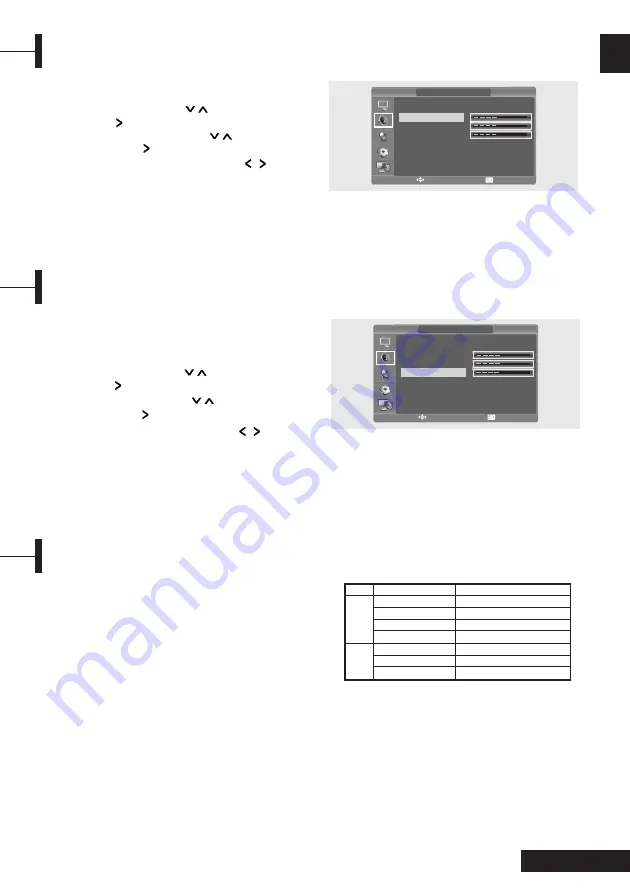
Adjusting the Bass/Treble

SOUND

Sound Mode

Bass

Treble
Balance
Stereo
Dual
AVC

Standard

MONO

MAIN

On

œ

œ
œ
œ


MOVE&ADJUST             EXIT

Determines the volume ratio between the left and
right speakers.

Œ

Press the 

MENU

button. 

The OSD MENU will be displayed.

´

Select Sound using the 

/

button and then 

press the 

button.

ˇ

Select Balance using the 

/

button and

then press the 

button.

¨

Select the desired status using the 

/

button. 

During the adjustment, an additional adjustment
window will be displayed. 
Also, the Sound Status is automatically changed
to User mode.

ˆ

Press the 

EXIT

button to exit the menu.

SOUND

Sound Mode
Bass
Treble

Balance

Stereo
Dual
AVC

Standard

MONO

MAIN

On

œ

œ
œ
œ


Adjusting the BALANCE

MOVE&ADJUST             EXIT

Type of broadcast

Standard broadcast

NICAM MONO

NICAM STEREO

NICAM DUAL

Standard broadcast

Bilingual or DUAL

STEREO

Choosing a Soundtrack

NICAM 

STEREO

A2 

STEREO

On-Screen

MONO

MONO

NICAM STEREO 

MONO

NICAM MAIN 

NICAM SUB

MONO

MAIN 

SUB

STEREO 

MONO

Содержание P7220HDD-D

Страница 1: ...English Before using this product please read the security instructions first and bear them in mind when using the product OWNERS INSTRUCTIONS TFT LCD TV 19 20 22 ...

Страница 2: ...place hot objects or naked flame sources such as lighted candles or nighlights on or close to the TV High temperatures can melt plastic and lead to fires Do not set on top of the TV any object or container that might spill liquids or small objects into the TV Protect the power cord from being walked on or pinched particularly at plugs convenience receptacles and the point where it exits the appara...

Страница 3: ...d of correctly you will help prevent potential negative consequences for the environment and human health which could otherwise be caused by inappropriate waste handling of this product The recycling of materials will help to conserve natural resources For more detailed information about recycling of this product please contact your local city office your household waste disposal service or the sh...

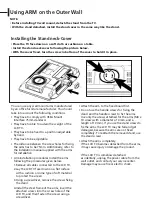
Страница 4: ...screws using a screwdriver Attach the arm to the fixed board first Do not use the handle screws for fixing the stand and the handle screws to fix the arms Use only the screws attached for the arms M4 x 10 screws with a diameter of 4 mm and a length of 10 mm If you use the stand screws to fix the arms the LCD TV may be fall and get damaged because the arms are not fixed completely To reattach the r...

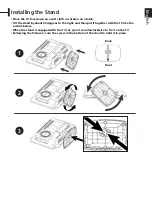
Страница 5: ...on on a table Tilt the stand by about 45 degrees to the right and then put it together with the TV like the picture below When the stand is engaged with the TV set spin it counterclockwise to fix it on the TV Following the Picture 3 turn the screw in the bottom of the stand to hold it in place ...

Страница 6: ... procedures Install the arms following the procedures given below 1 Remove all cables connected to the LCD TV 2 Lay the LCD TV face down on a flat surface with a cushion or some type of soft material to protect the screen 3 Using a screwdriver remove the screws fixing the stand 4 Install the steel frame of the arms insert the attached screws into the screw holes of the LCD TV and then fasten the s...

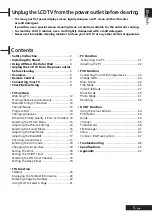
Страница 7: ...Name 13 Program Edit 14 Changing Channel 14 When the Picture Quality is Poor or Unstable 15 Selecting the Picture Status 15 Adjusting the Picture Settings 16 Selecting the Sound Mode 16 Adjusting the Bass Treble 17 Adjusting the BALANCE 17 Choosing a Soundtrack 17 Selecting the AVC mode 18 Changing the Screen Size 18 Setting the Clock 18 Setting the On Off Timer 19 Selecting the ON Timer Channel 1...

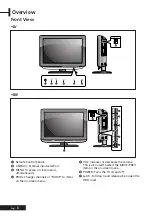
Страница 8: ...U To access or close menus simultaneously PROG Changes channels or MOVE to items on the on screen menu ˆ VOL Increases or decreases the volume This is also used to select the MOVE PREV item on the on screen menu Ø POWER Turns the TV on and off Latch Full down and release when open the HDD cover ...

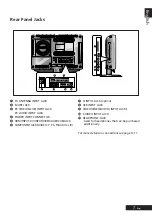
Страница 9: ...CK POWER INPUT CONNECTOR ˆ HDMI INPUT DVI INPUT VIDEO AUDIO L R JACK Ø COMPONENT JACKS VIDEO Y Pb Pr AUDIO L R CI INPUT JACK option USB INPUT JACK VIDEO VIDEO AUDIO INPUT JACKS S VIDEO INPUT JACK Ô HEADPHONE JACK Used for headphones that can be purchased additionally For more details on connections see page 9 11 ...

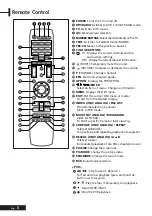
Страница 10: ...enu Change confirmation ı MENU Displays the OSD menu EXIT Exit the current OSD menu or mode To exit from the teletext display INDEX ONLY ANALOG FILE LIST Programme selection by name Move to PVR mode MIX ONLY ANALOG BOOKMARK Video TTX MIX To SAVE a specific frame for later viewing SUB PAGE ONLY ANALOG REPEAT Teletext SUB PAGE For specifying and repeating playback of a segment REVEAL ONLY ANALOG Aœ ...

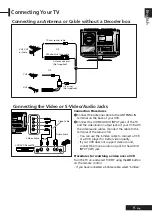
Страница 11: ...tter video quality If your VCR does not support stereo sound connect the mono audio out jack to the AUDIO INPUT left jack Procedures for watching a video over a VCR Turn the TV on and select VIDEO using the AV button on the remote control If you have connected a S Video cable select S Video Connecting the Video or S Video Audio Jacks Connecting an Antenna or Cable without a Decoder box VHF UHF or ...

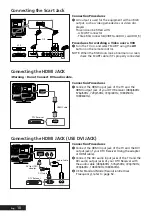
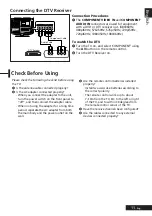
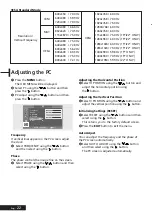
Страница 12: ...output jacks of your DTV Receiver with the audio cable 480p 60Hz 576p 50Hz 720p 50Hz 720p 60Hz 1080i 50Hz 1080i 60Hz ˇ VESA Standard Mode Resolution Vertical Fraequency refer to page 52 Audio Cable DVI Cable DVI to HDMI adapter DTV Receiver Connection Procedures Œ AV output is used for the equipment with an RGB output such as video game devices or video disc players This end can be fitted with A S...

Страница 13: ...cted properly Is the AC adapter connected properly When you connect the adapter to the unit turn the power switch on the front panel to off and then connect the adapter cable When not using the adapter for a long time period separate the AC adapter from both the main body and the power outlet on the wall ˇ Are the remote control batteries installed properly Install two AAA size batteries according...

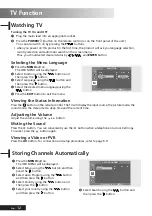
Страница 14: ...oor bell rings To cancel press the button again Muting the Sound Press the AV button For connection and setup procedures refer to page 9 11 Viewing a Video or PVR Œ Press the MENU button The OSD MENU will be displayed Select Function using the button and then press the button ˇ Select Language using the button and then press the button Select the desired menu language using the button ˆ Press the ...

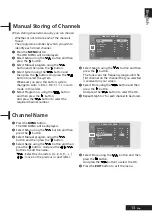
Страница 15: ...cy range until the first channel on the channel that you selected is received on your screen Select Store using the button and then press the button And press the button to select the OK Repeat Step 5 to 7 for each channel to be stored Manual Storing of Channels Œ Press the MENU button The OSD MENU will be displayed Select Setup using the button and then press the button ˇ Select Manual program us...

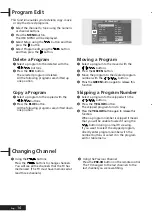
Страница 16: ...llowing programs are shifted up one position Delete a Program Œ Select a program to the copied with the buttons Press the BLUE button All the following programs are shifted down one position Copy a Program Œ Select a program to the moved with the buttons Press the GREEN button ˇ Move the program to the desired program number with the buttons Press the GREEN button again to release this function Mo...

Страница 17: ...your personal preferences Use fine tune to adjust a particular channel for better picture quality when noise interferes color quality is poor or the screen is unstable Œ Select the channel to tune using the numeric or P Press the MENU button The OSD MENU will be displayed ˇ Select Setup using the button and the press the button Select Manual program using the button and then press the button ˆ Sel...

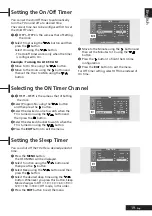
Страница 18: ... this order Adjusting the Picture Settings PICTURE Status Contrast Brightness Sharpness Color Tint Color Temperature Standard Normal œ œ Selecting the Sound Mode MOVE ADJUST EXIT You can select a sound mode from among STANDARD MUSIC SPEECH or USER mode according to your personal preference Œ Press the MENU button The OSD MENU will be displayed Select Sound using the button and then press the butto...

Страница 19: ...djustment window will be displayed Also the Sound Status is automatically changed to User mode ˆ Press the EXIT button to exit the menu Adjusting the Bass Treble SOUND Sound Mode Bass Treble Balance Stereo Dual AVC Standard MONO MAIN On œ œ œ œ MOVE ADJUST EXIT Determines the volume ratio between the left and right speakers Œ Press the MENU button The OSD MENU will be displayed Select Sound using ...

Страница 20: ...16 9 wide mode default 4 3 Sets the picture to 4 3 normal mode This is a standard TV screen size ZOOM1 Magnifies the size of the picture on the screen ZOOM2 Magnifies the size of the picture on the screen leaving the subtitles visible Note You can select only WIDE 4 3 screen size in the PC HDMI Mode 1 2 Œ Press the MENU button The OSD MENU will be displayed Select Function using the button and the...

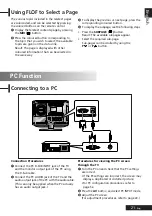
Страница 21: ...on Ø Move to the Hours using the button and then set the Hour to AM 6 using the button Move to the Minute using the button and then set the Minutes to 10 using the button Press the button to finish the On time configuration Press the EXIT button to exit the menu For Off timer setting select Off time instead of On time Œ ˇ STEP1 STEP3 is the same as that of Setting the clock Select Program No using...

Страница 22: ...vice using the P or P button Press the TEXT button to activate the teletext mode Result The contents page is displayed It can be redisplayed at any time by pressing the INDEX button ˇ If you wish to display the actual broadcast at the same time as the teletext page press the MIX button again Press the TEXT button to exit from the teletext display Displaying the Teletext Information You can enter t...

Страница 23: ...PUT mode ˇ Adjust the PC screen For adjustment procedures refer to page 22 PC Function The various topics included in the teletext pages are colorcoded and can be selected by pressing the colored buttons on the remote control Œ Display the teletext contents page by pressing the MIX button Press the coloured button corresponding to the topic that you wish to select the available topics are given on...

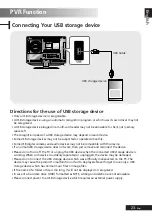
Страница 24: ...the PC screen adjust the clock Select FREQUENCY using the button and then select using the button Phase The phase controls the image fine on the screen Select PHASE using the button and then select using the button Adjusting the Horizontal Position Select H POSITION using the button and adjust the horizontal position using the button Adjusting the Vertical Position Select V POSITION using the butt...

Страница 25: ...device does not work then just remove and reconnect the device Please do not turn off the TV or unplug the USB device when the connected USB storage device is working When such device is suddenly separated or unplugged the device may be damaged Please do not connect the USB storage device which was artificially maneuvered on the PC The device may cause the product to malfunction or fail to be play...

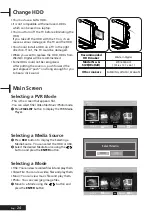
Страница 26: ...elect the desired Media Source using the button and press the ENTER button This is the screen that appears first You can select Title VideoFile Music Photo mode Œ Press FILE LIST button to display the PVR Media Player Main Screen Change HDD Selecting a PVR Mode Selecting a Media Source Title You can view recorded files list and play them Video File You can view video files and play them Music You ...

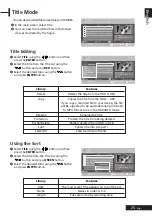
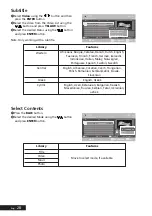
Страница 27: ...0 08 39 BOOKMARK 25 Eng English You can view recorded files list and play on HDD USB Œ In the main screen select Title You can view the recorded files in thumbnail view as illustrated by the figure Title Mode Library Features Delete Deletes the title from the HDD or USB Copy Copies the title from the HDD USB If you copy a recorded file to your device the file will be supposed to be automatically t...

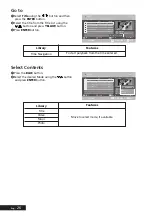
Страница 28: ...0 00 09 003 10 MAR 2007 17 38Hits Chart 00 03 04 004 RECOVERY 00 26 11 005 10 MAR 2007 18 02Hits Chart 00 08 39 BOOKMARK HDD 10 MAR 2007 17 15 The Paul O Gr Edit 001 10 MAR 2007 17 15 the Paul 00 08 39 Length Title No Title List 1 5 MPEG2 10 MAR 2007 17 15 LP Sort Go to Contents EXIT 002 10 MAR 2007 18 02 Hits Chart 00 00 09 003 10 MAR 2007 17 38Hits Chart 00 03 04 004 RECOVERY 00 26 11 005 10 MAR...

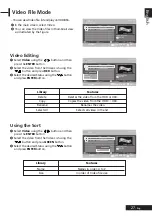
Страница 29: ... DAT Edit 001 SETTINGS DAT 0 61KB Size Title No Video List 1 2 Video File ROOT Sort Subtitle Contents EXIT 002 MVI_0002 AVI 60 93MBKB BOOKMARK 27 Eng English You can view Video file list and play on HDD USB Œ In the main screen select Video You can view the Video files in thumbnail view as illustrated by the figure Video File Mode HDD SETTINGS DAT Edit 001 SETTINGS DAT 0 61KB Size Title No Video L...

Страница 30: ...ETTINGS DAT 0 61KB Size Title No Video List 1 2 Video File ROOT Sort Subtitle Contents EXIT 002 MVI_0002 AVI 60 93MBKB BOOKMARK Library Features Western Afrikaans Basque Catalan Danish Dutch English Faeroese Finnish French German Icelandic Indonesian Italian Malay Norwegian Portuguese Spanish Swahili Swedish Central English Albanian Coratian Czech Hungarian Polish Romanian Serbian Latin Slovak Slo...

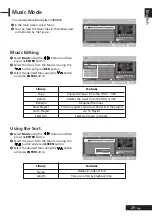
Страница 31: ...lect the desired Status using the button and press ENTER button 29 Eng English Youcanview MusiclistandplayonHDD USB Œ In the main screen select Music You can view the Music files in thumbnail view as illustrated by the figure Music Mode HDD 001 Another mp3 Edit 001 Another mp3 5 0MB Size Title No Music List 1 2 001 Another mp3 ROOT Sort Play Mode Contents EXIT Library Features Delete Deletes the m...

Страница 32: ...BOOKMARK 00 00 00 HDD 001 Another mp3 Edit 001 Another mp3 5 0MB Size Title No Music List 1 2 001 Another mp3 ROOT Sort Play Mode Contents EXIT BOOKMARK 00 00 00 Library Features Normal Music files are played normally Repeat Track The current track will be played repeatedly Repeat Folder The current folder will be played repeatedly Repeat All All music file will be played repeatedly Random The ran...

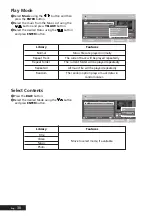
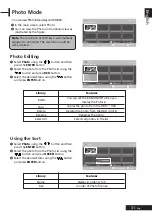
Страница 33: ... Picture 001 jpg Edit Photo List 2 2 Sort Slideshow Contents BOOKMARK EXIT Picture 001 JPG HDD Picture 001 jpg Edit Photo List 2 2 Sort Slideshow Contents BOOKMARK EXIT Picture 001 JPG Œ Select Photo using the button and then press the ENTER button Select the photo from the Photo List using the button and press RED button ˇ Select the desired Status using the button and press ENTER button Library ...

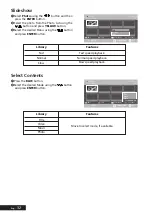
Страница 34: ... photo from the Photo List using the button and press YELLOW button ˇ Select the desired Status using the button and press ENTER button Library Features Fast Fast speed playback Normal Normal speed playback Slow Slow speed playback Slideshow Fast Normal Slow Œ Press the BLUE button Select the desired Mode using the button and press ENTER button Select Contents Library Features Title Video Music Ph...

Страница 35: ... mode the PVR main screen appears and recording begins Intheothercases recordingbeginswhilemaintaining the current mode You cannot play the recorded video on another device or computer Caution If the size of a HDD exceeds under 4GB recording is not supported Recording is supported up to a 4GB The quality of recording file depends on selecting a resolution Starting a Recording Stopping a Recording ...

Страница 36: ...r Setup DVB T Function PVR Option You just have to push the 3 Colour buttons on the remote controller to use additional service offered by DVB T Œ GREEN Button Select Video YELLOW Button Select Audio track ˇ BLUE Button Select Sub Title Using the Colour Buttons QUICK Press the OPTION button PVR OPTION OSD will be displayed Guide HDD PVR Option Guide HDD USB EXIT ENTER MOVE GUIDE Channel Timer Reco...

Страница 37: ...17 00 17 25 Currunt Time FRI 10 MAR 2006 17 26 46 080 BBC NEW BBC News BBC News Sportsday 070 CBBC Cha Blue Peter Tracy Beaker BAMZOOKi 007 BBC THRE 002 BBC TWO Ready The Weakest Link Animal Park W Masterchef G 001 BBC ONE Blue Peter News Neighbours BBC news BBC London N 10 MAR 2006 17 00 17 30 18 00 18 30 Blue Peter CBBC Grange Hill students Holly and Donnie Join us in the studio to answer your q...

Страница 38: ...3 Chellel 4 014 More 4 028 ITV 4 œ œ Page Exit Edit Fav CH Delete CH Move Œ ˇ STEP1 STEP3 is the same as that of Digital Channel List Press the RED button Favorite DTV 1 4 will be displayed ˆ Select a list by using the buttons and press the ENTER button Ø Select a channel by using the buttons and press the RED button You can Add or Remove the channel from the Favorite Channels List by using the RE...

Страница 39: ...n allows you to download of the channels automatically from the programmed load Œ STEP1 STEP2 is the same as that of Digital Channel List ˇ Select Auto Scanning using the button and then press the ENTER or button Press the buttons to select desired option Country Press the buttons to select desired country Channel Type Only Digital Scan Mode All Receives signals including the scrambled signal Only...

Страница 40: ...K œ Digital œ All œ CH 5 œ 0kHz œ 7kHz Start Cancel Œ Press the OPTION button The PVR OPTION will be displayed Select Timer Record using the button and then press the ENTER or button ˇ Select Scheduled List using the button and then press the ENTER or button Press the buttons to select the number of the Scheduled List you want to edit then press the ENTER button ˆ Press the ENTER button to confirm...

Страница 41: ...operation The Scheduled List screen will disppear Œ STEP1 STEP2 is the same as that of Editing the Scheduled List ˇ Press the buttons to select the number of the Scheduled List you want to delete then press the GREEN button Press the buttons to select Yes then press the ENTER button The selected entry will be deleted from the list ˆ Press the EXIT button after finishing the operation The Scheduled...

Страница 42: ...e DVB T screen will be converted to the recording screen When you record in TV SCART VEDIO S VEDIO mode you cannot watch DVB T TV Recording time should be longer than 10 seconds to make it Clear Recorded List Clears all Recorded List at once Scheduled List No 02 01 To HDD HDD Source BBC TWO BBC ONE Start 02 35 02 35 Date DEC 31 DEC 31 Mode OK OK End 07 30 13 25 Mode SP SP Recorded List EXIT ENTER ...

Страница 43: ...rd File manager SETUP Press ENTER or Right buton for File Manager Delete Format HDD All video will be deleted Do you want to continue Yes No All video will be deleted Do you want to continue Yes No Video Music Photo Space Used Space 70 GB Available Space 10 GB File Manager EXIT ENTER MOVE Delete Format HDD All data will be deleted Do you want to continue Yes No Œ STEP1 STEP2 is the same as that of...

Страница 44: ...n ˇ Select SYSTEM using the button and then press the ENTER or button Select Automatic Subtitle using the button and then press the ENTER or button Off Select if you do not want use Automatic Subtitle On Select this option to use the Automatic Subtitle ˆ Press the EXIT button to exit the menu Automatic Subtitle HDD PVR Option Setup EXIT ENTER MOVE GUIDE Channel Timer Record File manager SETUP Syst...

Страница 45: ...urs To cancel the Time shift function press the button and then select Off To display the banner again press the or button when the Time shift function is set to On Timeshift Quality Mode XP High quality mode SP Standard quality mode Timeshift Quality HDD PVR Option Setup EXIT ENTER MOVE GUIDE Channel Timer Record File manager SETUP System PVR Quality Clock Set DTT Language HDD PVR Option PVR Qual...

Страница 46: ...mer Record File manager SETUP System PVR Quality Clock Set DTT Language HDD PVR Option Setup EXIT ENTER MOVE GUIDE Channel Timer Record File manager SETUP System PVR Quality Clock Set DTT Language HDD PVR Option Clock Set EXIT ENTER MOVE GUIDE Channel Timer Record File manager SETUP Time Zone Daylight Saving Time Off HDD PVR Option Clock Set EXIT ENTER MOVE GUIDE Channel Timer Record File manager ...

Страница 47: ...k Set DTT Language HDD PVR Option DTT Language EXIT ENTER MOVE GUIDE Channel Timer Record File manager SETUP Audio Original Subtitle Automatic Teletext English EPG English For the current broadcastig Programme provides audio Œ ˇ STEP1 STEP3 is the same as that of Time Zone Select Daylight Saving Time using the button and then press the ENTER or button ˆ Select the desired option using the button a...

Страница 48: ...ption ˇ Select Teletext using the button and then press the ENTER or button Select the desired option using the button and then press the ENTER button Setting up the Teletext Language option HDD PVR Option DTT Language EXIT ENTER MOVE GUIDE Channel Timer Record File manager SETUP Audio Original Subtitle Automatic Teletext English EPG English Œ STEP1 STEP2 is the same as that of Setting up the Audi...

Страница 49: ...ion Language Software Download Top Up Tv CI Message Slot A initializing CAM Press the OPTION button The OPTION MENU will be displayed Select SETUP using the button and then press the ENTER button Select System using the button and then press the ENTER button Select Common Interface using the button and then press the ENTER button to display the Common Interface see below for an example Connecting ...

Страница 50: ... fluorescent tube is out of order Discordance between the external device jack and the input switch button location This is caused by an inherent property of LCD panels Depending on the number of valid pixels there may be black or bright pixels These will be less than 0 005 of the sum of all pixels This is not a problem Possible Solution Check the power cable connectivity to the power connector Pr...

Страница 51: ...e This may be caused by reflected broadcasting signals when there is are mountains buildings or trees near your house The direction of the antenna is not optimal The antenna cable is disconnected Check if there are any tall objects such as skys crapers near your house Check that the direction of the antenna is adjusted correctly Check that the direction of the antenna is correct Check that the ant...

Страница 52: ...me shift Supported Playback Data Type AUDIO Video Output Audio Output Video Input Audio Input Upgrade HDD USB Enable USB HOST 1 1 USB Recording RF Video S VHS DTV Scart Mode Record enable Delete Copy Rename Protection Split RF DVB T only JPEG MPEG1 File Playback Music Slide Show DivX 3 4 5 6 Ultra XviD MPEG 1 Layer 2 3 WMA YPbPr 576P 2Ch Audio Composite CVBS Audio L R USB PORT DVB T BASIC Logic Ch...

Страница 53: ...e Remote control Battery AAA Owner s Instructions Power Cord AC adapter Stand Screw Cleaning Cloth Neck Cover for WALL MOUNT 160G HDD INTERNAL Dimension mm Weight Accessories With Stand W x H x D Monitor W x H x D 479 X 392 6 X 200 479 X 323 X 89 8 5 Kg 532 9 X 398 5 X 200 532 9 X 332 5 X 99 5 6 Kg 548 5 X 428 X 200 548 5 X 381 X 85 5 6 3 Kg 50 60Hz DC12V 5A Maximum 60W 50 60Hz DC12V 6A Maximum 72...

Страница 54: ... the following 24 signal modes A user can register up to 24 modes Configure the PC display mode referring to the following table For configuration procedures refer to the Appendix of the PC manual Resolution IBM 640 X 350 IBM 640 X 480 IBM 720 X 400 MAC 640 X 480 MAC 832 X 624 MAC 1152 X 870 VESA 640 X 480 VESA 640 X 480 VESA 800 X 600 VESA 800 X 600 VESA 800 X 600 VESA 800 X 600 VESA 1024 X 768 V...

Страница 55: ...53 Eng English Note ...

Отзывы: