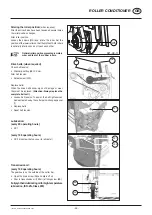
background image

Maintenance

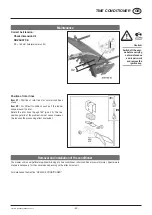
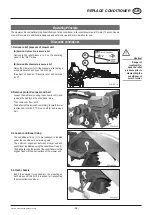
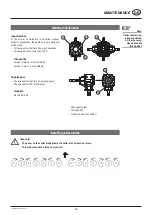
Cleaning: (every 20 operating hours)

•  Unscrew the covers and maintenance openings (WA) 

during belt and chain drive

•  Remove deposited dirt
•  Clean rubber rollers


Dirt can impair lubrication that will 
subsequently cause equipment damage!

Chain drive maintenance unit
Lubrication:

 (every 20 operating hours)

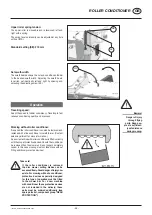
The driving chains are lubricated through the central 
lubricating device.
A lubricating impulse is released every time the mower 
is raised 
•  Lubricating device function check
•  Check oil level. (Oil container is located on the lighting 

carrier)


Check the central lubricating device oil 
level before each operation. Operating 
with insufficient lubrication leads to drive 
chain damage.

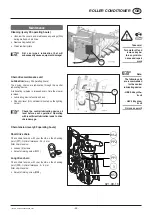
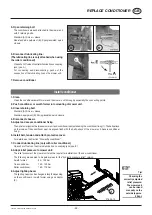
Chain tension: (every 60 operating hours)


Short drive chain

Check chain tension with your thumb on the checking 
point (PP1). Optimal tolerance: 3.5 –5 mm.
Alter chain tension:
•  Loosen (3) screws
•  Adjust straining screw (WS1)

Long drive chain

Check chain tension with your thumb on the checking 
point (PP2). Optimal tolerance: 5 – 8 mm.
Alter chain tension:
•  Adjust straining screw (WS2)

WS1

3

PP1

PP2

WS2

021-09-16

021-09-20

Take care!

Turn motor off and 

remove key be-

fore any mainte-

nance and repair 

work

WA

S

Note:

The following oils 

are recommended 

for the central 

lubricating device: 


- HEES 46 synthe-

tic oil 


- HLP 46 hydrau-

lic oil

Only use new oil!

- 45 -

1000-GB_WALZENAUFBEREITER_3843

ROLLER CONDITIONER

GB

Содержание NOVACAT X8 COLL

Страница 1: ...Operator s manual GB INSTRUCTIONS FOR PRODUCT DELIVERY Page 3 Translation of the original Operating Manual Nr Disc mower 99 3843 GB 80L 1 NOVACAT X8 ED RC COLL Type PSM 3843 01001 ...

Страница 2: ...f Euro 500 is provided for such a liabilioty In accordance with the laws of product liability entrepreneurial property damages are excluded from the liability Attention Should the customer resell the machine at a later date the operating manual must be given to the new owner who must then be instructed in the recommended regulations referred to herein GB Dear Farmer You have just made an excellent...

Страница 3: ...or carried out to three point linkage T Trial run carried out and no defects found T Functions explained during trial run T Pivoting in transporting and operating position explained T Information given re optional extras T Absolute need to read the operating manual indicated Please check X According to the product liability please check the above mentioned items INSTRUCTIONS FOR PRODUCT DELIVERY G...

Страница 4: ...n 32 Calibration 32 Joystick Mower Configuration 33 Setting the Joystick 33 OPERATION Important points before starting work 34 Mow 35 Collision safety device 35 Working on slopes 36 SWATH FORMER Operating Principle 37 Adjustment Possibilities 37 Non standard equipment 37 maintenance 38 Removal and installation of the swath former 38 TINE CONDITIONER Operating Principle 39 Adjustment Possibilities ...

Страница 5: ...ts 76 SERVICE Hydraulic plan Select Control 78 Electrical circuit diagram Select Control 79 Hydraulic plan Power Control ISOBUS 80 Electrical circuit diagram Power Control ISOBUS 81 Electrical circuit diagram Hydraulic pressure relief 82 Hydraulic plan Collector 83 Electrical circuit diagram Cross conveyor belts 84 Repairs on the cutter bar 85 TAPER BUSHES Taper bushes installation instructions 86...

Страница 6: ...ing the EU Declaration of Conformity the manufacturer declares that the machine being brought into service complies with all relevant safety and health requirements Meaning of warning signs Danger flying objects keep safe distance from the machine as long as the engine is running Wait until all machine components have stopped completely before touching them Stay clear of mower knife area as long a...

Страница 7: ...ditioners and manual side protection folding Power Control ISOBUS compatible Operation by means of Power Control ISOBUS optionally hydraulic or spring pressure relief automatic side protection folding suitable for roller conditioner and cross conveyor belt Reverse drive tractor drives backwards Both versions are suitable for reverse drive in triple combinations ED The mower units are fitted with a...

Страница 8: ...ng gear Three point linkage The tractor s lifting gear three point linkage must be designed for the occurring load see technical information Theliftingstrutsaretobesetatthesamelength 4 usingtherelevant adjusting equipment See the tractor manufacturer s operator s manual If the lifting struts on the lower linkage can be fixed in various positions then select the back position this will relieve the ...

Страница 9: ...on Return SN 20 blue Load sensing connection SN 6 Operating pressure Caution Check the compatibility of the hydraulic oils before connecting the machine to the hydraulic system of your tractor Do not mix mineral oils with bio oils Operating pressure minimum 170 bar Operating pressure maximum 200 bar Necessary power connections Design Used for Pole Volt Power connection Standard Lighting 7 pin 12 V...

Страница 10: ...ntal when mowing This height allows optimal evenness when working on uneven ground and need not be changed for swinging cutter bar up TD 79 98 01 15 Attaching implement to tractor Safety hints see supplement A1 points 7 8a 8h Setting upper link height using spindle By turning upper link spindle 16 the cutting height is adjusted A hydraulic upper link is recommended double action hydraulic connecti...

Страница 11: ...fore putting the tractor into operation check vehicle safety lights brake unit protective cover ing Connection of connecting lines from front mower unit Power Control Version In the Power Control version there is a possibility of controlling the automatically folding side guard of the front mower unit with the rear mower unit non standard equipment Note Thehydraulichosesbetweenfrontandrear mowerun...

Страница 12: ...tractors with closed hydraulic system Completely screw in screw 7 on hydraulic block In tractors with open hydraulic system Completely unscrew screw 7 on hydraulic block Hydraulic connection Power Control Version 7 Caution Before a gearbox is remounted on the machine Swapbleedscrewanddrainscrewforeach other The correct position of the bleed screw is on top Pay attention to the direction of rotatio...

Страница 13: ...down operating unit and connecting lines on the holder on the coupling jack Uncouple upper link and lower link Cross conveyor belt version Uncouple connecting lines and PTO drive shaft Extend the 3 support feet on the coupling jack and the support foot on the cross conveyor belt respectively and secure properly with the linch pin K Uncouple the cross conveyor belt Details see section on Cross Conv...

Страница 14: ... plug in coupling St on tractor and on mower combination Open shut off valve Ab position E Activate control valve on tractor until working pressure is reached see pressure gauge Ma display Collision lock Working pressure x 110 bar Close shut off valve Ab position A Disconnect plug in coupling St A E x St 278 09 13 Ma Ab 110 bar 278 09 21 X 278 09 19a P2 P1 Hydraulic pressure relief of mower units ...

Страница 15: ...can only be activated if all mowing units are in the field transport position headland FT Switch off drive and wait for complete standstill Swing in all protective hoop guards on mowing unit Version with Select Control Version with Power Control Version with ISOBUS Terminal Note Therelevantsectionsofthecontrolsystem Select Control Power Control ISOBUS contain details about the individual operating...

Страница 16: ...o position Check that lighting functions before travelling Important information can also be found in the supplement of this operating manual Hydraulic lower link Fix the hydraulic lower link U in such a way that the machine cannot swing out sideways Transport safeguard Ts Before travelling check transport safeguards Both mower units are properly secured with safety hooks Attention Be alert to the...

Страница 17: ...tion IP65 Fuse 10 A multi fuse in operatingvoltageplug Function The attachment is operated by way of a single action control unit on the tractor with which the individual functions can be pre selected using the Select Control terminal The pre selected functions are indicated by means of an active LED display next to the key Commissioning Position the Select Control terminal so that it is easily vi...

Страница 18: ...he Field transport and Working position position Using the tractor s control unit only one mowing unit is swung between the Field transport and Working position position sAfter the swinging action there is an automatic switchover back to both mowing units Example a b d f h c e g i Control device Floating position Control device Raise Control device Floating position Control device Raise When autom...

Страница 19: ... is reached and the mechanical transport lock has engaged Caution Danger of tipping if swinging is carried out on a slope For safety reasons the mowing units must be swung into road transport position by means of individual lifting Always swing the downhill side mower unit first and only then may the uphill side mower unit be swung into road transport position Swinging from the Road transport to t...

Страница 20: ...nt status is displayed on the work screen Power control initial operation Switching on operating device pressing the I O button Switch off the control panel and job calculator by pressing the I O button Note After turning off the control panel OFF Move the hydraulic control valve to the O position This is particularly necessary for tractors withopenhydraulicsystems otherwiseoil heating occurs 1 2 ...

Страница 21: ...selection button Button function This button has a preselection function Preselection is shown a s a symbol in the display The button must be used to lower from the transport to the pre turnover position raise from the pre turnover to the transport position Buttons to operate the cross conveyor belt Swing cross conveyor belt out Swing cross conveyor belt in Preselect buttons for individual cross c...

Страница 22: ...g f t2 time difference when raising Setting range for both sides 0 0 secs 0 9 secs Times are set using the plus and minus buttons in 0 1 second intervals A speed specific distance control is not possible Note Altering the respec tive configuration takes place with the plus and minus buttons on the console Note Navigating to input fields takes place with the arrow buttons on the console Note The me...

Страница 23: ...levant cross conveyor belt Speedindicationisshownonlywhenthecrossconveyor belts are in the working position g Set operating method Tick varying speed between left and right cross conveyor belt for mowing in lineal contours Cross Even speed for both cross conveyor belts withthepossibilityofswitchingbetweentwospeed rates h Set speed rate Two speed rates can be set for cross conveyor belts Setting in...

Страница 24: ...ter than 10 r p m b Voltage indicator Thetopvoltageindicatorshowsthelowestmeasured distribution voltage value since work started This value is stored until the next new start The bottom voltage indicator shows the current measured distribution voltage value c Pressure measuring transmitter voltage indicator Thisindicatorshowsthecurrentpressuremeasuring transmitter voltage level output Consequently...

Страница 25: ...hed off until the next system start using the minus key Switchingoutputs example Y1 raisedirectional control valve On fault identification the alarm screen is faded in and an alarm sound is audible the corresponding symbol and fault are displayed Sensor inputs example sensor voltage supply 10 V Note The alarms for the voltage supply cannot be switched off Time out monitoring When after 6 seconds a...

Страница 26: ... 10 seconds Meaning of display a Pivoting aid This configuration must be deactivated in the case of Novacat X8 and X8 Collector b Hydraulic pressure relief c Individual cross conveyor belt pivoting d Speed control of the cross conveyor belts e Diagnostic function of the inputs and outputs tick active cross inactive Press the I O key on the control panel to leave the menu ...

Страница 27: ... TERMINAL Version Operation with an ISO control terminal Version Operation via ISO Bus tractor terminal Display Tractor terminal Joystick I S O b u s adaptor Tractor cable with ISO Bus ISO Control panel 10 amp fuse Job calculator with additional ISO board ...

Страница 28: ... values can put the control into an undefined state Pressing the STOP button for 10 seconds will reset the control to the normal state This is confirmed by an audible signal The locking hooks open if the trans port pre selection button is activa ted immediately afterwards Then bring the mower units to the working position again F1 F2 F3 F5 F6 F7 F8 F9 F4 F10 ...

Страница 29: ...ange to screen F4 T3 Swing cross conveyor belts out T4 Swing cross conveyor belts in T7 Change from working position to road transport position Press button T7 for 3 seconds the side protection hydraulic hoses are switched without pressure e g before uncoupling T8 Raise cutter bars into road transport position T9 Lower cutter bars into working position T2 Switch to page 1 change to screen F3 T3 Ra...

Страница 30: ...Display meter M or seconds sec F7 a b c d Meanings of Indicators a Voltage indicator Thetopvoltageindicatorshowsthelowestmeasureddistribution voltage value since work started This value is stored until the next new start The bottom voltage indicator shows the current measured distribution voltage value b PTO In the right field the sensor function during turning p t o is checked This field has a bl...

Страница 31: ...veyor belt Tick pivotable Cross pivoting deactivated hydraulic cylinder not driven T7 T8 T9 a F9 Meanings of Indicators a Tick different speed between left and right cross conveyor belt for mowing on contour line on slopes Cross samespeedofbothcrossconveyorbeltswithpossibility of switching between two speed levels b Set speed levels Two speed levels of the cross conveyor belts may be set Adjustmen...

Страница 32: ... Electrohydraulics Sensor inputs example sensor voltage supply 10 V Note The alarms for the voltage supply cannot be switched off T 9 Diag Diag Calibration Starting from the SET menu F6 the Test button must be pressed for 10 seconds to enter the diagnostic menu a b c d e a Pivoting aid This configuration must be deactivated in the case of Novacat X8 and X8 Collector b Individual cross conveyor bel...

Страница 33: ...nment of joystick function keys Starting from the START menu press T6 and in the Field operator 300 menu press T9 to access the joystick setting menu T6 T9 1 Select the function symbol using the terminal s key block 2 Select the level on the joystick using the level switch E1 E2 E3 3 Press green activation button A0 on the joystick and simultaneously select the desired function key 1 8 4 The follo...

Страница 34: ... Such objects e g large stones pieces of wood boundary stones etc can damage the mower unit In the event of a collision Stop immediately and switch off the drive Carefully check the implement for damage The mowing discs and their drive shaft must be checked in particulare Have the implement checked also by a specialist workshop if necessary After any contact with foreign objects Check the conditio...

Страница 35: ...on safety device When mowing around trees fences boundary stones etc collisions between the cutter bar and obstacles can occur despite careful and slow driving Therefore in order to prevent such damage collision protection has been planned for the cutting device Attention It is not the intention of the collision safety device to prevent damage to the machine when working at full speed Return swive...

Страница 36: ...t This can lead to dangerous situations especially on slopes Danger of tipping occurs when the mower units are in a raised position when travelling in a curve with the mower units raised Safety advice Reduce speed in curves accordingly It is better to travel in reverse on a slope than to carry out a risky turning manoeuvre TD79 98 05 G Working on slopes ...

Страница 37: ...rticularly the safety notes prior to commis sioning Designations 1 Swath plates 2 Swath plate mounting Adjustment Possibilities Working range The horizontal working range of the swath former is adjustable via the slots L Optimum adjustment The discs are mounted 0 10 mm lower than the bottom edge of the cutter bar Non standard equipment Additional swath plate Adjusting the two tension springs A For...

Страница 38: ...vities Removal and installation of the swath former The mower unit is compatible for optional hitching of a tine conditioner roller conditioner or swath former Special work steps are necessary for the conversion depending on the attachment unit For details see the Section REPLACE CONDITIONER 122 02 39 Caution Switch off the engi ne before carrying out maintenance and repair work and remove the ign...

Страница 39: ...e plates 2 Adjusting unit for intensity 3 Tine rotor 4 Drive unit 5 Adjustable baffle plate Adjustment Possibilities The following adjustments should be made on the tine conditioner for optimum adaptation to the environmental conditions Adjust processing effect The gap between adjusting strip and rotor is adjusted using lever 1 Position 3 processing is most effective The surface of the crop is hea...

Страница 40: ...th using the swath plates Adjustment of the swath plates is performed identically left and right by opening and adjusting the adjusting screw S Scattering device individuallyadjustableguideplates L supportthedesired shape of the swath deposited Adjust position of swath and guide plates The settings described below are to be seen as basic settings It may not be possible to determine the best possib...

Страница 41: ... removed Mowing may not be carried out in the condition without protective elements Caution The cutting blades of the disc mower are freely accessible if the processor is dismantled There is a very high risk of injury Protective elements that are specially intended for this mode of operation must be installed on the cutter bar for mowing without conditioner For a new machine with conditioner these...

Страница 42: ...f the fodder wraps around the rotor Rotate the rotor tines through 180 pos Z2 This tine position gets rid of the problem in most cases However this reduces the processing effect somewhat Removal and installation of the conditioner The mower unit is compatible for optional hitching of a tine conditioner roller conditioner or swath former Special work steps are necessary for the conversion depending...

Страница 43: ...r and lower rubber roller 2 Adjusting unit for swath board left and right 5 Maintenance unit belt drive 3 Maintenance unit chain drive Adjustment possibilities Whendeliveredtherollerconditionerispreset formedium intensity For optimum adaptation to the surrounding conditions the following adjustments can be made Distance of rollers from each other The roller gap is set identically on the left and r...

Страница 44: ...partment for more information Asaunitamachinewithrollerconditionerisfittedcorrectly withtheproperprotectivedevices Shouldtheconditioner be removed then the mower unit is no longer completely cased In this case mowing must not take place without fitting additional protective devices Take note If the roller conditioner is removed the disc mower cutting blades can be accessedfreely Greatdangerofinjur...

Страница 45: ...e oil level before each operation Operating with insufficient lubrication leads to drive chain damage Chain tension every 60 operating hours Short drive chain Check chain tension with your thumb on the checking point PP1 Optimal tolerance 3 5 5 mm Alter chain tension Loosen 3 screws Adjust straining screw WS1 Long drive chain Check chain tension with your thumb on the checking point PP2 Optimal to...

Страница 46: ...he drive belts show signs of damage or wear they must be replaced Attention Always replace the complete belt set Loosen belt tension To assist the belt tightener can be deactivated using the cutter quick change spanner 1 Replace belts Reset belt tension Lubrication every 20 operating hours SP 1 every 100 operating hours SP 2 Unscrew the top cover to lubricate Transmission oil every 100 operating h...

Страница 47: ...additionalrolleraffectstheejectionangleofthemowed material The height of the roller may be altered to adjust the ejection angle Unscrew the 4 bolts AW left and right Adjust height of roller and fix in position Swath plate in conjunction with collector The swath plate is easy to remove and may be pinned to the processor s ejection hood SA 278 09 45 AW SA 47 1000 GB_WALZENAUFBEREITER_3843 ROLLER CON...

Страница 48: ...rotective cover and belt Loosen the belt tension using the knife wrench 1 and remove the belt 2 on the conditioner side Then remove knife wrench Thebeltsmustberemovedcompletelyifaswathformer is attached Unhitch PTO drive shaft 3 and remove belt 3 Loosen conditioner fixing The conditioner fixing 1 to be loosened is located under the conditioner s outer side guard The optimum alignment between mower...

Страница 49: ... and secure conditioner fixing Theoptimumalignmentbetweenmowerunitandconditionerisadjustedusingtheconditionerfixing 1 Thebeltpulleys on the inside of the conditioner must be aligned flush with the belt pulleys of the mower unit Secure conditioner fixing 6 Install belt tension and attach protective cover For details see the Section Dismantle conditioner 7 Connect lubricating line only with roller c...

Страница 50: ...on equipment Safety note Before initial operation read and observe the operator s manu al especially the safety advice Possible settings Deflector plate P Set deflector plate P so that forage is thrown onto the centre of the cross conveyor belt Belt speed Optional extra Cross conveyor belt speed can be set using the control Note When operating on slopes contours different speeds for the cross conv...

Страница 51: ...parts Ensure that persons maintain a sufficient safe distance during operation Operation Note Check and clean belt run regularly to prevent premature wear and tear see chapter Maintenance Swing cross conveyor belt in Cross conveyor belts will always be in this position when swinging from transport to working position Swinging the cross conveyor belts in and out is carried out using the operating p...

Страница 52: ...f a swath is not to be deposited the cross conveyor belts can be swung out Swinging the cross conveyor belts in and out is carried out using the operating panel Note If the cross conveyor belts are no longer required they can be removed from the machine The tractor will therefore have less load 52 0900 GB_QUERFÖRDERBAND_3843 CROSS CONVEYOR BELT GB ...

Страница 53: ...single swath Mowing with a cross conveyor belt Both conveyor belts move forage to the centre and create a triple swath The swath width can be narrowed using the additional roller Mowing with only one cross conveyor belt If operating with only one cross conveyor belt the possibility exists of laying a swath row over the other two swath rows Advantage Thetotalswathwidthisoptimallypreparedforawindrow...

Страница 54: ...Securesupportstand 3 ontherearmainframeofthe cross conveyor belt at the very outside position 3 Undo locking flap Undo the flap screws 4 4 Lower mower unit to working position Note Lowering can be interrupted using the STOP button on the control unit This enables lowering to be gradual and smooth 5 Undo lower link Undo the upper screw 5 in the lower link safeguard Fold lower ling safeguard 6 out 6...

Страница 55: ...ines Be aware Do not unplug hydraulic lines if the line pressure is too high To assist screw in theemergencyactuationofthelast4valve blocks on the hydraulic block under the white hitching frame protection cover Take note Aftersuccessfullyunpluggingthehydraulic lines unscrewtheemergencyactuationof the last 4 valve blocks If this is forgotten the cross conveyor belts swing when the control device is...

Страница 56: ...tween feed plate and conveyor belt with screws 1 so that gap on conveyor belt ejector side A is greater than gap on feed in side E Min distance 5mm Note A correctly set feed in plate prevents blockages and or minimizes cleaning Sensor setting The cross conveyor belt sensor advises the swinging status of the belt Set the sensor distance S between 3 5 mm Oil change Interval Every 2 years max 4000 ha...

Страница 57: ...nal components must be mounted on the coupling jack 3 for reverse drive suitability Upper link 1 Remove depending on central mower unit or A frame mounting and adjust desired inclination Attach hitching lugs for central mower unit 2 or A frame mounting Attach hitching lugs for tractor 4 1 2 3 4 Adaptation of the tractor to the mower unit The tractor s 3 point suspension must be adapted such that n...

Страница 58: ...o not use high pressure washers for the cleaning of bearing and hydraulic parts Danger of rust After cleaning grease the machine according to the lubrication chart and carry out a short test run Cleaning with too high pressure may do damage to varnish Safety point Turn engine off when adjustment service and repair work is to be done Hydraulic unit Caution Danger of injury or infection Under high p...

Страница 59: ...ut oil filler plug 63 and top up oil SAE 90 4 Oil level check Measure the distance up to the level of the oil The oil level is correct when the measurement is 12mm Too much oil leads to the mower bar overheating during operation Too little oil does not guarantee the necessary lubrication Changing oil Change oil after first 100 operating hours the at least once a year Raise cutter bar on the outer ...

Страница 60: ...th 3 stubs Oil change after the first 50 hours of operation Oil change after no more than 100 h Oil quantity Version 3 stubs 4 0 litre SAE 90 Version 4 stub 4 4 lire SAE 90 Angular gear Change oil after the first 50 operating hours Change oil after 100h at the latest Quantity 0 8 litre SAE 90 Gearing maintenance Note Under normal ope rating conditions oil is to be reple nished annually OIL LEVEL F...

Страница 61: ...e travelled in to a measurement of 1100 mm 3 Loosen plate screws 10 4 Move plate 10 in slot until edge is positioned just at sensor S1 5 Retighten plate screws Adjustment of sensors Always carry out adjustments and controls in that operating position where the distance from the sensor is smallest When doing this a possible assembly clearance should also be taken into account Distance 3 5 mm 278 09...

Страница 62: ...er s support stands remove the spring pin then the clamping sleeve from each stand then remove the stands 5 Fit support stand to secure using linch pin 4 Securefrontguidesonparkingsupportsagainstslipping using chocks 3 Bring mower into position and lower onto parking supports 2 Bring the rear guides left and right into position and secure with linch pin ...

Страница 63: ... Pöttinger immediately Screw down the pin of the blade with the nut with 120 Nm Check the suspension of mowing blades as to wear and other damage everytimebeforebringingthemachineintooperational use several times during use immediatelyafterhittinganobstacle e g astone piece of wood metal Attention Danger of accident if wearing parts are worn If such wearing parts are worn out they must not be used...

Страница 64: ...errain or in other difficult operating conditions Check immediately after driving over a hard obstacle e g stones pieces of wood ect Carry out a check as described in chapter Changing the Cutter Blades Changing the Cutter Blades 1 Insert lever from left or right side on the cutter disc Pos A until it stops 2 Swing lever from pos A to pos B and push the movable holder 30 down 3 Remove cutter blade ...

Страница 65: ...gency application Be alert to the dangers involved with all raising and lowering and on and off switching activities The hydraulic block is located under the front protective cover To carry out the desired hydraulic function Screw in the correct valve knob Turn on servo valve on the towing vehicle The hydraulic function will be carried out Afterwards unscrew the relevant valve knob again Disruptio...

Страница 66: ...trol ISOBUS Whenthereisadisruptionintheelectricalunit therequired hydraulic function can be carried out by means of an emergency application Be alert to the dangers involved with all raising and lowering and on and off switching activities The hydraulic block is located under the front protective cover To carry out the desired hydraulic function Screw in the correct valve knob Turn on servo valve ...

Страница 67: ...of knives per disc 2 Power requirement kw PS 110 150 Area output ha h 10 0 PTO drive shaft speed rpm 1 1000 PTO drive shaft overload protection Nm 1100 Weight1 kg NovaCat X8 NovaCat X8 ED NovaCat X8 RC NovaCat X8 ED Coll NovaCat X8 RC Coll 2020 2550 2760 3810 4120 Continuous sound pressure level db A 93 6 Dimensions Transport mm M 1 3000 M 2 3960 M 3 200 Dimensions Mower blades mm M 1 9100 M 2 830...

Страница 68: ...tions immediately on taking delivery of the vehicle equipment The defined use of the mower unit The mower is intended solely for normal use in agricultural work The mowing of grassland and short stemmed fodder Any other uses outside of these are regarded as undefined The manufacturer takes no responsibility for any resulting damage which occurs henceforth The risk is carried by the user alone Comp...

Страница 69: ...GB Anhang Titelblatt _BA Allgemein GB SUPPLEMENT ...

Страница 70: ...cheap buy can sometimes be very expensive Be sure you purchase the Original with the cloverleaf sym bol Quality and precise fitting Operating safety Reliable operation Longer lasting Economy Guaranteed availability through your Pöttinger Sales Service Things will run better with genuine Pöttinger parts The original cannot be copied ...

Страница 71: ...bited a The transport of persons on the machine is not permitted b The machine may only be driven on public roads when in the position stipulated for road transport 7 Driving ability with auxiliary equipment a The towing vehicle is to be sufficiently equiped with weights at the front or at the rear in order to guarantee the steering and braking capacity a minimum of 20 of the vehicle s tare weight...

Страница 72: ...non use clean and lubricate driveshaft For winter working grease the tube guards to avoid them freezing together Matching driveshaft to tractor To determine the actual length required hold the two halves of the driveshaft side by side Procedure for cutting to length To determine length required set implement in closest working position L2 to tractor hold driveshaft halves side by side and mark off...

Страница 73: ...d to protect the implement against damage Driving the right way will avoid triggering the clutch too often and thus causing unnecessary wear on it and the implement Lubricating interval 500 hrs Special lubricant Important for driveshafts with friction clutch Torque is limited with overloading and brief torque peaks and evenly transferred during slipping Prior to initial operation and after long pe...

Страница 74: ...les 40 voyages 80 F Tous les 80 voyages 1 J 1 fois par an 100 ha tous les 100 hectares FETT GRAISSE Nombre de graisseurs Nombre de graisseurs IV Voir annexe Lubrifiants Liter Litre Variante Voir le guide du constructeur Lubrication chart Xh after every X hours operation 40 F all 40 loads 80 F all 80 loads 1 J once a year 100 ha every 100 hectares FETT GREASE Number of grease nipples Number of grea...

Страница 75: ... FETT 278 09 22 h 50 1x IV FETT FETT 1x IV FETT FETT 1x IV FETT FETT 1x IV FETT FETT h 20 3x IV FETT FETT 1x IV FETT FETT 1x IV FETT FETT 3x IV FETT FETT h 50 1x IV FETT FETT 1x IV FETT FETT 50h 5x IV FETT FETT 5x IV FETT FETT ...

Страница 76: ...meermiddelen code gefordertes Qualitätsmerkmal required quality level niveau de performance demandé caratteristica richiesta di qualità verlangte kwaliteitskenmerken smeerolie SAE 90 of 85 W 140 volgens API GL 5 gear oil SAE 90 resp SAE 85 W 140 according to API GL 5 huile transmission SA 90 ou SAE 85 W 140 niveau API GL 5 oilio per cambi e differenziali SAE 90 o SAE 85 W 140 se condo specifiche A...

Страница 77: ...D GB 90 GETRIEBEÖL MP 85W 90 GETRIEBEÖL B 85W 90 GETRIEBEÖL C 85W 90 TRANSELF TYP B 90 85W 140 TRANSELF EP 90 85W 140 GEAROIL GP 80W 90 GEAROIL GP 85W 140 HP GEAR OIL 90 oder 85W 140 TRANS GEAR OIL 80W 90 SPIRAX 90 EP SPIRAX HD 90 SPIRAX HD 85 140 TOTAL EP 85W 90 TOTAL EP B 85W 90 MOBILUBE GX 90 MOBILUBE HD 90 MOBILUBE HD 85W 140 GETRIEBEÖL MP 90 HYPOID EW 90 HYPOID 85W 140 PONTONIC N 85W 90 PON T...

Страница 78: ...c plan Select Control Explanation Y1 Directional control valve right mower unit Y9 Directional control valve mower unit left Y7 Directional control valve interlock floating position Y2 Directional control valve interlock raise lower 8 Y 1 Y Y2 Y7 ...

Страница 79: ...tion mower unit right S7 Pressure switch Y7 Y8 l 350 mm l 330 mm Y1 Y2 l 330 mm l 350 mm 2 1 S3 S5 S6 S7 gnge JR Kabel Mäher 7p 3m l 1100 mm l 1100 mm l 700 mm Ansicht auf Sensorstecker S3 S6 S7 von außen 1 br 2 ws 3 gn Signal T gr br rt ws bl sw gg 1 2 3 4 5 6 7 8 L 1 2 3 4 5 6 7 8 gn ws br gn ws br gn ws br ws br br bl br bl br bl br bl y7 y2 y4 y6 y8 y1 y9 y3 1 6 2 5 4 3 gnge ws bl sw rt br gr ...

Страница 80: ...ion mower unit centre Y9 Seat valve side protection Y10 Seat valve interlock Y11 12Cross conveyor belt swivelling left Y13 Seat valve hydraulic pressure relief right Y15 Seat valve hydraulic pressure relief left Y16 Restrictor CCB speed right Y17 Restrictor CCB speed left Y18 Seat valve cross conveyor belt on off right Y19 Seat valve cross conveyor belt on off left Y 27 Sitzventil side protection ...

Страница 81: ...lief left Y7 Seat valve mower unit centre Y8 Seat valve floating position mower unit centre Y9 Seat valve side protection Y10 Seat valve interlock Y11 Cross conveyor belt QFB swivelling left Y12 Cross conveyor belt QFB swivelling left Y27 Seat valve side protection Y33 Cross conveyor belt QFB swivelling right Y34 Cross conveyor belt QFB swivelling right S1 Speed sensor S3 Position mower unit left ...

Страница 82: ...10 13 4 5 4 5 13 13 ELEK T RONI K S15 S13 ST1 Y13 blrt 1 0 rt 1 0 sw 1 0 blsw 1 0 1 2 1 2 UB Sign GND Masse Masse Y13 Y15 Y16 S4 Y15 Schaltleit 1 2 3 1 2 3 4 5 6 7 8 9 10 brrs 0 5 grvio 0 5 gert 0 5 Schaltleit 11 12 13 14 15 16 17 18 19 20 21 22 23 24 25 26 27 28 29 30 31 32 33 34 35 36 37 38 39 40 41 42 X1 A B C gesw 1 gegn 1 brge 1 D E F G H J K L M N O swws 1 gr 1 gn 1 br 1 ge 1 blgn 1 blbr 1 Y...

Страница 83: ...ontrol valve left mower unit Y18 Directional control valve interlock floating position Y19 Directional control valve interlock raise lower W Non standard equipment 0 8 mm A T T1 p Antrieb QFB Antrieb Rolle Y16 od Y17 Y18 od Y19 1 2 Eigenversorgung Tank Antrieb Zapfwelle 175 bar 445 248 445 170 011 445 198 445 286 Rücklauffilter 445 320 W ...

Страница 84: ...ion Y16 Restrictor CCB speed right Y17 Restrictor CCB speed left Y18 Seat valve cross conveyor belt on off right Y19 Seat valve cross conveyor belt on off left S9 Sensor cross conveyor belt right S10 Sensor Cross conveyor belt left 1 UB 2 GND 3 Signal Colour code bl blue br brown gn green gnge green yellow gr grey rt red sw black ws white ...

Страница 85: ...397 P65 Repairs on the cutter bar Adjust markings in a line K1 K2 Only screw the nut M on when there is sufficient thread length in order to prevent any damage Secure nut M against loosening with Loctite 242 or an equivalent product and center point 2x ...

Страница 86: ...tween the key and the keyway in the bore Using a hexagon socket wrench DIN 911 gradually tighten the grub cap screws in accordance with the torques as listed in the schedule of screw tightening torques Bush identifier Torque Nm 2017 30 2517 49 Whenthedrivehasbeenoperatingunderloadforashortperiod half to on hour check and ensure that the screws remain at the appropriate tightening torque In order t...

Страница 87: ...nt mounted implement front ballast distance from centre of gravity for combinedfrontmountedimplement front ballast to front axle centre Tractor wheelbase distance from rear axle centre to centre of lower link balls distance from centre of lower link balls to centre of gravity for combined rear mounted implement rear ballast a m b m c m d m 2 3 1 1 1 1 1 2 2 2 3 3 1 3 2 Combination of tractor and m...

Страница 88: ...the rear Record the calculated real and the permissible total weight given in the instruction handbook for the tractor into the table 5 CALCULATION OF THE REAL REAR AXLE LOAD TH tat Record the calculated real and the permissible rear axle load given in the instruction handbook for the tractor into the table 6 TYRE LOAD CARRYING CAPACITY Record double the value two tyres of the permissible load car...

Страница 89: ...adherence to the other following EU directives and or relevant provisions Source of applied harmonised norms EN ISO 12100 EN ISO 4254 1 EN ISO 4254 12 Source of applied miscellaneous technical norms and or specifications Person responsible for documentation Andreas Gadermayr Industriegelände 1 A 4710 Grieskirchen EC Conformity Declaration Original Conformity Declaration Markus Baldinger CTO R D Gr...

Страница 90: ...s and weights are given as anindicationonly Responsibilityforerrorsoromissions not accepted Reproductionortranslationofthispublication inwhole orpart isnotpermittedwithoutthewrittenconsentofthe PÖTTINGER Landtechnik GmbH A 4710 Grieskirchen All rights under the provision of the copyright Act are reserved PÖTTINGER Landtechnik GmbH werkt permanent aan de verbetering van hun producten in het kader v...

Страница 91: ...ger at PÖTTINGER Landtechnik GmbH A 4710 Grieskirchen Telefon 43 7248 600 0 Telefax 43 7248 600 2513 e Mail info poettinger at Internet http www poettinger at PÖTTINGER Deutschland GmbH Verkaufs und Servicecenter Recke Steinbecker Strasse 15 D 49509 Recke Telefon 49 5453 9114 0 Telefax 49 5453 9114 14 e Mail recke poettinger at PÖTTINGER France S A R L 129 b la Chapelle F 68650 Le Bonhomme Tél 33 ...

Отзывы: