39
14.
Initial operation
Ensure that all valves in the water circuit and the refrigerant circuit are open and that water
can flow
unimpeded. Check whether all clamps are tight. Make sure that the appliance and the casing are
properly closed. Check for refrigerant leaks caused by knocks etc.
15.
Commissioning
Before starting the commissioning activities, ensure that the casing and body are firmly mounted and
the mechanical work on the heat pump has been completed. Panels and casings must be firmly
mounted. It is also important that the electrical connection work is complete before the
commissioning activities are started! Now push the main MCB up. The whole heating heat pump is
now in setup mode and ready for the setup wizzard. After completion, the heat pump is switching in
automatic mode. Check whether the condenser input is becoming hot on the refrigerant circuit side
and the condenser output is becoming hot on the water side. Make sure that the rotational direction
of the compressor is correct. If the rotational direction of the compressor is found to be incorrect, this
must immediately be remedied. Use the commissioning protocol, which is part of the warranty
conditions, which can be ordered at PicoEnergy.
15.1.
Commissioning AP420
Detail Menu
►
Service
►
Stationsettings:
Mask is not available in the web application.
The mask is used for precise specification of the existing
station (operating unit):
With
Systemname
a unique name for the master operating
unit can be set via an alphanumeric input panel. Touch
remote controls have to assign the same systemname as their master operating unit.
Via
Type
can be determined from a dialogue whether the station is a master operating unit or a touch
remote control.
If present heating circuits should be operated with this station (e.g. setting the nominal room
temperature of the heating circuit) a heating circuit has to be allocated to it via the parameter
heating
circuit
from the corresponding text selection menu. The performed settings will be accepted by
pressing
APPLY
.
15.2.
Commissioning OI420
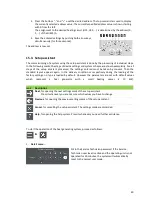
In the delivery mode, the address is set to 0 (thus heat circuit 1). An address may only be used once in
the system for same-type modules! If there are additional OI 423/Awith the same address on the
system bus, the LED on theOI 423/A blinks alternating between red and orange. The address is set via
the service menu. Proceed as follows:
1.
Open the service menu by pressing both arrow keys
simultaneously for at least 3 sec.
LED1 (left LED on the lower LED semi-circle) lights up and signals the selection of the menu
item "Bus address".


