Wireless Data Gateway
3-8
November 1996
3981-A2-GN31-20
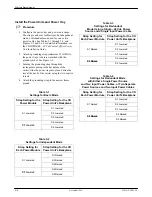
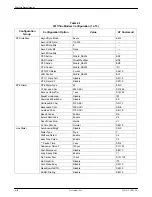
Table 3-5
Carrier Address DIP Switches
SDU
Carrier Address
SDU
label
1*
2
3
4
5
6
7
8
S2-4
—
—
—
—
—
—
—
—
S2-3
Off
Off
Off
Off
On
On
On
On
S2-2
Off
Off
On
On
Off
Off
On
On
S2-1
Off
On
Off
On
Off
On
Off
On
* Factory default setting:
On is to the left as you face the rear of the carrier.
Off is to the right.
Table 3-6
Protocol DIP Switches
Switch
Protocol
Switch
DPII/ADp, CC *
DPII/ADp, DC
S1 – 4
—
—
S1 – 3
—
—
S1 – 2
Off
On
S1 – 1
Off
Off
* Factory default setting:
On is to the left as you face the rear of the carrier.
Off is to the right.
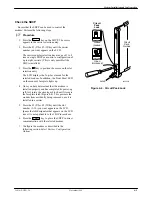
Next, install the SDU into its carrier.
.
Procedure
1. Using a Phillips screwdriver, loosen the screw
holding the circuit pack lock and rotate the lock to
the open position. See Figure 3-8.
2. At the front of the carrier, hold the SDU vertically
with the faceplate latch in the open position.
3. Insert the circuit card into the top and bottom card
guides of the slot labeled SDU.
4. Slide the circuit card into the slot until the
backplane connector is seated firmly.
5. Press the latch to secure the SDU in the carrier,
rotate the circuit pack lock back into the closed
position, and tighten the screw.
Circuit
Card
Guides
Circuit
Pack
Lock
Latch
Open
(Unlocked)
Closed
(Locked)
495-14813
Figure 3-8. Installing the SDU


