40
ENGLISH
ESPAÑOL
1
2
5
3
4
1
<
EJECT
3
OPEN
2
6
3
4
LOCK
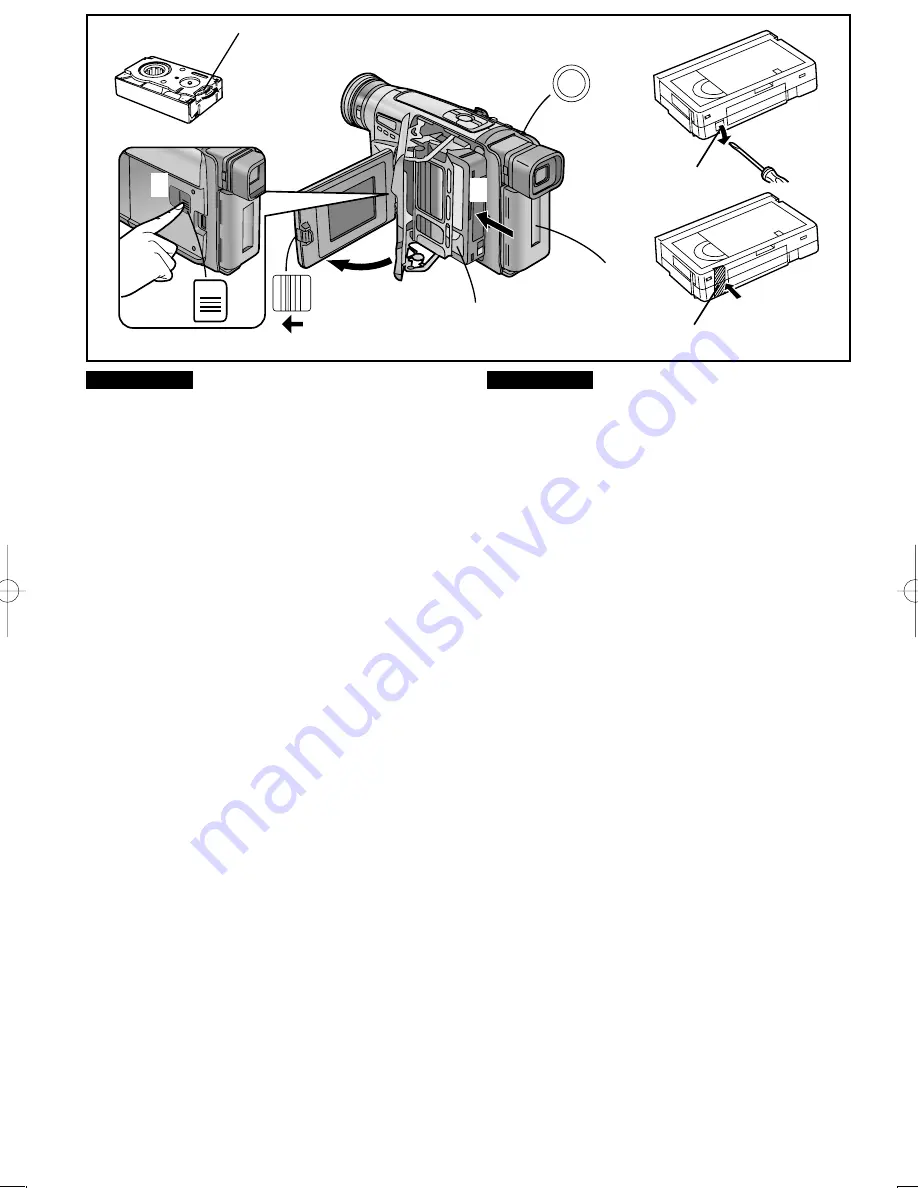
Inserting/Ejecting the Cassette
1
Connect the AC Adaptor or attach a charged
Battery.
(
m
18, 20)
2
Turn the cog wheel
1
to tighten the tape.
3
(NV-VZ14 only)
Slide the [
3
OPEN] Lever to the left and
simultaneously open the LCD Monitor in the
direction of the arrow approximately 90
x
.
≥
Be sure to keep the LCD Monitor in its vertical position, so
that the Cassette Compartment Cover, when it opens,
does not hit the LCD Monitor.
4
Press the [
<
EJECT] Button.
5
Insert the cassette with the cassette window
2
facing outward and push it all the way in.
6
Close the Cassette Compartment by pressing
the [LOCK] Button.
≥
If the AC Adaptor or Battery is used to supply power, it is
possible to insert or eject the cassette without turning on the
Movie Camera.
≥
If a cassette with broken out erasure prevention tab is inserted,
the [
Y
] Indication flashes.
≥
You will hear noise of tightening the tape when you insert the
cassette, and noise of rewinding the tape when you close the
cassette compartment. However, this is not a malfunction.
∫
Preventing Accidental Erasure of Recordings
≥
Recording on a previously recorded cassette erases the
existing scenes and sound.
≥
To protect important recordings against accidental erasure, use
a screwdriver to break out the tab
3
on the cassette (some
cassettes have sliding-type tabs).
≥
To be able to record again on a protected cassette, firmly cover
the hole where the tab was with two layers of adhesive tape
4
.
Colocación/Expulsión del cassette
1
Conecte el adaptador de CA o instale una
batería cargada.
(
m
18, 20)
2
Gire la rueda dentada
1
para tensar la cinta.
3
(NV-VZ14 solamente)
Deslice la palanca [
3
OPEN] a la izquierda y
abra simultáneamente el monitor de cristal
líquido en el sentido de la flecha, en
aproximadamente 90°
.
≥
Confirme que el monitor de cristal líquido está en su
posición vertical, para que, cuando se abra la cubierta del
casetero, no golpee contra el monitor de cristal líquido.
4
Empuje el botón [
<
EJECT].
5
Empuje el cassette con la ventanilla
2
hacia
afuera, hasta el tope.
6
Cierre el compartimiento del cassette
oprimiendo el botón [LOCK].
≥
Si se utiliza el adaptador de CA o la batería para alimentar la
electricidad puede colocar o expulsar el cassette sin
necesidad de conectar la videocámara.
≥
Si se coloca un cassette con la lengüeta rota para evitar el
borrado, destella la indicación [
Y
].
≥
Oirá ruidos de apriete de la cinta cuando inserte el cassette, y
ruidos de rebobinado de la cinta cuando cierre el
compartimiento del cassette. Sin embargo, esto no indica
ningún problema.
∫
Prevención del borrado accidental de una
grabación
≥
Si se graba en una cinta ya grabada, la imagen y sonido
actuales se borran.
≥
Para proteger una grabación importante, rompa la lengüeta
3
del cassette con un destornillador (algunos cassettes tienen
lengüetas deslizantes).
≥
Para volver a grabar en un cassette protegido, cubra el orificio
donde estaba la lengüeta, con dos capas de cinta adhesiva
4
.
Содержание NV-VZ14PN
Страница 150: ...150...
Страница 151: ...151...
Страница 152: ...P VQT9487 LYT0897 001A F1201Sn0 Matsushita Electric Industrial Co Ltd Web site http www panasonic co jp global...


