– 68 –
Chapter 5 Basic Operations — KEY
2
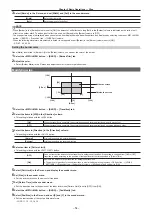
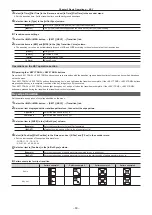
Adjust the color.
f
Set the [Hue], [Sat], [Lum], or [Color Palette] in [Border Color] in the R menu.
Setting the trimming
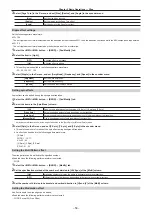
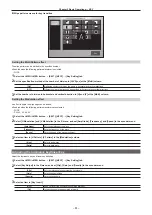
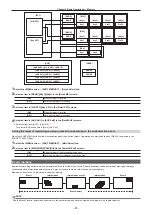
Set the trimming type and values as well as operation for when manual is set. The default setting is as shown in the following figure.
PinP effective area
Area trimmed
Original size of PinP
[Right]
[Left]
[Top]
[Bottom]
[50]
[40]
[0]
[
−
40]
[
−
50]
[
−
50]
[0]
[50]
[
−
40]
[40]
1
Select the <ME1>/<ME2> button
→
[PinP1], [PinP2]
→
[Resizer] tab.
2
Select an item in [Preset] in the [Trim(Square)] column.
[Trim]
Trimming is performed.
[Pair]
Changes the settings in such a way that the [Left] and [Right] trimming amounts, and the [Top] and [Bottom] trimming
amounts are the same. (This makes for a top-bottom and left-right symmetry.)
[Manual]
Trims using the values set with [Trim Adjust1] and [Trim Adjust2].
3
Set the [Left], [Top], [Right], or [Bottom] in [Trim] in the R menu.
f
Set the trimming value. The [Left] setting cannot exceed the [Right] setting (and vice versa), and the [Top] setting cannot exceed the [Bottom]
setting (and vice versa).
[Left]
Sets the left trimming value.
[Top]
Sets the top trimming value.
[Right]
Sets the right trimming value.
[Bottom]
Sets the bottom trimming value.
4
Set [WipeAspect] in the [Trim] column.
f
The aspect ration of the wipe pattern is changed when anything other than [Off] is selected in [WipeMask] in the [Mode] column.
Setting the priority
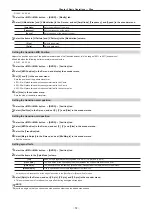
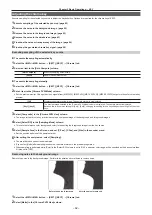
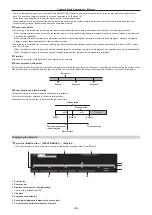
Set the priority (image positioning). The default setting is as shown in the following figure.
Background image
[Key2], [PinP2]: [1st]
[Key1], [PinP1]: [2nd]
1
Select the <ME1>/<ME2> button
→
[MISC]
→
[Key Priority] tab.
2
Select an item in [Key1], [Key2], [PinP1], [PinP2] in the [Key Priority] column.
f
Select the priority for any key from [1st], [2nd].
f
Changing the setting of one item will change the settings of other items accordingly. In the default setting, if [Key1], [PinP1] is changed from [2nd]
to [1st], then the settings of [Key2], [PinP2] also change as follows.
- [Key2], [PinP2]: [1st]
→
[2nd]
Setting [Key Link]
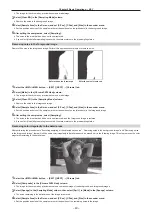
Combine [Key1], [Key2], [PinP1], [PinP2] in the same ME to start transitions simultaneously.
1
Select the <ME1>/<ME2> button
→
[MISC]
→
[Key Link] tab.
2
Select an item in [Key1], [Key2], [PinP1], [PinP2] in the [Key On Link] column.
f
Select [Off], [Group1] or [Group2] for any key.
Keys that were set in the same group operate in conjunction.
Example) When [Key1], [PinP1] is set to [Group1], and [Key2], [PinP2] is set to [Off]
Pressing the <KEY1 TRNS> button starts transitions of [Key1], [PinP1] and [Key2], [PinP2] at the same time.
Содержание Live Production Suite Series
Страница 5: ...Please read this chapter and check the accessories before use Chapter 1 Overview ...
Страница 11: ...This chapter describes installation and connection Chapter 2 Installation and Connection ...
Страница 33: ...This chapter describes basic operations and matters to be performed prior to use Chapter 4 Preparations ...
Страница 50: ...This chapter describes menu operations Chapter 5 Basic Operations ...
Страница 107: ...This chapter describes the input output signal settings Chapter 6 Input Output Signal Settings ...
Страница 112: ... 112 Chapter 6 Input Output Signal Settings Setting MultiView displays f f Set the marker size ...
Страница 113: ...This chapter describes the configuration of operations Chapter 7 Configuring Operations ...
Страница 122: ...This chapter describes how to operate system menus Chapter 8 System Menu ...
Страница 136: ...This chapter describes plug in functions Chapter 9 External Interfaces ...
Страница 138: ...This chapter describes the dimensions and specifications of this product Chapter 10 Specifications ...
Страница 139: ... 139 Chapter 10 Specifications Dimensions Dimensions Dimensions of the Gateway Unit AV LSG10 Unit mm inch ...
Страница 140: ... 140 Chapter 10 Specifications Dimensions Dimensions of the XPT Unit AV LSX10 Unit mm inch ...
Страница 141: ... 141 Chapter 10 Specifications Dimensions Dimensions of the ME Unit AV LSM10 Unit mm inch ...
Страница 142: ... 142 Chapter 10 Specifications Dimensions Dimensions of the System Manager Unit AV LSS10 Unit mm inch ...
Страница 153: ...This chapter describes the setting menu table and terms Chapter 11 Appendix ...
Страница 176: ...Web Site https www panasonic com Panasonic Corporation 2020 ...

