– 137 –
Chapter 5 Playback — Thumbnail operations
- [LACK OF CAPACITY!]
Copying could not be performed because the recording capacity of the copy destination is insufficient.
- [UNKNOWN CONTENTS FORMAT!]
Copying could not be performed because a defective clip is selected.
- [NO COPY TO SAME CARD!]
Copying could not be performed because you are attempting to copy to the same card.
- [TOO MANY CLIPS!]
Copying could not be performed because there are too many clips selected.
t
If copying is performed while a text memo is selected in the lower part of the text memo, the section between the selected text memo position and the
next text memo will be copied. If no text memo is found after the selected one, then the part after the selected text memo to the end of the clip will be
copied. For details, refer to “Using a text memo to divide a clip and copy the necessary portion” (page 135).
t
To interrupt copying, press <SHIFT> button
+
<EXIT> button or the <SET> button to cancel the operation. The clip being copied will be deleted from
the copy destination.
t
When identical clips (same [GLOBAL CLIP ID]) exist on the destination, [OVERWRITE?] is displayed. Select [YES] when overwriting the clip, and
select [NO] when not overwriting the clip.
Setting clip metadata
Information such as the name of the person who shot the video, the name of the reporter, the shooting location, or text memos can be loaded from an
SD memory card, and can be recorded as clip metadata.
Loading clip metadata (metadata upload)
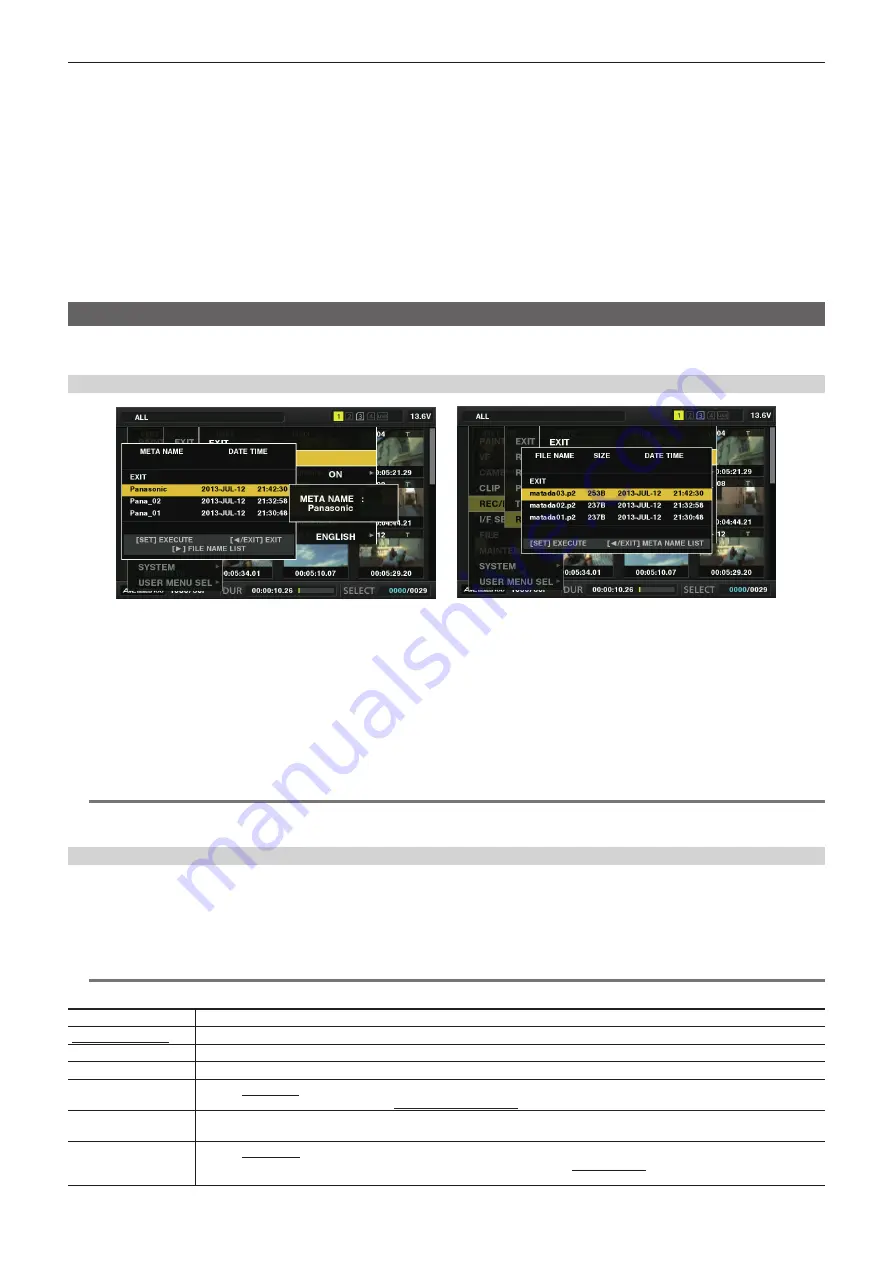
Fig. 1
Fig. 2
1
Insert the SD memory card that contains the clip metadata (metadata upload file).
2
Select [LOAD] in main menu
→
[REC/PB]
→
[REC META DATA] and press the <SET> button.
The metadata name of the metadata upload file on the SD memory card is displayed. (Fig. 1)
3
Use the cursor buttons to select the desired file to be loaded, and select [YES].
f
Upload starts.
f
Uploaded metadata is retained even if the power is turned off.
f
For confirmation of uploaded data, refer to “Checking and modifying uploaded metadata” (page 138).
@
@
NOTE
t
While displaying metadata names, press the cursor button (
I
) to switch to display of file names. (Fig. 2)
Press the cursor button (
Y
) to return to display of metadata names.
Clip metadata items
Clip metadata includes the following items. Underlined items can be set by loading the metadata upload file on the SD memory card. Other items are
set automatically during shooting. Using the latest update version of P2 Viewer Plus, metadata upload files can be written to SD memory cards using a
computer. Download and install the latest version of P2 Viewer Plus from the following website.
https://pro-av.panasonic.net/
For details on SD memory cards to be used, refer to “Cautions when using SD memory cards” (page 24).
@
@
NOTE
t
Files which were not edited using P2 Viewer Plus are displayed as [UNKNOWN DATA!] and may not be readable.
[GLOBAL CLIP ID]
Displays the global clip ID that shows the shooting status of the clip.
[USER CLIP NAME]
Displays the clip name set by the user.*
1
[VIDEO]
Displays [FRAME RATE] (frame rate of the clip), [PULL DOWN] (pull-down format), and [ASPECT RATIO].
[AUDIO]
Displays [SAMPLING RATE] (sampling frequency of recorded audio) and [BITS PER SAMPLE] (quantizing bits for recorded audio).
[ACCESS]
Displays [CREATOR] (person who recorded the clip), [CREATION DATE] (date when the clip was recorded), [LAST UPDATE DATE]
(date of the latest update of the clip), and [LAST UPDATE PERSON] (person who made the latest update of the clip).
[DEVICE]
Displays [MANUFACTURER] (name of the device manufacturer), [SERIAL NO.] (serial number of the device), and [MODEL NAME]
(model name of the device).
[SHOOT]
Displays [SHOOTER] (name of the person who shot the video), [START DATE] (start date of shooting), [END DATE] (end date of
shooting), and [LOCATION]/[ALTITUDE]/[LONGITUDE]/[LATITUDE]/[SOURCE]/[PLACE NAME] (altitude, longitude, latitude, and
source of the information and name of the location).
Содержание AJ-PX5100G
Страница 11: ...Before using the camera read this chapter and check the accessories Chapter 1 Overview ...
Страница 225: ...This chapter describes how to use the camera by connecting to network Chapter 8 Network Connection ...
Страница 246: ...This chapter describes the warnings and error messages displayed in the viewfinder screen Chapter 9 Maintenance ...
Страница 254: ...This chapter describes the dimensions specifications and connector signals Chapter 10 Specification ...
Страница 263: ...Web Site http www panasonic com Panasonic Corporation 2018 ...


