Form No. OVS16M_LC-0719
10
OPERATION
Cooking
Use the following procedures to operate the oven in
Shuttle
Mode. Shuttle Mode
provides the options of cooking single
items with specific settings as needed or cooking multiple items
with specific settings continuously (queued items).
Single Item Cooking
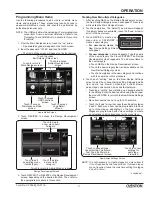
1. Make sure the oven has reached setpoint temperature.
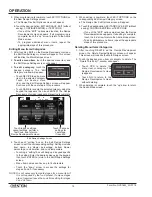
The Main Recipes screen will appear on one of the
touchscreens.
Indicates
current
screen.
Indicates number
of Menu screens
available.
Menu Items
Indicates oven
setpoint
temperature.
Main Recipes Screen
Product Placement
Line
2. Using a paddle, pan gripper,
or other utensil, place the food
product onto the left side of the
conveyor belt. Make sure food
product is placed behind the
product placement line (on the
arrow side).
3. Touch the desired menu item
on the touchscreen.
• The shuttle door opens, the conveyor belt moves the
food product into the oven chamber, the shuttle door
closes, and the cooking sequence begins.
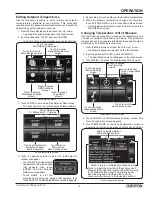
• The touchscreen changes to the Cooking screen and
shows the remaining cook time for the selected menu item.
Indicates remaining cook time.
Touch to cancel cooking sequence. Conveyor belt
moves food product out of oven chamber onto
right side of conveyor belt.
Touch to show settings for active menu item.
Cooking Screen
• When the cooking sequence is finished, the touchscreen
flashes “DONE”, an audible alert sounds, the opposite
side shuttle door opens, and the conveyor belt moves
the food product out of the oven chamber onto the right
side of the conveyor belt.
CAUTION
BURN HAZARD: Pan/tray will be very hot upon removal—
use oven mitt, pan gripper, or other utensil to remove.
4. Using a paddle, pan gripper, or other utensil, remove the
cooked food product.
Queued Item Cooking (Continuous Cooking)
1. Perform steps 1
–
3 of the “Single Item Cooking” procedure
in this section.
• The shuttle door opens, the conveyor belt moves the
food product into the oven chamber, the shuttle door
closes, and the cooking sequence begins.
2. Using a paddle, pan gripper, or other utensil, place the next
food product onto the left side of the conveyor belt. Make
sure food product is placed behind the product placement
line (on the arrow side).
3. Touch the desired menu item on the Main Recipes screen.
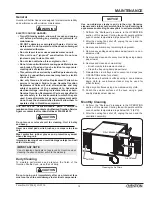
• The touchscreen changes to the In Queue screen and
shows the queued menu item, the queued item cook time,
and the total time remaining until the queued item is done.
LEFT TOUCHSCREEN
RIGHT TOUCHSCREEN
Touch to cancel current
cooking sequence and
start queued menu item.
Touch to cancel
queued menu item.
Touchscreens During Queued Item Cooking
• When the first cooking sequence has 10 seconds
remaining, the In Queue screen flashes yellow to
indicate that the conveyor belt is about to move.
• When the first cooking sequence is complete, the
corresponding touchscreen flashes “DONE”, an audible
alert sounds, both shuttle doors open, and the conveyor
belt moves the food product out of the oven chamber
onto the right side of the conveyor while moving the
queued food product into the oven chamber.
4. Using a paddle, pan gripper, or other utensil, remove the
cooked food product from the right side of the conveyor belt.
5. Repeat steps 2
–
4 of this procedure for continuous, queued
item cooking.
Shutdown
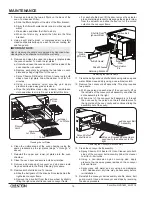
1. Move the Standby switch on the control box down to the
“Off” position.
• The oven heaters and touchscreens will shut off.
• The air blowers and cooling fans will continue to operate
until the oven chamber temperature drops below 140°F
(60°C).
CAUTION
Do not unplug unit immediately after use. Internal fans
must cool oven to avoid damage to electrical components.
2. Move the Power switch for the ventilation assembly to the
“Off” position.


