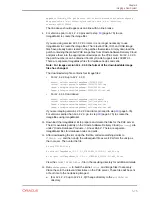
# cp /path/preconf.csv /mnt/preconf.csv
# umount /mnt
The
umount
command above ensures that the file system is synchronized.
h.
(page 5-81). Steps
(page 5-81) to
(page 5-81),
which create the image files, can be skipped.
10.
Download the ImageMaker kit to prepare and create the files for the USB drive.
This kit is available publicly on the Oracle Software Delivery Cloud (edelivery) site
under “Oracle Database Products -> Linux x86-64”. There are separate
ImageMaker files for database nodes and cells.
11.
After downloading ImageMaker, unzip the first file, which is named similar to
V75080-01.zip
, and then also unzip the subsequent file. Perform the unzip as the
root
user. Then untar the file.
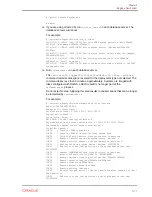
# unzip V75080-01.zip
# unzip cellImageMaker_12.1.2.1.1_LINUX.X64_150316.2-1.x86_64.zip
# tar -pxvf cellImageMaker_12.1.2.1.1_LINUX.X64_150316.2-1.x86_64.tar
View the
README_FOR_FACTORY.txt
file in the resulting directory for additional details
12.
Insert a blank USB device in the slot of the server where ImageMaker was
unpacked.
13.
Run
makeImageMedia.sh
to build the kernel,
initrd
, and image files for the USB
device.
makeImageMedia.sh
will prompt to confirm creation of the image on the USB
device. For building 12.1.2.1.0 and above images, the recommended
makeImageMedia.sh
options for building USB bootable media are:
a.
(For 12.1.2.1.0 up to 12.2.1.1.0) Change directory to the
dl180
or
dl360
directory.
b.
(For 12.2.1.1.0 and above) Change directory to the
cell
or
compute
directory.
c.
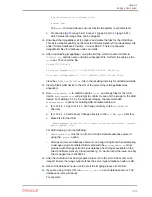
Make files for the USB.
./makeImageMedia.sh -factory -stit -reboot-on-success -nodisktests [-preconf
path_to_preconf_file]
For USB imaging, note the following:
•
makeImageMedia.sh
must be run from an Oracle Exadata database server if
using the
-preconf
option.
•
Storage servers and database servers can hang during boot when attempting
a reimage using a bootable USB created with the
makeImageMedia.sh
script
provided with storage cell and Linux database host images available on the
Oracle Software Delivery Cloud (edelivery). To work around the issue, see My
Oracle Support note 1919001.1
14.
After the USB drive has been prepared, place it into the slot of the server to be
imaged. Ensure the image type matches the server type (database node or cell).
15.
Reboot the database node or cell to start the imaging process from USB.
16.
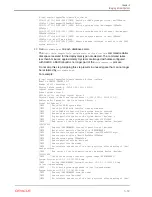
If you are using Oracle VM, run
switch_to_ovm.sh
on each database server. The
database servers will reboot.
For example:
Chapter 5
Imaging a New System
5-81


