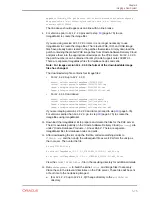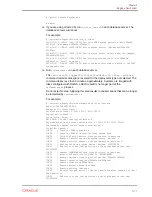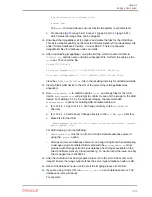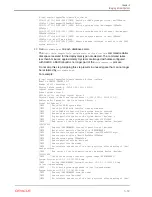
append initrd=img_file pxe factory stit reboot-on-success notests=diskgroup
dhcp preconf=n.n.n.n:/directory/preconf.csv sk=n.n.n.n:/directory
console=ttyS0,115200n8
The line above should appear as one line with no line breaks.
9.
For versions prior to 12.1.2.2.0 proceed to step
ImageMaker to create the image files.
.
If you are using version 12.1.2.2.0 or later, it is no longer necessary to use
ImageMaker to create the image files. The relevant PXE, ISO, and USB image
files have already been created in the patches themselves. Simply download the
patch containing the prebuilt PXE image files from Oracle Software Delivery Cloud
and place them into the appropriate directories on the PXE server. For 12.1.2.2.0
the patch numbers can be obtained from My Oracle Support note 2038073.1 .
There are separate ImageMaker files for database nodes and cells.
Note : For image version 12.1.2.2.0 the format of the downloadable image
files has changed.
The downloaded zip file contains four image files:
•
For 12.1.2.2.0 up to 12.2.1.1.0:
kernel: vmlinux-version-ImageName-{DL180|DL360}
initrd: initrd-version-ImageName-{DL180|DL360}.img
image: nfsimg-version-ImageName-{DL180|DL360}.tar
image: nfsimg-version-ImageName-{DL180|DL360}.tar.md5
•
For 12.2.1.1.0 and above:
kernel: vmlinux-version-ImageName-{cell|compute}
initrd: initrd-version-ImageName-{cell|compute}.img
image: nfsimg-version-ImageName-{cell|compute}.tar
image: nfsimg-version-ImageName-{cell|compute}.tar.md5
If you are imaging version 12.1.2.2.0 and later, proceed to step
(page 5-76).
For versions earlier than 12.1.2.2.0, go to step
(page 5-75) to create the
image files using ImageMaker.
10.
Download the ImageMaker kit to prepare and create the files for the PXE server.
The kit is available publicly on the Oracle Software Delivery Cloud (
edelivery
) site
under “Oracle Database Products -> Linux x86-64”. There are separate
ImageMaker files for database nodes and cells.
11.
After downloading the kit, unzip the first file, called something similar to
V75080-01.zip
, and then unzip the subsequent file as well. Perform the unzip as
the root user. Then untar the file.
# unzip V75080-01.zip
# unzip cellImageMaker_12.1.2.1.1_LINUX.X64_150316.2-1.x86_64.zip
# tar -pxvf cellImageMaker_12.1.2.1.1_LINUX.X64_150316.2-1.x86_64.tar
View the
README_FOR_FACTORY.txt
file in the resulting directory for additional details.
12.
Run
makeImageMedia.sh
to build the kernel,
initrd
, and image files if necessary.
Place these in the relevant directories on the PXE server. These files will be sent
at boot time to the node being imaged.
a.
(For 12.1.2.2.0 up to 12.2.1.1.0) Change directory to the
dl180
or
dl360
directory.
Chapter 5
Imaging a New System
5-75


