OnRobot Gecko Gripper Скачать руководство пользователя страница 94

Additional Software Options 

94 

On the 

Users 

tab click on the 

Add new user

 button to add more users: 


There are three user levels: 


Administrator 


Operator 


User 


Fill in the user information and click 

Save

Later on to change any user information just click on the edit 

icon. 

Содержание Gecko Gripper

Страница 1: ...USER MANUAL FOR NACHI ROBOTS ORIGINAL INSTRUCTION EN v1 05...

Страница 2: ...ode I OnRobot EtherNet IP 12 4 Installation 13 4 1 Overview 13 4 2 Mounting 13 4 2 1 Adapter s 13 4 2 2 Quick Changer options 15 4 2 3 Tools 17 4 3 Wiring 23 4 3 1 Tool data cable 23 1 1 2 Ethernet ca...

Страница 3: ...er 70 7 4 2 Program Editor 71 8 Additional Software Options 77 8 1 Compute Box 77 8 1 1 Interfaces 77 8 1 2 Web Client 77 8 2 EtherNet IP 96 8 2 1 Available connections and assembly instances 96 9 Har...

Страница 4: ...koGripper v2 RG2 v2 RG2 FT v2 RG6 v2 VG10 v2 VGC10 v1 Sensors Version HEX E QC v3 HEX H QC v3 Where applicable the combination of the products is also coveredin the manual NOTE Generally the products...

Страница 5: ...his is an instruction relevantforthe RG2 product only RG2 FT This is an instruction relevantforthe RG2 FT productonly VG10 This is an instruction relevantforthe VG10 product All textwithoutthese visua...

Страница 6: ...tionof the integrator Collecting all documentationin a technical file including the risk assessmentandthismanual 2 1 IntendedUse OnRobottools are intendedto be usedon collaborative robotsand light ind...

Страница 7: ...set forth in the standards and regulationsof the countrywhere the robotis installed Anysafetyinformationprovidedinthismanual mustnotbe construedas a warranty by OnRobot A S that the robot application...

Страница 8: ...e movement OnRobot A S have identified the potential hazards listed below as significant hazards that must be consideredbythe integrator Objectsflyingfrom OnRobottools due to loss of grip Objectsfalli...

Страница 9: ...product Motionis then preventedaslong as one or both of the two buttonsare activated If this happens while running the robot program user can detect this condition with the help of the providedstatus...

Страница 10: ...bination e g RG2 VG10 The instances are containing a setof words 16 bit data that can be used to control monitor the grippers sensor e g the 4th word of the Assembly Instance 104 is the Actual Width f...

Страница 11: ...Compute Box swebinterfacecalledWebClient Itrequires only a normal computerwith a browser In this documentbothmodesof operationwill be coveredandwill be referredtoas OnRobotEtherNet IP OnRobotWebLogic...

Страница 12: ...Operationmode s 12 Mode I OnRobot EtherNet IP...

Страница 13: ...swill be described 4 2 Mounting Requiredsteps Mountthe robot dependentadapter Mountthe Quick Changeroption Mountthe tool s In the followingthree subsectionsthese three mountingstepswillbe described 4...

Страница 14: ...Installation 14 Adapter J 1 M5x8 screws ISO14580 A4 70 2 OnRobot adapter flange ISO940 1 50 4 M6 3 Dowelpin 6x8 ISO2338 h8 4 Robottool flange Use 5 Nm tighteningtorque...

Страница 15: ...Quick Changer ISO9409 1 50 4 M6 3 Dowelpin 6x10 ISO2338 h8 4 Adapter Robot tool flange ISO 9409 1 50 4 M6 Use 10 Nmtightening torque Dual Quick Changer Dual Quick Changer 1 M6x20mm ISO14580 8 8 2 Dua...

Страница 16: ...C HEX E H QC 1 HEX E H QC sensor 2 M4x6mm ISO14581 A4 70 3 M6x8mm NCN20146 A4 70 4 HEX E H QC adapter 5 Adapter Robot tool flange ISO 9409 1 50 4 M6 Use 1 5 Nm tightening torque for M4x6mm Use 10 Nmti...

Страница 17: ...tongue will keepthe lower part locked once mounted Step2 Flip the tool until it is fully mated and youhear a clicking sound To unmount the tool press the aluminum button on the Quick Changer and repe...

Страница 18: ...you heara clicking sound To unmountthe tool pressthe aluminumbutton on the Quick Changerand repeatthe stepsin the reverse order To change the relative angle of the gripper to the Quick Changer first...

Страница 19: ...nd you heara clicking sound To unmountthe tool pressthe aluminumbutton on the Quick Changerand repeatthe stepsin the reverse order To change the relative angle of the gripper to the Quick Changer firs...

Страница 20: ...uhear a clicking sound To unmount the tool press the aluminum button on the Quick Changer and repeat the stepsin the reverse order To change the relative angle of the gripper to the Quick Changer firs...

Страница 21: ...nd To unmount the tool press the aluminum buttonon the Quick Changerand repeatthe stepsin the reverse order VGC10 Step1 Move the tool close to the Quick Changeras illustrated The hook mechanism rod an...

Страница 22: ...anger as illustrated The hook mechanism rod and hook tongue will keep the lower part locked once mounted Step2 Flip the tool until it is fully mated and you heara clicking sound To unmountthe tool pre...

Страница 23: ...o the tool For Single or Dual RG2 RG6 VG10 VGC10 or GeckoGripper Use the M8 8pin connector on the Quick Changer or on the Dual Quick Changer Use the cable holderas illustrated on the left CAUTION Make...

Страница 24: ...s 70mm Finally connectthe otherend of the Tool data cable to the Compute Box sDEVICESconnector CAUTION Use only original OnRobot tool data cables Do not cut or extendthese cables CAUTION Quick Changer...

Страница 25: ...te Box enclosure metal and the robot controller enclosure metal are not connected no galvanic connectionbetweenthe two 4 3 3 Power supply Connect the supplied power supply to the Compute Box 24V conne...

Страница 26: ...Installation 26...

Страница 27: ...e will use the term Adapter E g The robot is an adapter 4 4 2 Configure the Compute Box as a Scanner NOTE Temporarily the Compute Box will be needed to be connected to your computer To configure the C...

Страница 28: ...stallation 28 The sign in page opens The factory defaultadministrator login is Username admin Password OnRobot For the first login a newpasswordneedstobe entered passwordmustbe atleast 8 characterslon...

Страница 29: ...IP address to connect to RobotIP address if defaultvaluesareused enter 192 168 1 2 Origin to targetinstance id 150 Target to origininstance id 100 Configurationinstance id 102 Requestedpacketinterval...

Страница 30: ...can be initialized Goto Constant setting Communication Fieldbus Select the EtherNet IP card installed in your robot controller for Channel 1 in this case AnyBusEtherNet IP NOTE The AnyBus EtherNet IPc...

Страница 31: ...ding to your configuration Thenpress Referbuttonto set the robotIP address The IP addressshouldbe set to be on the same subnetwiththe Compute Box If the defaultIP settingsare usedonthe Compute Box you...

Страница 32: ...in the PUBLIC INC bothcan be foundonthe accompanying USBstick Uploadingthe OnRobot USRPROC INC to the robotusing FD on Deskapplication Load boththe PUBLIC INC andUSRPROC INC filesinto the FD on Desk...

Страница 33: ...arameters which shall be configured are stored in the PUBLIC INC Both are uploadedtothe robot during the installation These high levelfunctionscanbe usedby calling these userproceduresinyour program C...

Страница 34: ...RGx 107 HEX VGx 108 HEX Gecko 109 RGx VGx 110 RGx Gecko 111 RGx RGx 112 VGx RGx 113 VGx Gecko 114 VGx VGx fieldbusCH integer Fieldbuschannel 1 if Channel1 is used 2 if Channel2 is used 3 if Channel3...

Страница 35: ...ype Description Input instance integer 1 single or primary in dual configuration 2 secondaryin dual configuration wait integer 0 returnaftercommandis executed 1 returnafterpads reachedthe final positi...

Страница 36: ...n Input instance integer 1 single or primary in dual configuration 2 secondaryin dual configuration Output integer 0 gripperis notconnected 1 gripperis connected Description Checksthat is the gripper...

Страница 37: ...sare worn out Description Checksthe pads worn outstate Example instance 1 CallProc OR_Gecko_padSt instance Functionname OR_Gecko_padPos instance Name Type Description Input instance integer 1 single o...

Страница 38: ...ue OR_HEX_get FT_type Functionname OR_HEX_zero Name Type Description Input Output Description ZeroingHEX sensor Use currentforce torque values asoffset these values will be zero Example CallProc OR_HE...

Страница 39: ...gersreachedthe position Output Description Open close the gripper Example width 50 force 20 waitFor 1 CallProc OR_RG2FT_move width Force waitFor Functionname OR_RG2FT_stop Name Type Description Input...

Страница 40: ...nname OR_RG2FT_hexZero Name Type Description Input Output Description Zeroingthe HEX sensors currentforce torquevalueswillbe usedas offset Example CallProc OR_RG2FT_hexZero Functionname OR_RG2FT_hexUn...

Страница 41: ...equested force or torque value Force values are in 1 10N torque valuesare in 1 100Nm Description Getforce torque value fromHEXsensors Example FT_type lFz getleft HEX force value onZ axis CallProc left...

Страница 42: ...eris busy Description Checksgripperstatus busyoridle Example CallProc gripper_busy OR_RG2FT_isBusy Functionname OR_RG2FT_isGrip Name Type Description Input Output integer 0 grip is notdetected 1 grip...

Страница 43: ...R_RG2FT_move instance width force waitFor Functionname OR_RGx_isConn instance Name Type Description Input instance integer 1 single or primary in dual configuration 2 secondaryin dual configuration Ou...

Страница 44: ...pperstate busyoridle Example instance 1 CallProc RG_busy OR_RGx_isBusy instance Functionname OR_RGx_isSSOn instance Name Type Description Input instance integer 1 single or primary in dual configurati...

Страница 45: ...he part gripped Example instance 1 vacuumA 20 vacuumB 20 waitFor 1 CallProc OR_VG10_grip instance vacuumA vacuumB waitFor Functionname OR_VG10_getVacA instance Name Type Description Input instance int...

Страница 46: ...rimary in dual configuration 2 secondaryin dual configuration Output integer Currentlimit in mA Description Getconfigured currentlimit Example instance 1 CallProc act_current_lim OR_VG10_setCur instan...

Страница 47: ...Operation 47...

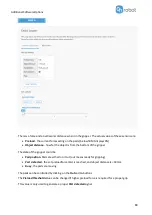
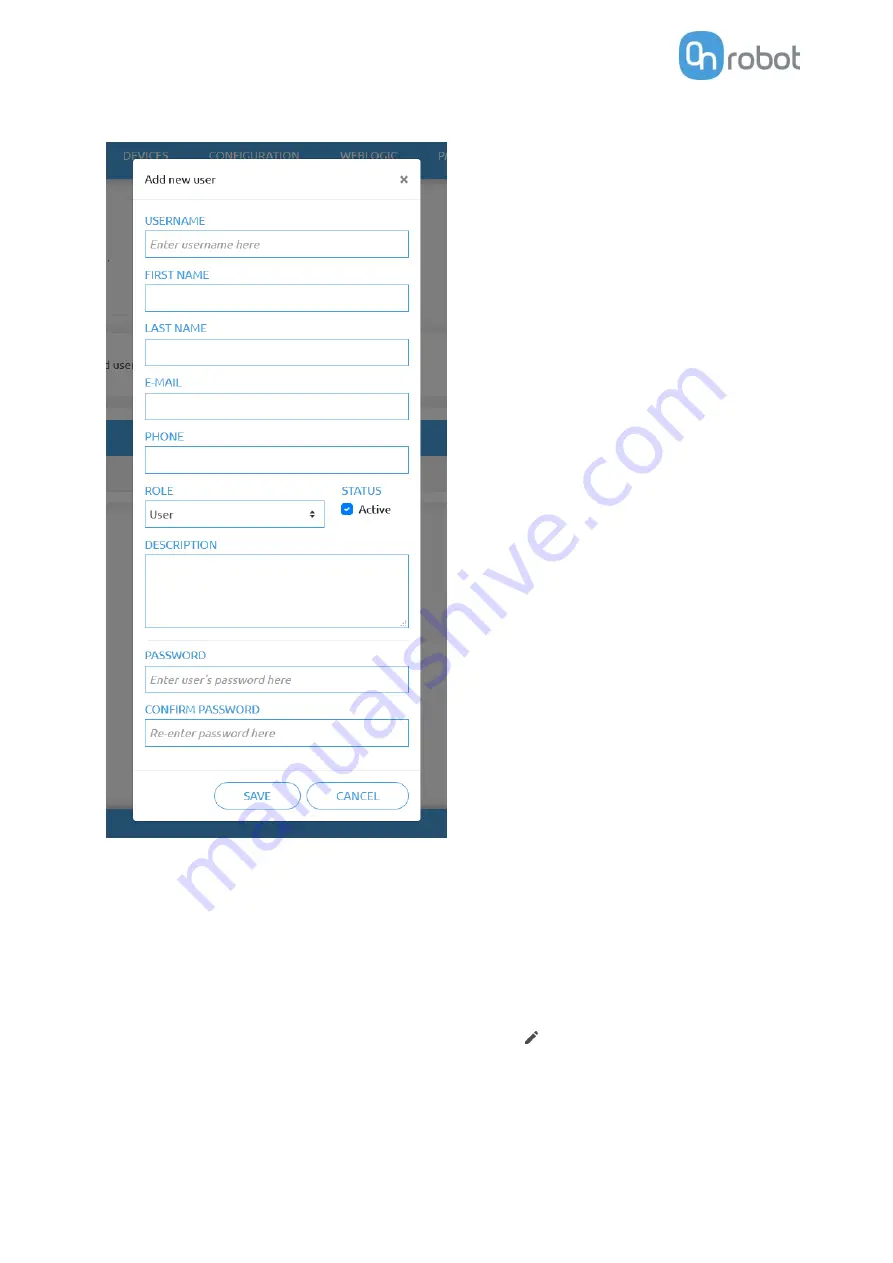
Страница 48: ...Operation 48 Mode II OnRobot WebLogic...

Страница 49: ...swill be described 6 2 Mounting Requiredsteps Mountthe robot dependentadapter Mountthe Quick Changeroption Mountthe tool s In the followingthree subsectionsthese three mountingstepswillbe described 6...

Страница 50: ...Installation 50 Adapter J 1 M5x8 screws ISO14580 A4 70 2 OnRobot adapter flange ISO940 1 50 4 M6 3 Dowelpin 6x8 ISO2338 h8 4 Robottool flange Use 5 Nm tighteningtorque...

Страница 51: ...Quick Changer ISO9409 1 50 4 M6 3 Dowelpin 6x10 ISO2338 h8 4 Adapter Robot tool flange ISO 9409 1 50 4 M6 Use 10 Nmtightening torque Dual Quick Changer Dual Quick Changer 1 M6x20mm ISO14580 8 8 2 Dua...

Страница 52: ...C HEX E H QC 1 HEX E H QC sensor 2 M4x6mm ISO14581 A4 70 3 M6x8mm NCN20146 A4 70 4 HEX E H QC adapter 5 Adapter Robot tool flange ISO 9409 1 50 4 M6 Use 1 5 Nm tightening torque for M4x6mm Use 10 Nmti...

Страница 53: ...tongue will keepthe lower part locked once mounted Step2 Flip the tool until it is fully mated and youhear a clicking sound To unmount the tool press the aluminum button on the Quick Changer and repe...

Страница 54: ...you heara clicking sound To unmountthe tool pressthe aluminumbutton on the Quick Changerand repeatthe stepsin the reverse order To change the relative angle of the gripper to the Quick Changer first...

Страница 55: ...nd you heara clicking sound To unmountthe tool pressthe aluminumbutton on the Quick Changerand repeatthe stepsin the reverse order To change the relative angle of the gripper to the Quick Changer firs...

Страница 56: ...uhear a clicking sound To unmount the tool press the aluminum button on the Quick Changer and repeat the stepsin the reverse order To change the relative angle of the gripper to the Quick Changer firs...

Страница 57: ...nd To unmount the tool press the aluminum buttonon the Quick Changerand repeatthe stepsin the reverse order VGC10 Step1 Move the tool close to the Quick Changeras illustrated The hook mechanism rod an...

Страница 58: ...anger as illustrated The hook mechanism rod and hook tongue will keep the lower part locked once mounted Step2 Flip the tool until it is fully mated and you heara clicking sound To unmountthe tool pre...

Страница 59: ...ne tothe Compute Box CB anduse the suppliedVelcrotape black to fix it NOTE Leave some extra cable length around the joints so that the cable is not pulledwhenthe robot moves Also make sure that the ca...

Страница 60: ...O board Checkyourdigital I Omodule installedinthe controlcabinetandconfigure the Compute Box DIPswitches red accordingly For PNP type setthe 1 and2 DIP switchestoOFF position down For NPNtype set the...

Страница 61: ...grippers sensortothe robot DI1 8 Digital inputs of the Compute Box signals fromthe robot to the grippers sensor GND To be usedto have a commongroundbetweenthe robotandthe gripper sensor It is recomme...

Страница 62: ...igital output103 B8 Digital input 104 A8 Digital output104 A10 M1 Internalpower24V B10 M1 Internalpower24V A11 P1 Internalpower0V B11 P1 Internalpower0V B9 Inputcommon A9 Outputcommon B12 PR Relaypowe...

Страница 63: ...ogramming CAUTION Use only original OnRobot ethernet cables or replace it with one that is shieldedand nomore than3 meterlong WARNING Check and make sure that the Compute Box enclosure metal and the r...

Страница 64: ...Installation 64...

Страница 65: ...s to be programmed first with the help of a computer connected to the Compute box Thenit can run standalone withoutany Ethernetconnection Stepsto programit Setupthe Compute Box s Ethernetinterface and...

Страница 66: ...rationforthe robot computer NOTE To change between modes first change the DIP switches and then the Compute Box powerneedstobe cycledfor the changesto take effect Auto mode Use the factorydefaultsetti...

Страница 67: ...rsetting IP address 192 168 1 2 Subnetmask 255 255 255 0 Othersettingslike Gateway DNSServer etc couldbe keptemptyor setto 0 0 0 0 Advanced mode Setthe DIPswitch3in OFFandDIPswitch4 in ON positionandc...

Страница 68: ...ernet Interface setup Thendo the following steps Connectthe Compute Box to yourcomputerwith the suppliedUTPcable Powerthe Compute Box withthe suppliedpowersupply Wait one minute forthe Compute Box LED...

Страница 69: ...Operation 69 For the first login a newpasswordneedstobe entered passwordmustbe atleast 8 characterslong Once loggedin youcan accesstop menus Select WebLogicmenu...

Страница 70: ...the WebLogic programsthat are storedonthe Compute Box To create a new program go to the Program Editor tab To edit a stored program click on the pencil icon and it will be loadedin the Program Editor...

Страница 71: ...er to 77 mm Anotherrowin a programcan be like this If DI1 0 Then RG2 Width 20 force 40N If the robotsetsthe Digital Input1 DI1 of the Compute Box tolow thenclose the RG2 gripperto 20 mm With the above...

Страница 72: ...uncheckthe checkbox nexttothe row number The rows musthave at leastone condition and at least one commandto be executed Conditions Conditionsare the input fields markedby blue There are two typesof c...

Страница 73: ...ed andit will give true result Commands Commandsare the inputfields markedwithgray There are twotypesof commands Device specific value type like setRG2 width77 mmand with force 20N Digital Outputtype...

Страница 74: ...o the pads N below 50N it reads0N Ultrasonic Actual distance measuredfromthe bottomof the gripperto the object mm Pad position Actual position of the pads either In or Out Pads worn If a Grip wasdetec...

Страница 75: ...Grip Internalor externalgrip is detected Safety pressed True if anyof the gripper s safetyswitchis currently being pressed Safety triggered True if anyof the gripper s safetyswitchis triggered Comman...

Страница 76: ...components Both F3D T3D The combinedF3D and T3D acting on an objectthatthe grippergrippedon Commands Description Width Setthe gripperto a new width mm witha gripping force N Bias Setto TRUE to zeroth...

Страница 77: ...utputthatcouldbe used These inputsandoutputscanbe programmed through the OnRobot WebLogic that requires the Ethernet interface to be used only for programmingtime 8 1 2 Web Client To accessthe WebClie...

Страница 78: ...ntered passwordmustbe atleast 8 characterslong Once signedin the followingtop menusappear Devices Monitorand control the connecteddevices e g grippers Configuration Change the Compute Box ssettings We...

Страница 79: ...ttings e g change password addnew user Selectthe language of the WebClient In the following these menuswill be described Devicesmenu To control monitora device click onthe Selectbutton Gecko 80 HEX E...

Страница 80: ...m the bottomof the gripper The state of the gripper could be Pad position Padsare eitherIn or Out out meansreadyforgripping Part detected the set preloadforce limit is reached and objectdistance is 18...

Страница 81: ...are restoredtothe defaultvalue 90N on powerreset If a part was detectedandthe objectdistance becomes 18mm part is lost BEFORE the pads are setto be IN normalrelease the Pads worn warningis displayedin...

Страница 82: ...QC The force andtorque values Fx Fy FzandTx Ty Tz are shownin N Nm The Zero toggle switchcan be usedto zerothe force andtorque reading NOTE Zerovalue seton thispage is not storedpermanentlyandare res...

Страница 83: ...orce limit is reachedbutthe set widthis not The status of the twosafetyswitchshows Pushed the safetyswitch1 2 is still beingpushed Triggered the safetyswitch1 2 has beenactivatedand gripperis stopped...

Страница 84: ...e currentfingertipsattachedtothe gripper Offsetismeasured fromthe innermating face of the bar metal fingertips Tosave the value to the gripperpermanentlyclick Save The grippercan be controlled byadjus...

Страница 85: ...torque values Fx Fy Fz and Tx Ty Tz are shownin N Nm along with the Proximity sensor values opticaldistance sensorbuiltin the fingertip are show inmmforthe leftandright fingertipsensor The Zero toggle...

Страница 86: ...paper betweenthe fingertips Readthe actual Left and Right Proximityvalues e g 19mm and 25mm Write these values to the Left and Right edit boxes and click on the Save button to store it permanently Ope...

Страница 87: ...anently and always restoredtothe defaultvalue onpowerreset Higher powerlimit value meansthe requiredvacuumlevelisreachedfaster higherairflow butif it is set too fastovershootmayoccur Low powerlimit ma...

Страница 88: ...e Box expectsanIPaddress fromaDHCPserver If the network that the device is connected to has no DHCP server then the fixed 192 168 1 1 IP is used for the device after60 secondsof timeout If it is setto...

Страница 89: ...dtheCompute Boxneedstobe theScannerthefollowingaddition informationis requiredforthe communication IP address to connect to the robot IPaddress Origin to targetinstance id referto the robot s EtherNet...

Страница 90: ...mport and browse forthe file The available Pathsare listedat the endof the page Anypathscanbe exportedanddownloadedasa ofp file or permanentlydeletedtofree upthe list if a path is notneededanymore NOT...

Страница 91: ...tware update byclicking on the Browse buttonto browse forthe cbu software update file Thenthe Browse buttonwill turn to Update Click on thatUpdate buttonto start the software update process CAUTION Du...

Страница 92: ...nyof the components is outof date To start the firmware update click on UPDATE buttonin the firmware sectionof the page CAUTION During the update process takes about 5 10 minutes DO NOT unplug any dev...

Страница 93: ...user Goto Account settings Sign out Account settings This page hastwo tabs My profile to see and update the currentlyloggedin usersprofile e g change password Users to manage users e g add remove edit...

Страница 94: ...4 On the Userstab click on the Add new userbuttonto add more users There are three userlevels Administrator Operator User Fill in the userinformationand click Save Later on to change anyuser informati...

Страница 95: ...Additional Software Options 95 To preventa userto sign ineithercould be deactivatedbychanging its Active statusin the editmode or removedbyclicking the delete icon...

Страница 96: ...tionsimplemented Exclusive Owner RECOMMENDEDto be used Input only Listen only Every connection has an Input Target to Origin Producing assembly Output Origin to Target Consumingassembly pair All assem...

Страница 97: ...INT16 See below 49 HEX Fx 2 INT 16 1 10 N 65 HEX Fy 2 INT 16 1 10 N 81 HEX Fz 2 INT 16 1 10 N 97 HEX Tx 2 INT 16 1 100 Nm 113 HEX Ty 2 INT 16 1 100 Nm 129 HEX Tz 2 INT 16 1 100 Nm 145 Reserved 4 161 O...

Страница 98: ...NT 16 1 100 Nm 145 Reserved 4 161 Right HEX Status 4 UINT32 0 Noerror 193 Right HEX Filter 2 UINT16 See below 225 Right HEX Fx 2 INT 16 1 10 N 241 Right HEX Fy 2 INT 16 1 10 N 257 Right HEX Fz 2 INT 1...

Страница 99: ...17 RG Control 2 UINT16 0 Ignored 1 Move 2 Stop 33 HEX Zero 2 UINT16 0 Ignored 1 Zero 2 Unzero 49 HEX Filter 2 UINT16 0 Ignored 1 Nofiltering 2 500 Hz 3 150 Hz 4 50 Hz 5 15 Hz 6 5 Hz 7 1 5 Hz 65 Left P...

Страница 100: ...in motion 0 whennot The gripper will only acceptnew commandswhen0 0b_____1_ Internal orexternalgripis detected 0b____1__ Safetyswitch1 is pushed 0b___1___ Safetycircuit1 is activated The gripper will...

Страница 101: ...setmeasuredfrommetal 1 10mm 49 Prim RG Store Fingertipoffset 2 UINT16 0 Ignored 1 Store offset 65 Prim RG ResetToolPower 2 UINT16 0 Ignored 1 Reset 81 Reserved 4 97 Sec RG TargetWidth 2 UINT16 1 10 mm...

Страница 102: ...Device connected 2 UINT16 0 Disconnected 16 VG10 is connected 17 VGC10 is connected 1 Prim VG Currentlimit 2 UINT16 mA 17 Prim VG CH A actual vacuum 2 UINT16 1 10 33 Prim VG CH B actual vacuum 2 UINT...

Страница 103: ...annelA 17 Prim VG CH A Target Vacuum 2 UINT16 33 Prim VG CH B Target Vacuum 2 UINT16 49 Prim VG Currentlimit 2 UINT16 mA 65 Reserved 6 81 Sec VG CH A Control 2 UINT16 0 Ignore 1 Grip 2 Idle 3 Release...

Страница 104: ...UINT16 0b___1 Part detected 0b__1_ Padsworn 0b_1__ PadsOUT 0b1___ Busy 17 Prim GeckoLast Error Code 2 UINT16 0 Noerror 33 Prim Actual GeckoPreload Force 2 INT 16 1 100 N 49 Prim Actual GeckoUltrasonic...

Страница 105: ...0 Ignored 1 50N 2 90N 3 120N 17 Prim GeckoResetError Logs 2 UINT16 0 Do notreset keeplogging 1 Resetanddisable logging 33 Reserved 10 49 Sec GeckoPadControl 2 UINT16 0 Ignored 1 PushPadsOUT 2 Pull Pa...

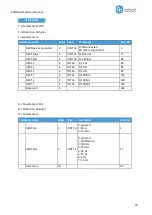
Страница 106: ...Additional Software Options 106 HEX E H QC RG2 6 T Oassemblyid 150 T Odata size 40 bytes T Oparameters...

Страница 107: ...Prim RG Actual Relative Depth 2 INT 16 1 10 mm 225 Prim RG Actual Width 2 INT 16 1 10 mm withfingertipoffset 241 Prim RG Status 2 UINT16 0b______1 1whenin motion 0 whennot The gripper will only accept...

Страница 108: ...15 Hz 6 5 Hz 7 1 5 Hz 17 Reserved 12 33 Prim RG TargetWidth 2 UINT16 1 10 mm correctedwithfingertipoffset 129 Prim RG TargetForce 2 UINT16 1 10 N 145 Prim RG Control 2 UINT16 0 Ignored 1 Start motiont...

Страница 109: ...low 49 HEX Fx 2 INT 16 1 10 N 65 HEX Fy 2 INT 16 1 10 N 81 HEX Fz 2 INT 16 1 10 N 97 HEX Tx 2 INT 16 1 100 Nm 113 HEX Ty 2 INT 16 1 100 Nm 129 HEX Tz 2 INT 16 1 100 Nm 145 Reserved 4 161 Prim VG Devic...

Страница 110: ...0 Ignored 1 Nofiltering 2 500 Hz 3 150 Hz 4 50 Hz 5 15 Hz 6 5 Hz 7 1 5 Hz 17 Reserved 12 33 Prim VG CH A Control 2 UINT16 0 Ignore 1 Grip 2 Idle 3 Release 129 Prim VG CH B Control 2 UINT16 Same as Cha...

Страница 111: ...1 HEX Fz 2 INT 16 1 10 N 97 HEX Tx 2 INT 16 1 100 Nm 113 HEX Ty 2 INT 16 1 100 Nm 129 HEX Tz 2 INT 16 1 100 Nm 145 Reserved 4 161 Prim GeckoDevice connected 2 UINT16 0 Disconnected 48 Geckois connecte...

Страница 112: ...Ignored 1 Nofiltering 2 500 Hz 3 150 Hz 4 50 Hz 5 15 Hz 6 5 Hz 7 1 5 Hz 17 Reserved 12 33 Prim GeckoPadControl 2 UINT16 0 Ignored 1 PushPadsOUT 2 Pull PadsIN 129 Prim GeckoPreloadForce Threshold 2 UI...

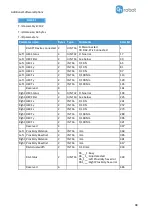
Страница 113: ...Additional Software Options 113 RG2 6 VG10 VGC10 T Oassemblyid 156 T Odata size 64 bytes T Oparameters...

Страница 114: ...s high can onlybe resetbypower cycling the gripper 0b1______ Generalsafetyerror Possible cause the gripper is booted with some safetyswitchpressedor hardware error 65 Reserved 6 81 Sec RG Device conne...

Страница 115: ...Additional Software Options 115 O Tassemblyid 157 O Tdata size 64 bytes O Tparameters...

Страница 116: ...c RG Control 2 UINT16 0 Ignored 1 Start motionto target 2 Stopthe current motion 161 Sec RG CustomFingertipoffset 2 INT 16 Offsetmeasuredfrommetal 1 10mm 177 Sec RG Store Fingertipoffset 2 UINT16 0 Ig...

Страница 117: ...Additional Software Options 117 RG2 6 Gecko T Oassemblyid 158 T Odata size 64 bytes T Oparameters...

Страница 118: ...t move while this flag is high can only be resetbypowercycling the gripper 0b1______ Generalsafetyerror Possible cause the gripper is booted with some safetyswitchpressedor hardware error 65 Reserved...

Страница 119: ...NT16 Same as above 401 Sec GeckoLast Error Code 2 UINT16 0 Noerror 417 Sec Actual GeckoPreload Force 2 INT 16 1 100 N 433 Sec Actual GeckoUltrasonic SensorValue 2 INT 16 1 100 mm 449 Reserved 6 465 O...

Страница 120: ...Control 2 UINT16 0 Ignored 1 Start motionto target 2 Stopthe current motion 161 Sec RG CustomFingertipoffset 2 INT 16 Offsetmeasuredfrommetal 1 10mm 177 Sec RG Store Fingertipoffset 2 UINT16 0 Ignored...

Страница 121: ...al vacuum 2 UINT16 1 10 161 Sec VG CH B actual vacuum 2 UINT16 1 10 177 Reserved 8 193 Prim GeckoDevice connected 2 UINT16 0 Disconnected 48 Geckois connected 257 Prim GeckoStatus 2 UINT16 0b___1 Part...

Страница 122: ...UINT16 Same as ChannelA 145 Sec VG CH A Target Vacuum 2 UINT16 161 Sec VG CH B Target Vacuum 2 UINT16 177 Sec VG Currentlimit 2 UINT16 mA 193 Reserved 6 209 Prim GeckoPadControl 2 UINT16 0 Ignored 1 P...

Страница 123: ...Additional Software Options 123...

Страница 124: ...4 9 Hardware Specification 9 1 Technical sheets Gecko 125 HEX E QC 128 HEX H QC 130 Quick Changer 132 Quick Changer for I O 132 Dual Quick Changer 132 Quick Changer Tool side 132 RG2 FT 134 RG2 139 RG...

Страница 125: ...140 N Detachmenttime 300 msec Holds workpiece onpowerloss yes Pads Change outinterval 150 000 to 200 000 cycles for HIGHpreload 200 000 to 250 000 cycles for LOW preload cycles Manual Cleaning Isopro...

Страница 126: ...rigid and flexible substrates surface finish payloadand the requiredpreloadto pick upsaid substrate Forexample if the customer knows that their part substrate is rigid with a mirror like finish and we...

Страница 127: ...pick up the material the grippercan pick up the material in some cases requirescautionand testingto verify Nothingthe grippercannot pick up this type of material NOTE This table is to be utilized as...

Страница 128: ...nal Capacity N C 200 200 10 6 5 N Nm Single axis deformationatN C typical 1 7 0 067 0 3 0 011 2 5 2 5 5 5 mm inch Single axis overload 500 500 500 500 Signal noise typical 0 035 0 15 0 002 0 001 N Nm...

Страница 129: ...29 The sensorcannot be operatedoutside of the Normal OperatingArea 0 2 5 5 7 5 10 0 50 100 150 200 Txy Nm Fxyz N Txy Fxyz 0 1 625 3 25 4 875 6 5 0 50 100 150 200 Tz Nm Fxyz N Tz Fxyz Normal OperatingA...

Страница 130: ...ominal Capacity N C 200 200 20 13 N Nm Single axis deformationatN C typical 0 6 0 023 0 25 0 009 2 2 3 5 3 5 mm inch Single axis overload 500 400 300 300 Signal noise typical 0 1 0 2 0 006 0 002 N Nm...

Страница 131: ...on 131 The sensorcannot be operatedoutside of the Normal OperatingArea 0 3 25 6 5 9 75 13 0 50 100 150 200 Tz Nm Fxyz Tz Fxyz Normal OperatingArea 0 5 10 15 20 0 50 100 150 200 Txy Nm Fxyz N Txy Fxyz...

Страница 132: ...kg lbs Repeatability 0 02 mm IP Classification 64 Operatinglife Tool change 5 000 cycles Operatinglife Robotoperation 10 Mcycles See loadcapacity graph below Quick Changer Quick Changer for I O Dual Q...

Страница 133: ...emperature compensation 2 General Properties Min Typical Max Units PayloadForce Fit 2 4 4 kg lb PayloadForm Fit 4 8 8 Kg lb Total stroke adjustable 0 0 100 3 93 mm inch Fingerposition resolution 0 1 0...

Страница 134: ...ce type and color Proximitysensor typical accuracy 20 10 0 10 20 30 40 50 60 70 80 90 100 0 10 20 30 40 50 60 70 80 90 100 Proximity sensor reading mm Part distance mm Ideal Response White colour Alum...

Страница 135: ...Hardware Specification 135 RG2 FT GrippingSpeedGraph GripperWorkingRange The dimensionsare in millimeters...

Страница 136: ...Specification 136 Fingertips The standardfingertipscanbe usedformanydifferentworkpieces If customfingertipsare required they can be made to fit the Gripperfingers Dimensionsof the Gripper sfinger inmi...

Страница 137: ...has directional laser sources Direct high temperature Mechanical contacts in any case Expose toany liquid or fine conductive dust NOTE Please clean regularly the proximity sensor surface with low pres...

Страница 138: ...004 mm inch Repetitionaccuracy 0 1 0 004 0 2 0 007 mm inch Reversingbacklash 0 1 0 004 0 3 0 011 mm inch Grippingforce adjustable 3 40 N Grippingforce deviation 25 Grippingspeed 38 127 mm s Grippingt...

Страница 139: ...Hardware Specification 139 RG2 GrippingSpeedGraph RG2 Work Range...

Страница 140: ...ght calculatedfromthe endof the fingertips isdependentonthegrippingwidth w Forvariouswidthvalues the height h limit is given below Fingertips The standardfingertipscanbe usedformanydifferentworkpieces...

Страница 141: ...0 004 mm inch Repetitionaccuracy 0 1 0 004 0 2 0 007 mm inch Reversingbacklash 0 1 0 004 0 3 0 011 mm inch Grippingforce adjustable 25 120 N Grippingforce deviation 25 Grippingspeed 51 160 mm s Grippi...

Страница 142: ...Hardware Specification 142 RG6 GrippingSpeedGraph RG6 Work Range...

Страница 143: ...ight calculatedfromthe endof the fingertips isdependentonthegrippingwidth w Forvariouswidthvalues the height h limit is givenbelow Fingertips The standardfingertipscanbe usedformanydifferentworkpieces...

Страница 144: ...that the arms do not move whenhandling15 kg payloads The VG10 suction cups are groupedinto twoindependentchannels General Properties Minimum Typical Maximum Unit Vacuum 5 0 05 1 5 80 0 810 24 Vacuum...

Страница 145: ...ependsprimarily onthe followingparameters Vacuumcups Vacuum Air flow Vacuum Cups Choosingthe right vacuum cups for yourapplication is essential The VG gripperscome withcommon 15 30 and 40 mm silicone...

Страница 146: ...stcommon non porousmaterialsare listed below Composites Glass High densitycardboard High densitypaper Metals Plastic Porousmaterials with a sealedsurface Varnishedwood In anideal case working withnon...

Страница 147: ...kage airflow isexpected and the more air is movedin a grip resultingin longergripping times When using porous materials the vacuum that can be achieve by using the OnRobot suction cups will dependonth...

Страница 148: ...to consult a vacuum cup specialist to find the optimal vacuumcup where the standardtypesare insufficient Fittingsand Blind Screws It is possible to change suctioncups simply bypulling themoff the fitt...

Страница 149: ...Leakingworkpieces The smallest leak undera vacuumcup can be hard to find see picture below Leakingworkpiecescanbe evenharderto identify Thingsthatlook completelytightmight notbe tight at all A typical...

Страница 150: ...boardbox is sufficientlytightissimply to testit using the VG grippers A high vacuum percentage setting does not give a higher lifting capacity on corrugated cardboard In fact a lower setting is recomm...

Страница 151: ...Vacuum Bar inHg Air flow 0 12 L min Payload With defaultattachments 6 13 2 kg lb With customizedattachments 10 22 15 33 1 kg lb Vacuumcups 1 7 pcs Grippingtime 0 35 s Releasingtime 0 20 s Vacuumpump...

Страница 152: ...B independentlyforvacuum The AdaptorPlate can be placedin differentpositionsbyrotatingit 90 Having as reference the lettersA and B written on the gripper housing the Adaptor Plate can be placed to sep...

Страница 153: ...andtightenthe 4screws with 4 Nmtightentorque NOTE Please note thatthe O Ringinthe AdaptorPlate isnot gluedtherefore it can be pulledout If that happenssimplyput it back in place and the gripper will w...

Страница 154: ...mage below Belowdifferentmountingconfigurationswiththe providedattachmentsare shown CustomizedAdaptor Platesand Push inFittings The design of the VGC10 is meant to facilitate the users to make their o...

Страница 155: ...t requiredremote vacuum In mostcases this size is enoughfor generatingthe neededvacuumfromthe pumpin the gripper The commercial name of the Push in Fittings is Fitting QSM G1 8 4 I R in case some more...

Страница 156: ...ingthe right vacuum cups for yourapplication is essential The VG gripperscome withcommon 15 30 and 40 mm silicone vacuum cups see table below whichare good for hard and flat surfaces but not good for...

Страница 157: ...ble below shows the number of cups and the cup size needed depending on the payload workpiece mass andthe vacuumused Numberof Cups neededfornon porousmaterials dependingonpayload and vacuum NOTE 15mm...

Страница 158: ...ng the OnRobot suction cups will dependonthe materialitself andwillbe betweenthe range statedinthe specifications Someof the most commonnon porousmaterialsare listedbelow Fabrics Foam Foam withopencel...

Страница 159: ...of the sidesand thenpull it out Unused holes can be blinded using a blind screw and each fitting can be changed to a different type to match the desired suction cup The fittings and the blinding scre...

Страница 160: ...Leakingworkpieces The smallest leak undera vacuumcup can be hard to find see picture below Leakingworkpiecescanbe evenharderto identify Thingsthatlook completelytightmight notbe tight at all A typical...

Страница 161: ...boardbox is sufficientlytightissimply to testit using the VG grippers A high vacuum percentage setting does not give a higher lifting capacity on corrugated cardboard In fact a lower setting is recomm...

Страница 162: ...Hardware Specification 162 9 2 Mechanical Drawings 9 2 1 Adapter plate s...

Страница 163: ...Hardware Specification 163 Adapter I...

Страница 164: ...Hardware Specification 164 Adapter J...

Страница 165: ...Hardware Specification 165 9 2 2 Mountings Quick Changer Robot side 166 Quick Changer for I O Robot side 167 Dual Quick Changer 168 HEX E H QC 169...

Страница 166: ...Hardware Specification 166 Quick Changer Robot side Distance from Robotflange interface to OnRobottool All dimensionsare in mm and inches...

Страница 167: ...Hardware Specification 167 Dual Quick Changer Distance from Robotflange interface to OnRobottool All dimensionsare in mm and inches...

Страница 168: ...Hardware Specification 168 HEX E H QC Distance from Robotflange interface to OnRobottool All dimensionsare in mm and inches...

Страница 169: ...Hardware Specification 169 9 2 3 Tools Gecko 170 RG2 FT 171 RG2 172 RG6 173 VG10 174 VGC10 176 Quick Changer Tool side 178...

Страница 170: ...Hardware Specification 170 Gecko All dimensionsare in mm and inches...

Страница 171: ...Hardware Specification 171 RG2 FT All dimensionsare in mm and inches...

Страница 172: ...Hardware Specification 172 RG2 All dimensionsare in mm and inches...

Страница 173: ...Hardware Specification 173 RG6 All dimensionsare in mm and inches...

Страница 174: ...Hardware Specification 174 VG10 All dimensionsare in mm and inches...

Страница 175: ...Hardware Specification 175 All dimensionsare in mm and inches...

Страница 176: ...Hardware Specification 176 VGC10 All dimensionsare in mm and inches...

Страница 177: ...Hardware Specification 177 All dimensionsare in mm and inches...

Страница 178: ...Hardware Specification 178 Quick Changer Tool side All dimensionsare in mm and inches...

Страница 179: ...ight X 0 Y 0 Z 50 cX 0 cY 5 cZ 20 0 35 kg 0 77 lb Gecko Coordinate system TCP mm Centerof Gravity mm Weight X 0 Y 0 Z 187 cX 0 cY 0 cZ 113 2 83 kg 6 10 lb RG2 FT Coordinate system TCP mm Centerof Grav...

Страница 180: ...50 cX 0 cY 0 cZ 90 1 25 kg 2 76 lb Mountedat0 VG10 Coordinate system TCP mm Centerof Gravity mm Weight X 0 Y 0 Z 105 cX 15 cY 0 cZ 54 1 62 kg 3 57 lb With arms foldedback VGC10 Coordinate system TCP m...

Страница 181: ...ctsmaydamage the pad surface and impair function The Gecko Gripper performance is maximized when the pads are clean and dry The pads can collect dust so it is bestto use the GeckoGripperin a clean env...

Страница 182: ...dull backing plate Leverage the pad removaltool against the gripper housingto pry off the usedpad Repeat for all pads Step3 To install new replacement pads align the notch of the pad with the tab in...

Страница 183: ...ed However particles can eventuallygetstuck andbuild upinside the filter loweringthe VG grippers performance A filter service kit is available which include bothnew filtersand tools needed Filter serv...

Страница 184: ...under the warranty must be submitted within two months of the warranty default becoming evident Ownership of devices or components replaced by and returned to OnRobot A S shall vest in OnRobot A S An...

Страница 185: ...Certifications 185 12 Certifications...

Страница 186: ...Certifications 186...

Страница 187: ...Certifications 187...

Страница 188: ...Certifications 188...

Страница 189: ...Certifications 189...

Страница 190: ...Certifications 190...

Страница 191: ...essentialrequirementsof Directive 2006 42 EC relies on the specific robot installation and the final risk assessment Technical documentationis compiledaccording to Directive 2006 42 EC annex VIIpart B...

Страница 192: ...ementsof Directive 2006 42 EC relies on the specific robot installation and the final risk assessment Technical documentationis compiledaccording to Directive 2006 42 EC annex VIIpart B and available...

Страница 193: ...mentsof Directive 2006 42 EC relies on the specific robot installation and the final risk assessment Technical documentationis compiledaccording to Directive 2006 42 EC annex VIIpart B and available i...

Страница 194: ...sof Directive 2006 42 EC relies on the specific robot installation and the final risk assessment Technical documentationis compiledaccording to Directive 2006 42 EC annex VIIpart B and available in el...

Страница 195: ...Directive 2006 42 EC relies on the specific robot installation and the final risk assessment Technical documentationis compiledaccording to Directive 2006 42 EC annex VIIpart B and available in elect...

Страница 196: ...f Directive 2006 42 EC relies on the specific robot installation and the final risk assessment Technical documentationis compiledaccording to Directive 2006 42 EC annex VIIpart B and available in elec...

Страница 197: ...f Directive 2006 42 EC relies on the specific robot installation and the final risk assessment Technical documentationis compiledaccording to Directive 2006 42 EC annex VIIpart B and available in elec...

Страница 198: ...of Directive 2006 42 EC relies on the specific robot installation and the final risk assessment Technical documentationis compiledaccording to Directive 2006 42 EC annex VIIpart B and available in ele...

Отзывы: