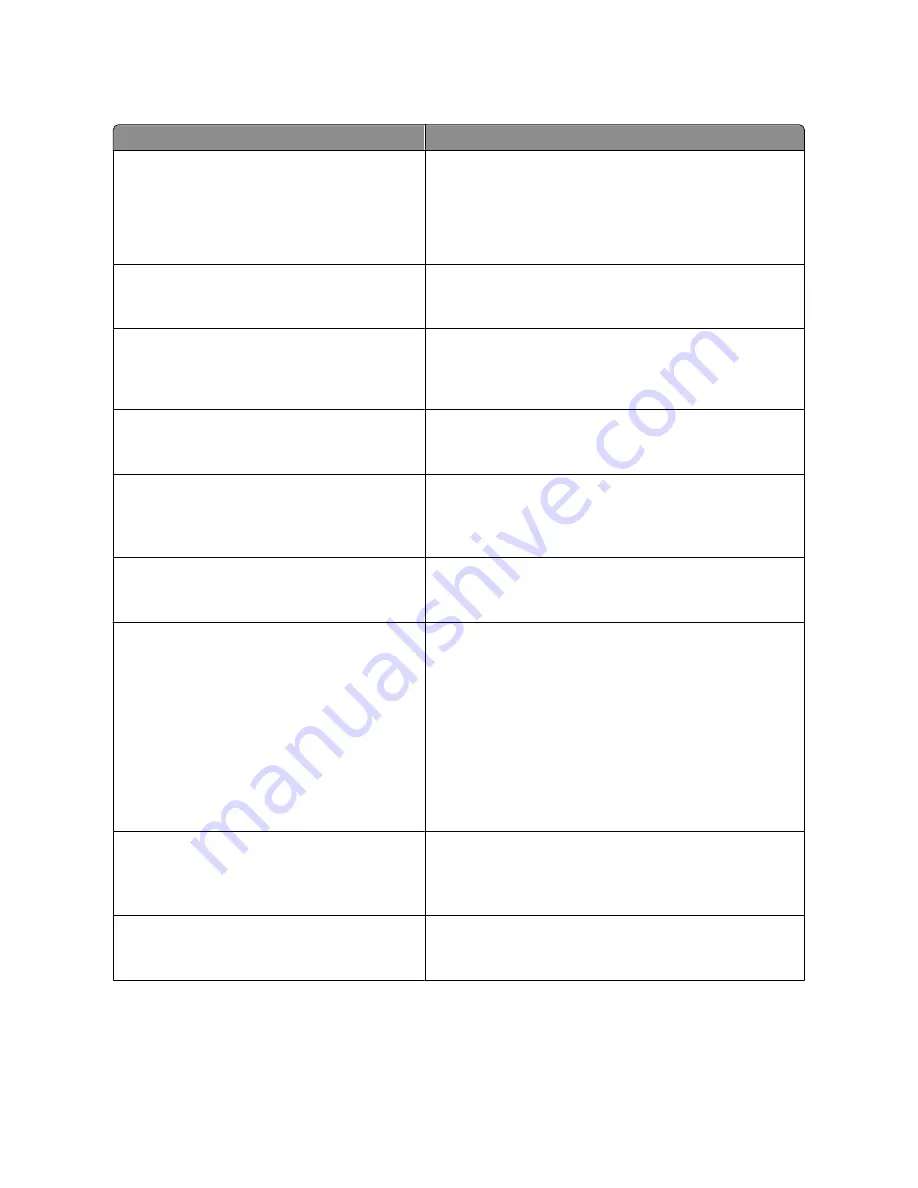
Menu item
Description
Run Initial setup
Yes
No
Instructs the printer to run the setup wizard
Notes:
•
Yes is the factory default setting.
•
After completing the setup wizard by selecting Done at the
Country select screen, the default setting becomes No.
Paper Sizes
U.S.
Metric
Specifies the printer factory default measurements. The default
setting is determined by the country selection in the initial setup
wizard.
Scan to PC Port Range
<port range>
Specifies a valid port range for printers behind a port blocking
firewall. The valid ports are specified by two sets of numbers
separated by a semicolon.
Note:
9751:12000 is the factory default setting.
Default Mode
Copy
Fax
Sets the function the printer enters when Go, Mode, Darkness, or
any number is pressed on the printer control panel
Note:
Copy is the factory default setting
Date Format
MM-DD-YYYY
DD-MM-YYYY
YYYY-MM-DD
Formats the printer date
Note:
MM-DD-YYYY is the US factory default setting and
DD-MM-YYYY is the international factory default setting.
Time Format
12 hour A.M./P.M.
24 hour clock
Formats the printer time
Note:
The factory default setting is 12 hour A.M./P.M.
Alarms
Alarm Control
Cartridge Alarm
Sets an alarm to sound when the printer requires operator
intervention. Available selections for each alarm type are:
Off
Single
Continuous
Notes:
•
Single is the factory default setting for Alarm Control. Single
sounds three quick beeps.
•
Off means no alarm will sound.
•
Continuous repeats three beeps every 10 seconds.
Timeouts
Power Saver
Disabled
1–240
Specifies the number of minutes of inactivity before some systems
begin entering a minimum power state.
Note:
30 minutes is the factory default setting.
Timeouts
Screen Timeout
15–300
Sets the amount of time in seconds the printer waits before
returning the printer display to a
Ready
state
Note:
30 seconds is the factory default setting.
Understanding printer menus
132
Содержание d-Color MF920
Страница 1: ...d Color MF920 d Color MF923 OPERATION GUIDE Code 556701en GB...
Страница 89: ...3 Connect the answering machine or telephone to the adapter Faxing 89...
Страница 115: ...4 Open the scanner cover and then remove any jammed pages 5 Close the scanner cover 6 Press Clearing jams 115...
Страница 174: ...3 Open the top door 4 Remove the right side cover Maintaining the printer 174...
Страница 193: ...13 Insert the developer unit 14 Align and insert the imaging kit Maintaining the printer 193...
Страница 248: ......


