40
1
2
3
4
Italiano
English
Français
MONTAGGIO KIT POMPA BOOSTER
ASSEMBLY OF BOOSTER PUMP KIT
MONTAGE KIT POMPE BOOSTER
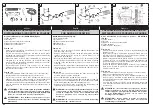
La pompa booster garantisce una portata costante
anche con il tubo di lancio inclinato verso l’alto o verso il
basso (Fig. 1).
Kit per pompa booster cod. 365200273 (OPZIONALE)
(Fig.2):
Pompa booster
1)
Giunto
2)
Raccordo
3)
n.2 tubi L=320 mm – n.1 tubo L=1.380 mm
4)
n.6 fascette
5)
MONTAGGIO
Smontare il tubo che collega il serbatoio liquidi
-
(svitare raccordo G) al rubinetto liquidi (togliere
fascetta H) (Fig.3).
Togliere il cuscino dello zaino (L, Fig.3).
-
Montare il giunto nella sede esagonale della griglia ed
-
inserire quindi la pompa booster (Fig.4). NB: fare
combaciare la sede in basso con incavo della
griglia con quella della pompa (Fig. 4). Fissare la
pompa con le tre viti (A, Fig.5).
Avvitare il raccordo (B, Fig.6) nella sua sede.
-
Collegare i 2 tubi L=320 mm C e D come indicato
-
nella Fig.5-7 con le fascette F.
Collegare il tubo L=1.380 mm E come indicato nella
-
Fig.5-8 con le fascette F.
ATTENZIONE! – Non utilizzare la pompa booster
per distribuire prodotti in polvere. Potrebbe
danneggiarsi gravemente.
The booster pump guarantees a steady rate of fl ow even
with the tube angled upwards or downwards (Fig. 1).
Booster pump kit p/n 365200273 (OPTIONAL) (Fig.2):
Booster pump
1)
Coupling
2)
Fitting
3)
2 hoses L=320 mm – 1 hose L=1380 mm
4)
6 clips
5)
ASSEMBLY
Detach the hose connecting the liquids tank (unscrew
-
fi tting) to the liquids cock (remove clip) (Fig.3).
Remove the backpack cushion.
-
Fit the coupling to the hexagonal socket in the grille
-
and attach the booster pump (Fig.4). Note: match
the slotted profi le in the socket of the grille to that
of the pump (Fig. 4). Secure the pump with the three
screws (A, Fig.5).
Screw the fi tting (B, Fig.6) into its socket.
-
Connect the 2 short hoses (L=320 mm) C and D with
-
the clips F, as indicated in Fig.5-7.
Connect the long hose (L=1380 mm) E with the clips
-
F, as indicated in Fig.5-8.
WARNING! – Do not use the booster pump for
dusting. Serious damage could be caused.
La pompe booster garantit un débit constant même
lorsque le tuyau de diffusion est incliné vers le haut ou
vers le bas (Fig. 1).
Kit pour pompe booster réf. 365200273 (OPTION)
(Fig.2):
Pompe booster
1)
Joint
2)
Raccord
3)
2 tubes L=320 mm – 1 tube L=1 380 mm
4)
6 colliers
5)
MONTAGE
Démonter le tube qui relie le réservoir à liquides
-
(dévisser le raccord) au robinet (ôter le collier) (Fig.3).
Ôter le coussin du sac.
-
Monter le joint dans le siège hexagonal de la grille et
-
installer la pompe booster (Fig.4.) NB : faire
correspondre le siège en bas de la partie concave
de la grille avec celui de la pompe (Fig. 4). Fixer la
pompe à l'aide des trois vis (A, Fig.5).
Visser le raccord (B, Fig.6) dans son logement.
-
Relier les 2 tubes L=320 mm C et D comme le montre
-
la Fig.5-7 avec les colliers F.
Relier le tube L=1 380 mm E comme le montre la
-
Fig.5-8 avec les colliers F.
ATTENTION! – Ne pas utiliser la pompe booster
pour distribuer des produits en poudre. Ceci
pourrait l'endommager sérieusement.


