- 123 -
5. Scan
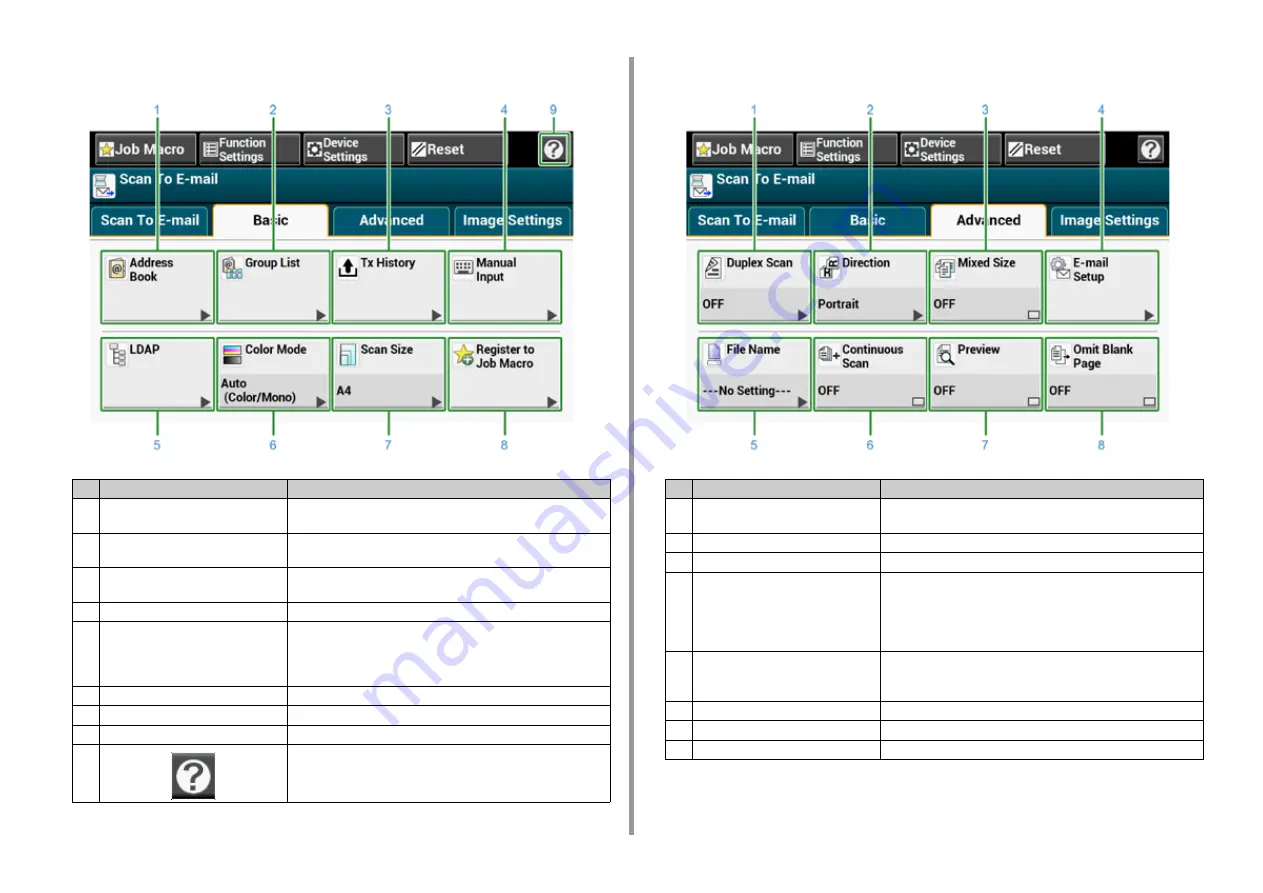
• [Basic] Tab
• [Advanced] Tab
Item
Description
1
Address Book
Displays e-mail addresses registered in the Address Book.
Select an e-mail address as a destination from the Address Book.
2
Group List
Displays a list of groups in which e-mail addresses are registered.
Select a group as a destination from the Group List.
3
Tx History
Displays a transmission history.
Select a destination from the transmission history.
4
Manual Input
Enter an e-mail address manually to use it as a destination.
5
LDAP
Search for an e-mail address from the LDAP server to use it as a
destination.
There are two search methods: Simple Search and Advanced
Search.
6
Color Mode
Specifies color mode to scan a document.
7
Scan Size
Specifies the scan size when scanning a document.
8
Register to Job Macro
Registers current settings to Job Macro.
9
Displays Help topics.
Item
Description
1
Duplex Scan
Specifies duplex scanning.
Set this function when scanning both sides of a document.
2
Direction
Specifies the orientation of images.
3
Mixed Size
Scans documents of different sizes.
4
E-mail Setup
Specifies an e-mail address as a reply destination.
If the recipient replies to the received e-mail, the reply is sent to the
e-mail address specified here.
Specifies the subject of the e-mail.
Specifies the body of the e-mail.
5
File Name
Specifies a file name for the scanned file.
If not specified, the file will be named according to the factory default
setting.
6
Continuous Scan
Scans multiple documents as a single job.
7
Preview
Specifies whether to preview scanned images.
8
Omit Blank Page
Skips blank pages when scanning.
Содержание MC573
Страница 1: ...MC573 ES5473 MFP User s Manual...
Страница 17: ...17 2 Setting Up Side view when the additional tray unit is installed...
Страница 22: ...22 2 Setting Up 13 Hold the handle B to close the scanner unit...
Страница 35: ...35 2 Setting Up 1 Plug the power cord into the power connector 2 Plug the power cord into the outlet...
Страница 41: ...41 2 Setting Up 7 Replace the paper cassette into the machine Push the paper cassette until it stops...
Страница 78: ...78 2 Setting Up 10 Click Complete 11 Click Next If the following dialog box is displayed click Yes...
Страница 107: ...4 Copy Copying Cancelling Copying Specifying the Number of Copies Descriptions of Screens for Copy...
Страница 131: ...131 6 Print 5 Change the settings in each tab to suit your needs 6 Click OK 7 Click Print on the Print screen...
Страница 143: ...143 6 Print Supply Levels Panel Item Description 1 Consumables Displays the remaining amount of consumables...
Страница 145: ...7 Fax Basic Operations of Fax Functions Setting for Receptions Names and Functions of Screen Items for Fax...
Страница 148: ...148 7 Fax A fax that is being sent is displayed on the top of the list 5 Press Yes on a confirmation screen...
Страница 225: ...46472402EE Rev3...


