background image

3-1

Chapter 3

Using the Operator Panel

This chapter explains the following topics:

• Understanding the Operator Panel
• Using the Operator Panel

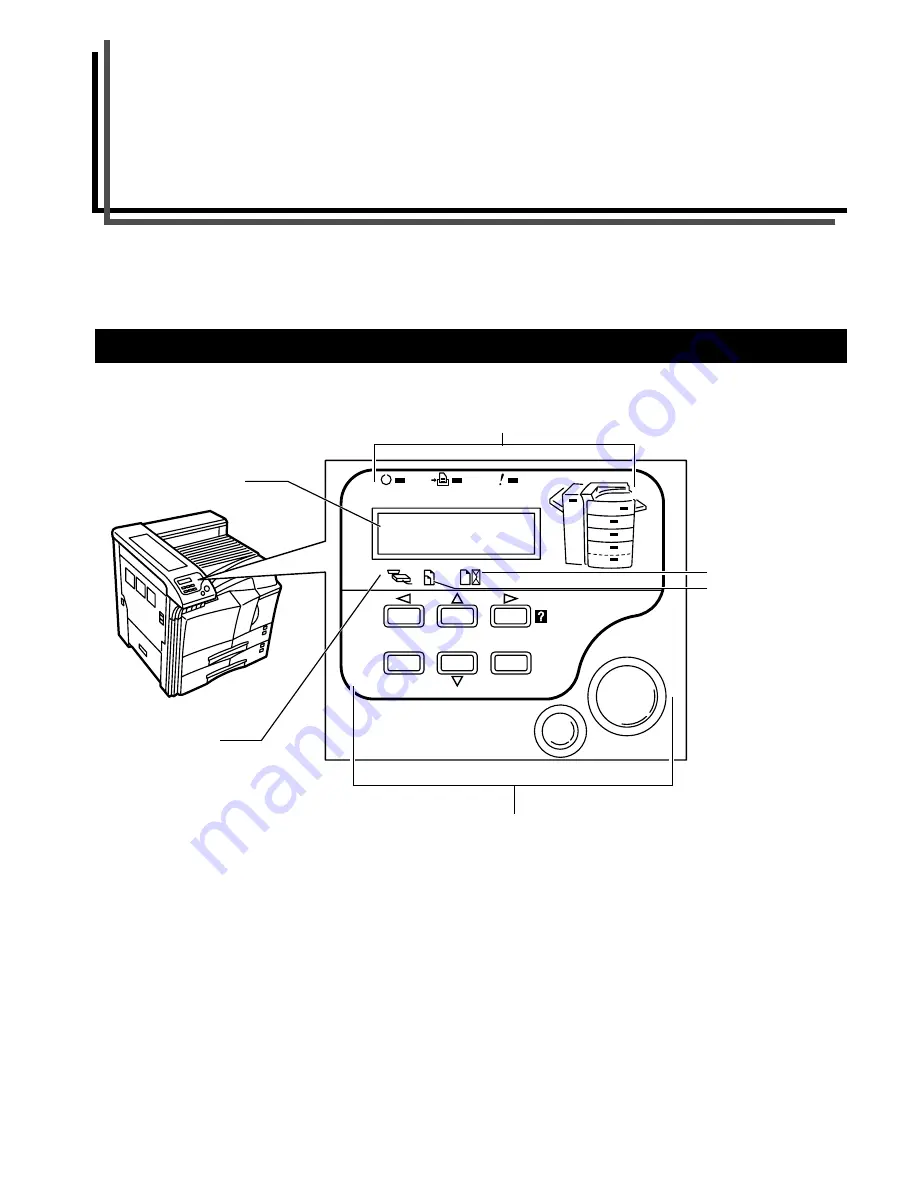
The operator panel has an LCD message display, indicators, and eight keys.

Figure 3-1

1. Understanding the Operator Panel

ENTER

GO

CANCEL

MENU

READY

INTERFACE

SIZE

TYPE

DATA

ATTENTION

Ready
- - -  A4 PLAIN

Message Display
(See

 page 3-2

)

Interface Indicator
(See

 page 3-2

)

Keys (See

 page 3-3

)

Paper Size Indicator
(See

 page 3-3

)

Paper Type Indicator
(See

 page 3-3

)

Operation Indicators (See

 page 3-2

)

Содержание WP36/50

Страница 1: ...1 1 1 Oc WP36 50 Operation Guide Education Services Oc Operation Guide English Version...

Страница 2: ...may be inserted in future edi tions The user is asked to excuse any technical inaccuracies or typographical errors in the present edition No responsibility is assumed if accidents occur while the user...

Страница 3: ...ny in cidental damages or other economic consequential damages even if IBM or its authorized supplier has been advised of the possibility of such damages IBM will not be liable for any dam ages claime...

Страница 4: ...ose and merchantability are excluded 8 Your exclusive remedy and the sole liability of Agfa Japan in connection with the Software and Typefaces is repair or replacement of defective parts upon their r...

Страница 5: ...ing the Default Font 3 24 2 2 7 Using Page Set Menus 3 27 2 2 8 Setting the Print Quality 3 31 2 2 9 Operating an Option Hard Disk 3 32 2 2 10 Operating the RAM Disk 3 35 2 2 11 Operating a Memory Car...

Страница 6: ...cifications B 2 2 2 Interface Signals B 2 4 RS 232C Protocol B 3 3 Serial Interface Option B 3 3 1 RS 232C Interface B 3 4 1 PRESCRIBE FRPO D0 command B 4 5 RS 232C Cable Connection B 4 5 1 Obtain a S...

Страница 7: ...s in ternal fonts Appendix A Option Units This appendix explains how to expand the printer s memory This appendix introduces the available options for use with the printer Appendix B Host Computer In...

Страница 8: ...a paper jam or when replacing toner Label 1 High voltage inside NEVER touch parts in this area because there is a danger of electric shock Label 4 Moving parts inside May cause personal injury Do not...

Страница 9: ...id the following locations when se lecting a site for the printer Avoid locations near a window or with exposure to direct sunlight Avoid locations with vibrations Avoid locations with drastic tempera...

Страница 10: ...If the power cord is damaged there is a danger of fire or electrical shock If the printer will not be used for a short period of time overnight etc turn the power switch OFF O O O O If it will not be...

Страница 11: ...the toner and not to rub your eyes or touch your mouth with the hands stained with the toner And make sure not to stick to your skin For the disposal of old toner container and waste toner box consult...

Страница 12: ...1 1 Chapter 1 Names of Parts A B C D E F 2 3 4 1 0 9 8 7 6 5 H I J L K G Figure 1 1 Figure 1 2...

Страница 13: ...ox Waste toner is collected D Cleaning knob Pull and push back in after toner container replacement or when print images become soiled with toner E Main charger unit When replacing the toner container...

Страница 14: ...paper you use the less risk there will be of paper jams and other problems and the higher the level of quality your printed output will reflect Differences between paper from different suppliers can a...

Страница 15: ...er with a rough or sandy surface can cause voids in the printed output Paper that is too smooth however can cause multiple feeding and fogging problems Fogging is a gray background effect Basis Weight...

Страница 16: ...n the printer should be long grain Other Paper Properties Porosity Refers to the density of the paper structure that is how openly or compactly the fibers are bonded Stiffness Limp paper can buckle in...

Страница 17: ...e carrier sheet also called the linear or backing sheet holds the labels until use Due to the complexity of its composition adhesive backed label paper is particularly likely to give trouble in printi...

Страница 18: ...ications on page 2 1 except whiteness Before purchasing recycled paper test a sample on the print er and check that the print quality is satisfactory The printer is capable of printing under the optim...

Страница 19: ...1 2 Metric specifications Each paper cassette can be set to hold paper of any desired size from A3 to A5R Pull the paper cassette out toward you as far as it will go Do not pull more than one paper ca...

Страница 20: ...tly push the paper cassette back in Before leaving the printer in disuse for a prolonged period of time remove the paper from the paper cassette s and seal it in its original packaging to protect from...

Страница 21: ...MP tray When using the optional printer function envelopes can be set in the MP tray Do not print on envelopes wuth flap adhesive exposed This can cause printer malfunction Open the MP tray Figure 2...

Страница 22: ...has an LCD message display indicators and eight keys Figure 3 1 1 Understanding the Operator Panel ENTER GO CANCEL MENU READY INTERFACE SIZE TYPE DATA ATTENTION Ready A4 PLAIN Message Display See pag...

Страница 23: ...warming up Please wait Lit Indicates when a problem or an error occurs that you can clear by yourself For example paper jam occurs 1Flashing Indicates when no paper is detected Fast Flashing Indicates...

Страница 24: ...e With only the MP tray feeding 1 4 Paper Size Indicator Message Display Paper Size A3 ISO A3 A4 ISO A4 A5 ISO A5 A6 ISO A6 B5 JIS B5 B6 JIS B6 LT Letter LG Legal MO Monarch BU Business B4 B4 LD Ledge...

Страница 25: ...rror Used to select the emulation font character code set to read a memory card and more When pressed during mode selection termi nates the setting and the printer returns to the Ready mode Used to ac...

Страница 26: ...operator panel settings The following is the hierarchy diagram of the menu selection system of the printer The vertical transition is made with the and keys and horizontal transition is made with the...

Страница 27: ...tWare Frame Auto DHCP OFF IP Address 000 000 000 000 Subnet Mask 000 000 000 000 Gateway 000 000 000 000 Parity None Protocol DTR pos XON NetWare On TCP IP On TCP IP Off NetWare Off Ether Talk On Ethe...

Страница 28: ...nly CR Action CR only Emulation EPSON LQ 850 Emulation IBM Printer Emulation Line Printer Print KPDL Errs Off Emulation KPDL AUTO Emulation KPDL Print KPDL Errs Off Alt Emulation PCL 6 KC GL Page Set...

Страница 29: ...Disk Size 0028 MByte read Data Write Data Delete Data List of Partition Read Data Opt ROM List of Partition Read Fonts Read Data Write Data Delete Data Format List of Partition Print Quality Resolutio...

Страница 30: ...just Reset Type Adjust MP Tray Size A4 MP Tray Type Plain Cassette 1 Type Plain MP Tray Mode Cassette MP Tray Mode First Cassette1 Size Feed Select Cassette 1 Stack Selects Top tray FaceDn Duplex Mode...

Страница 31: ...rum Life Counters Others New Toner Installed Sleep Timer 015 min Print HEX DUMP Printer Reset MSG Language English Form Feed Time Out 015sec Sleep Mode On Sleep Mode Off Finishing Error Duplex On Stap...

Страница 32: ...u can find the infor mation you need on the status page Press the MENU key Press the or key repeatedly until Print Status Page appears Press the ENTER key A question mark appears Press the ENTER key a...

Страница 33: ...eviation for enhanced Multiple Printing System which implements the following functions that are available from the printer driver Job Retention Job Storage In either job mode when printing a document...

Страница 34: ...all stored jobs will be deleted Printing Additional Copies using Quick Copy To print additional copies of a job stored in the printer Press the MENU key Press the or key repeatedly until e MPS ap pea...

Страница 35: ...the MENU key Press the or key repeatedly until e MPS ap pears Press the key Press the or key repeatedly until Private Stored appears The name entered in the printer driver Harold in this example also...

Страница 36: ...ter dialog box is reached When the printer is found in the Printer List click highlight it then Finish Double click Model Name on the list The jobs cur rently stored in the printer are shown To print...

Страница 37: ...stored in the mailboxes Press the MENU key Press the or key repeatedly until e MPS ap pears Press the key Press the or key repeatedly until List of VMB appears Press the ENTER key A question mark app...

Страница 38: ...orary code jobs You can change the maximum space from 0 to 9999 megabytes The actual maximum size depends on the size of free hard disk space however The default size is 1 6 of the total hard disk spa...

Страница 39: ...d the message display re turns to Ready Maximum Space Assigned to Virtual Mailboxes VMB This changes the hard disk space for virtual mailboxes You can change the maximum space from 0 to 9999 megabytes...

Страница 40: ...interface card is installed Serial only when an optional serial interface board is installed Press the ENTER key A blinking question mark appears If Parallel is not displayed press the or key repeate...

Страница 41: ...P Enter IP address subnet mask address and default gate way address Determine whether to print a network status page when the printer is turned on To confirm or change network card parameters proceed...

Страница 42: ...etwork administrator Press the ENTER key Press the MENU key The message display returns to Ready Printing a Network Interface Status Page You can print out a status page for the network interface The...

Страница 43: ...Ready Network Status Page Figure 3 8 2 2 5 Changing the Emulation The emulation mode for the current interface can be changed Press the MENU key Press the or key repeatedly until Emulation appears On...

Страница 44: ...l the desired al ternative emulation appears Press the ENTER key Press the MENU key The message display returns to Ready Auto Printing of KPDL Error The printer can be set to print error data during K...

Страница 45: ...s the or key until KC GL Page Set is displayed To change the page size press the ENTER key A blinking question mark appears Press the 3 or 4 key repeatedly until the desired page size A2 A1 A0 B3 B2 B...

Страница 46: ...lected as Regular or Dark For example to change the type of Courier proceed as follows Press the MENU key Press the or key repeatedly until Font ap pears Press the key Check that Internal is displayed...

Страница 47: ...Press the or key repeatedly until Pitch ap pears Press the ENTER key A blinking cursor _ ap pears Press the or key to increase or decrease the val ue of the figure where the cursor is blinking The cha...

Страница 48: ...List of Fonts Figure 3 9 2 2 7 Using Page Set Menus In Page Set menus you can set the number of copies the page orientation and other settings regarding pagination Setting the Number of Copies You ca...

Страница 49: ...play will appear Source size indicator This is the paper size before reduction This must be the same as the paper size set for print data from the computer Target size indicator This is the paper size...

Страница 50: ...t Portrait or Landscape using the or key Press the ENTER key Press the MENU key The message display returns to Ready Page Protect Mode Although Auto is the default setting and this menu does not usu a...

Страница 51: ...Set appears Press the key Press the or key repeatedly until CR Action appears Press the ENTER key A blinking question mark appears Press the or key repeatedly until desired car riage return action app...

Страница 52: ...status page to make the opti mum KIR mode setting Press the MENU key Press the or key repeatedly until Print Quality appears Press the key Press the or key repeatedly until KIR Mode appears Press the...

Страница 53: ...setting is 03 Press the MENU key Press the or key repeatedly until Print Quality appears Press the key Press the or key repeatedly until Print Density appears Press the ENTER key A blinking question...

Страница 54: ...on name also referred to as a partition name which the printer automatically assigns one after another as follows DataH001 first data DataH002 second data DataH003 third data In the example above if t...

Страница 55: ...g appears and the data is deleted from the hard disk The message dis play returns to Ready Printing a List of Data Names The printer prints a list of all data names referred to as par titions stored i...

Страница 56: ...can set 40 MB of RAM disk If you attempt to set the RAM disk size beyond this re striction the printer automatically rounds it down so that the size is always 24 MB less than the total printer memory...

Страница 57: ...which the printer automatically assigns one after another as follows DataH001 first data DataH002 second data DataH003 third data In the example above if the file TEST TXT is the first data to be wri...

Страница 58: ...the data is deleted from the RAM disk The message dis play returns to Ready Printing a List of Data Names The printer prints a list of all data names referred to as par titions stored in a RAM disk fo...

Страница 59: ...ta name Press the or key to display the desired data name Press the ENTER key Processing appears and the reading of data from the memory card starts Writing Data Data can be written to a memory card u...

Страница 60: ...r Messages on page 4 6 If this happens press the GO key The message display returns to Ready Repeat above steps until you have transferred all data files that you want to write to the memory card Each...

Страница 61: ...ored in a memory card for reference Printing a list is also available for a font card To print a list of data names for the memory card proceed as follows Press the MENU key Press the or key repeatedl...

Страница 62: ...e is selected After all paper in the MP tray is printed paper will be fed from the paper source originally selected Press the MENU key Press the or key repeatedly until Paper Handling appears Press th...

Страница 63: ...Handling appears Press the key Press the or key repeatedly until MP Tray Type appears Press the ENTER key A blinking question mark appears Press the or key to display the desired MP tray type The dis...

Страница 64: ...ot select the paper size and unit Press the MENU key Press the or key repeatedly until Paper Handling appears Press the key Press the or key repeatedly until Cassette1 size appears Press the key Unit...

Страница 65: ...lower paper cassette MP tray printer s MP tray Cassette3 Option upper paper feeder Cassette4 Option lower paper feeder When the desired paper source displayed press the ENTER key Press the MENU key Th...

Страница 66: ...tray changes as shown below Top tray FaceDn Finisher FaceUp when document finisher is equipped Finisher FaceDn when document finisher is equipped When the desired paper source displayed press the ENT...

Страница 67: ...from the paper size formatting the jobs Press the MENU key Press the or key repeatedly until Paper Handling appears Press the key Press the or key repeatedly until Override A4 LT appears Press the ENT...

Страница 68: ...s of the default setting for each paper type see Paper Type on page 2 5 Light Normal 1 Normal 2 Normal 3 Heavy 1 Heavy 2 Heavy 3 Extra Heavy When the desired paper thickness displayed press the ENTER...

Страница 69: ...Replace toner Clean Printer was not displayed reset the toner counter as follows so that an accurate toner gauge measurement is indicated on the status page Note that if this operation is performed wh...

Страница 70: ...as follows Press the MENU key Press the or key repeatedly until Others ap pears Press the key Press the or key repeatedly until Form Feed Time Out appears The default setting is 30 seconds Press the E...

Страница 71: ...s the key Press the or key repeatedly until Sleep Timer appears Press the key and display Sleep Mode Press the ENTER key A blinking question mark appears Select Off using the or key Press the ENTER ke...

Страница 72: ...Ready Resource Protection When you switch from the PCL 6 emulation to another all downloaded fonts and macros are lost Resource protection preserves these PCL resources in memory so that they are int...

Страница 73: ...aused by someone on a network where the printer is being shared for example data sent from another person will be printed after a preset amount of time For setting the auto continue recovery time see...

Страница 74: ...ey Press the or key repeatedly until Others ap pears Press the key Press the or key repeatedly until Finishing Error appears Press the key Press the or key repeatedly until Duplex appears Press the EN...

Страница 75: ...R key To exit the menu selection press the MENU key Service Menu The service menu contains maintenance operations to be performed by service personnel The Print Status Page Developer and Drum menus ap...

Страница 76: ...he ENTER key A question mark appears Press the ENTER key The message display indicates Processing and printing starts Figure 3 22 The network interface status page will be printed after the printer se...

Страница 77: ...r Flashing See Indicators on page 4 4 Lit A maintenance message appears in the message display See Maintenance Messages on page 4 4 Print quality is not good See Print Quality Problems on page 4 2 Pap...

Страница 78: ...lacement on page 5 1 Refresh drum See the following procedures in the operator panel and try cleaning the drum surface using the printer s built in cleaning system 1 Press the MENU key and then press...

Страница 79: ...ck the operator panel If the Toner low message is displayed and the ATTENTION indicator is flashing install a new toner kit See Toner Container Replacement on page 5 1 Check the print density Display...

Страница 80: ...er Messages indicating the printer status Ready Please wait Processing Waiting and FormFeed Time Out are displayed alternately These messages will not appear when the number of copies is set to 2 or m...

Страница 81: ...paper type settings menu appears After setting the correct paper type press the ENTER key and printing starts Load MP tray paper size paper type paper size and paper type are displayed flashing altern...

Страница 82: ...omatically resumed after a preset period of time See Auto Continue Setting on page 3 52 Format error Memory card This message appears when the printer is in the ready state and the memory card is not...

Страница 83: ...2 MemoryCard err Press GO This message appears when an error occurs during access to the memory card using the PRESCRIBE RWER command or from the printer s operator panel Look at the error code given...

Страница 84: ...o remove and may be hand to find Be sure to remove them all Online help messages With the online help message function this printer can display the procedure to correct a paper jam on the message disp...

Страница 85: ...per cassette Paper is jammed at the MP tray Remove the jammed paper using the procedure given below Remove the paper jammed at the MP tray Figure 4 3 If the jammed paper remains at the MP tray pull up...

Страница 86: ...jammed pa per from the MP transport tray section Figure 4 9 Open left cover 1 to remove paper jammed in the MP transport tray When removing jammed paper be careful not to touch the printer drum This c...

Страница 87: ...igure 4 16 Push the lever gray colored to raise the duplex unit and remove the jammed paper Figure 4 17 If there is jammed paper in the output section re move it Figure 4 18 Close left cover 1 Figure...

Страница 88: ...4 20 Remove the jammed paper Figure 4 21 Close left cover 2 Paper is jammed at the option document finisher Remove jammed paper referring to the Document Finisher Operation Guide 4 5 Jam in Left Cove...

Страница 89: ...time the number of copies that can be printed will be ap proximately 20 000 Toner Kits to be Used Name TK 70 40 000 pages Contents Toner container Waste toner box Wiper cloth Grid cleaner 2 plastic b...

Страница 90: ...of the arrow ten times or more to loosen and mix the toner inside Figure 5 6 Grasp the handle on the toner container and insert the toner container along the rail of the printer Figure 5 7 When inser...

Страница 91: ...nd then remove the cap from the grid cleaner Figure 5 13 Pull the main charger approximately 5 cm 2 inches out Figure 5 14 While avoiding the main charger roller A to be in contact with the grid clean...

Страница 92: ...ng brush from left to right along with the separator When removing jammed paper be careful not to touch the printer drum This can cause printer malfunction Figure 5 19 Replacing of toner and cleaning...

Страница 93: ...ference on the supplied Kyocera Mita Document Library CD ROM spacing pitch height style stroke weight and typeface family List of Fonts This section contains a full list of the printer s internal font...

Страница 94: ...Chapter 6 Fonts 6 2 PCL Scalable and Bitmap Fonts...

Страница 95: ...Chapter 6 Fonts 6 3 KPDL Fonts 1...

Страница 96: ...Chapter 6 Fonts 6 4 KPDL Fonts 2...

Страница 97: ...ore fonts and define more macros The printer has the following options available For instructions on installing individual options refer to the documentation included with the option Figure A 1 1 Avai...

Страница 98: ...led to the left side of the printer DF 73 Document Finisher Provides finishing with about 1000 sheets at a time Also pro vides staple and off set functions It is installed to the left side of the prin...

Страница 99: ...terface This printer supports the TCP IP IPX SPX Net BEUI and EtherTalk protocols so the network printing under various platforms such as Windows Macintosh UNIX and NetWare is available An option netw...

Страница 100: ...9 Tighten the two screws to secure the hard disk unit to the main circuit board Figure A 10 Insert the memory card into the memory card slot located on the right side of the printer A memory card is...

Страница 101: ...ischarge yourself of static electricity While doing the work it is recommend ed that you wear an antistatic wrist strap Touch the main circuit board and DIMM only at the edges Figure A 12 Remove the m...

Страница 102: ...pull the end clips outwards then pull the DIMM out of the socket Return the main circuit board to the printer by reversing the procedure explained in Removing the Main Circuit Board from the Printer o...

Страница 103: ...faster data transmission between the print er and the host computer Select this mode if printing prob lems occur when the printer is connected to a workstation The pins of the parallel interface conn...

Страница 104: ...ine It goes low when the GO key is pressed to set the printer offline 5 V DC Pin 18 This line is connected to the printer s 5 V DC line 5 V 0 5 V maximum 400 mA Serial and Parallel total fused Error n...

Страница 105: ...RS 232C Interface Voltage Levels The voltage levels of the interface signals conform to EIA RS 232C specifications SPACE is from 3 volts to 15 volts MARK is from 3 volts to 15 volts Voltages between...

Страница 106: ...into a single bundle Using a section of flat wire about 3 mm wide and 15 mm long connect the bundle of shield wires to the metal facing of the connector Check that the solder connections are secure D...

Страница 107: ...ings then click on Control Panel from among the items displayed The Control Panel window opens Double click on System System Properties window opens Click on the Hardware tab then click on the Device...

Страница 108: ...roperties Figure B 4 After setting the properties click the OK button DOS Enter the following commands C MODE COM1 96 N 8 1 P C MODE LPT1 COM1 To test the interface enter the following CTRL P C DIR CT...

Страница 109: ...nds or less from power on sleep mode at 23 C 120 or 230 V Controller PowerPC 750 CXe 400 MHz PowerPC 750 CXe 500 MHz Main memory 32 MB expandable up to 544 MB 64 MB expandable up to 576 MB Operating s...

Страница 110: ...da 220 240 V 50 Hz 60 Hz max 6 1 A European countries Max allowable voltage fluctuation 10 Max allowable frequency fluctuation 2 Power consumption Max 1 400 W During printing 850 W U S A Canada 920 W...

Страница 111: ...ing function It uses software to enhance the printer s resolution and produce high quality printing The default setting is On KM NET VIEWER This is a network management tool that can be used with the...

Страница 112: ...rily and use electronic sorting to reduce print time Simple Network Management Protocol SNMP This is a protocol for the management of networks that use TCP IP Transmission Control Protocol Internet Pr...

Страница 113: ...oof and hold 3 14 Quick copy 3 13 Virtual mailbox 3 16 Emulation 3 22 Glossary 1 Envelopes 2 5 2 8 Error messages 4 6 Expansion memory A 1 Glossary 1 F Font 3 24 6 1 Font list 3 27 6 1 Front cover 1 2...

Страница 114: ...terface 3 19 B 1 Glossary 1 Partition 3 33 3 34 3 36 3 39 3 41 PCL fonts 6 1 Plastic bag 5 1 5 2 Preprinted paper 2 4 2 5 PRESCRIBE 4 3 B 4 Print density 3 32 4 3 Print quality 3 31 4 2 Printer driver...

Страница 115: ......

Отзывы: