Names and Functions of Parts 2-5
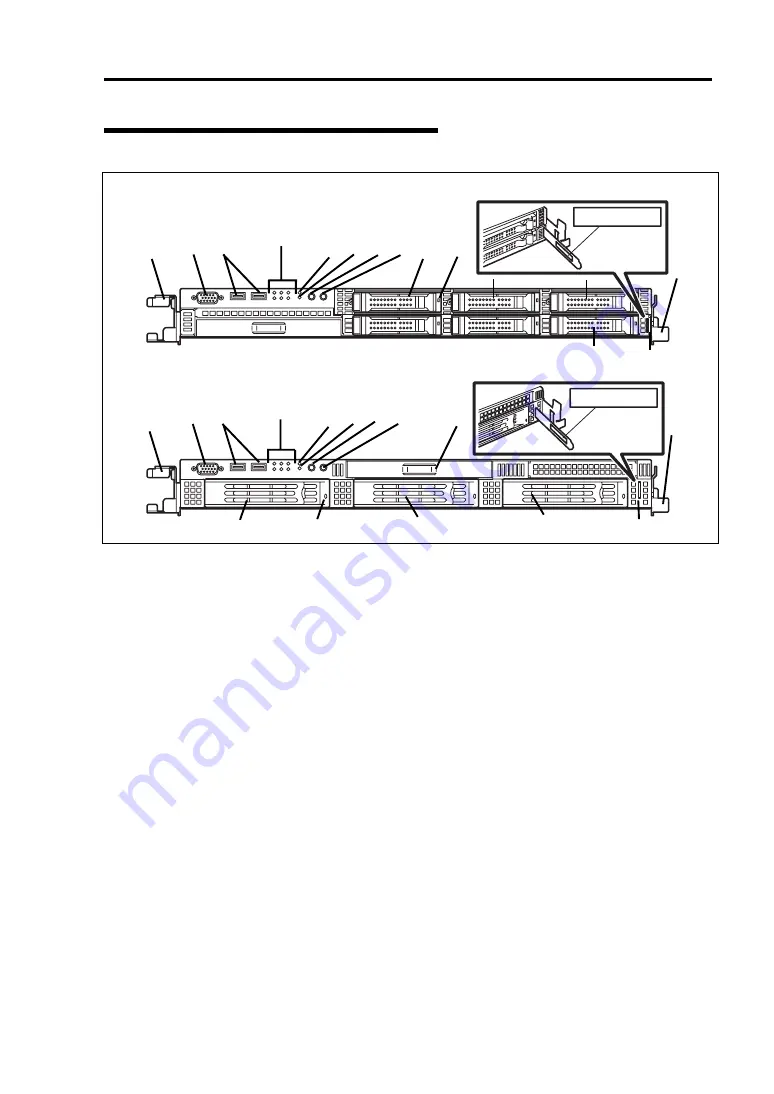
Front View with Front Bezel Removed
Part No.
Serial No.
N8100-9999
9999999
Part No.
Serial No.
N8100-9999
9999999
(1) Handles (1 at the right and left each)
Hold the handles when dismounting/mounting the server from/in the rack.
(2) Monitor
connector
Connect the display unit to this connector. Exclusively used with the one on the rear panel. (See page
3-18.)
(3) USB connectors (2 ports)
Connect device compliant with the USB interface to the connectors. (See page 3-18.)
(4) RESET
switch
Press this switch to reset the server. (See page 8-59.)
(5) DUMP (NMI) switch
Press this switch to dump system memory. (See page 3-22.)
(6) POWER
switch
Press this switch to turn on/off the power. (See page 8-60.)
Pressing the switch once turns on the power, and the POWER LED goes on. Pressing it again turns
off the power. Continuing to press the switch for 4 seconds or more forcibly turns off the power. (See
page 327.)
* This server does not support sleep functions.
(7) UID (Unit ID) switch
Press this switch to turn on/off the UID LEDs on the front and rear panels of the server. Pressing the
switch once turns on the LEDs. Pressing it again turns them off. (See page 2-24.)
(The LED also goes on or flashes when software issues a command.)
(8) Optical disk drive bay
Attach an optional optical disk drive. (See page 2-25.)
One of the following drives will be installed, according to the model or the purchase order.
DVD-ROM drive
DVD Super Multi drive
(9) Hard disk drive bays
See (3) to (7)
on page 2-4.
2.5-inch disk model
3.5-inch disk model
See (3) to (7)
on page 2-4
(11)
(1)
(2)
(3)
(4)
(5) (6) (7) (9)-0 (10)
(9)-2
(9)-4
(1)
(2)
(3)
(4)
(5) (6) (7)
(9)-0
(10)
(9)-1
(9)-2
(8)
(9)-1 (9)-3
(9)-5
(11)
(1)
(1)
Содержание Express5800/R120b-1
Страница 20: ...Notes on Using Your Server 1 3 3 5 inch disk model...
Страница 87: ...3 24 Setting Up Your Server This page is intentionally left blank...
Страница 264: ...6 10 Installing and Using Utilities 4 Click Parameter File Creator Parameter File Creator will appear...
Страница 268: ...6 14 Installing and Using Utilities Windows Server 2003...
Страница 296: ...7 14 Maintenance This page is intentionally left blank...
Страница 350: ...8 54 Troubleshooting When you use a remote console 6 Each tool is selected and it starts...
Страница 438: ...9 82 Upgrading Your Server This page is intentionally left blank...
Страница 450: ...C 2 IRQ This page is intentionally left blank...
Страница 474: ...D 24 Installing Windows Server 2008 R2 4 Activate Windows The Windows activation is complete...
Страница 504: ...E 28 Installing Windows Server 2008 4 Activate Windows The Windows activation is complete...
Страница 564: ......
Страница 566: ...H 2 Using a Client Computer Which Has a CD Drive This page is intentionally left blank...
Страница 576: ...I 10 Accessing Power and Performance Data This page is intentionally left blank...
Страница 580: ...J 4 Product Configuration Record Table This page is intentionally left blank...


