General Description 2-29
Floppy Disk Drive (Option)
If you want to use a floppy disk drive with this server, connect N8160-74USB FDD UNIT, which
are available optionally to a USB connector.
This server supports 3.5-inch 2HD (1.44 MB) and 2DD (720KB) floppy disks.
IMPORTANT:
–
When using a USB floppy disk drive, the access to the floppy disk is delayed on rare occasions
if the display graphic load is high because a moving picture is being played. In such a case,
retry the operation with the floppy disk inside the floppy disk drive.
–
The drive letter of the USB floppy disk may be displayed as B instead of A. This does not affect
the operation of the server. Use B drive for the floppy disk drive.
Insert/Remove Floppy Disk
Before inserting a floppy disk into the drive, make sure that NEC Express5800/ft series is on (the
POWER LED illuminates).
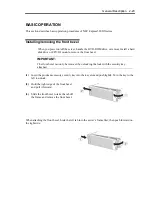
Insert a floppy disk into the drive firmly until it snaps in place. The eject button of the drive is then
raised slightly.
CHECK:
You cannot use 1.2 MB-formatted disks.
If you insert an unformatted disk, you will see a message that the disk cannot be
read or that needs formatting. To format a floppy disk, see your OS manual.
If you power on or restart NEC Express5800/ft series with a floppy disk left in the drive, the
server will access the floppy disk to start the system. Unless a system exits on the FD, the
server will be unable to start.
To remove a floppy disk from the drive, press the eject button.
CHECK:
Before removing a floppy disk, make sure that the floppy disk access LED is off.
If you eject a floppy disk while the LED is on, the stored data could be damaged.
When using a USB floppy disk drive, the access to the floppy disk is delayed on
rare occasions if the display graphic load is high because a moving picture is
being played. In such a case, retry the operation with the floppy disk inside the
floppy disk drive.
Use of Floppy Disk
You may need to store important data on floppy disks. Since the floppy disk is a very delicate
medium, you must handle it with extra care:
Push the floppy disk gently into place.
Содержание EXP320J
Страница 12: ... THIS PAGE IS INTENTIONALLY LEFT BLANK ...
Страница 25: ...xiii APPENDIX A SPECIFICATIONS A 1 APPENDIX B I O PORT ADDRESSES B 1 ...
Страница 26: ...xiv THIS PAGE IS INTENTIONALLY LEFT BLANK ...
Страница 28: ...1 2 Precautions for Use 使用上的注意 本章包含著對服務器恰當安全的操作必要的信息 ...
Страница 54: ...1 28 Precautions for Use This page is intentionally left blank ...
Страница 64: ...2 10 General Description Rear View ...
Страница 68: ...2 14 General Description CPU IO Module CPU IO module ...
Страница 88: ...2 34 General Description This page is intentionally left blank ...
Страница 100: ...3 12 Windows Setup and Operation 3 Confirm that RDR of the disk is cancelled ...
Страница 101: ...Windows Setup and Operation 3 13 4 Cancel the disk of the corresponding slot in the same manner ...
Страница 218: ...4 92 System Configuration This page is intentionally left blank ...
Страница 253: ...Installing and Using Utilities 5 35 DIMM Allows the information of DIMM on the CPU modules to be viewed ...
Страница 390: ...5 172 Installing and Using Utilities This page is intentionally left blank ...
Страница 408: ...6 18 Maintenance 3 Stop of PCI module 1 4 Start of PCI module 1 ...
Страница 410: ...6 20 Maintenance This page is intentionally left blank ...
Страница 454: ...7 44 Troubleshooting This page is intentionally left blank ...
Страница 485: ...System Upgrade 8 31 board must not be mixed with N8804 005 or N8803 035 ...
Страница 500: ......
Страница 503: ......

