NAU ROBOTICS RC40A Скачать руководство пользователя страница 15

RC40 Control manual


12 


2 Introduction of controller 


2.1 Introduction   

NAU-rc4 controller is an independently developed SCARA robot controller. The software 

adopts advanced real-time system and bus control. The whole control system has high real-

time  performance.Robot  programming  language  is  made  through  a  lot  of  application 

experience, making the application more simple. 


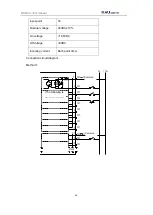
2.2 The name and functions of each part of the controller 


(1) POWER indicator   

The power indicator lights up green when the system is on 

(2) READY indicator 

When the system starts successfully, the ready indicator lights up in yellow 

(3) ERROR indicator 

When an error occurs in the system, the error indicator will be bright red 

(4) External encoder interface: 

Reserve external encoder interface 

(5) COM3 Driver Debugging Port: 

Содержание RC40A

Страница 1: ...ROBOT CONTROLLER OPERATING INSTRUCTION V1 0 RC40A Translated version...

Страница 2: ...Control manual NAU Robotics Co Ltd...

Страница 3: ...story Revision Revision date Revision details V1 0 2020 06 Translated version Contact us NAU Robotics Co Ltd Addr 246 98 Gojan Dong Namdong Gu Incheon South Korea Tel 82 32 719 7040 Fax 82 32 719 7041...

Страница 4: ...oduction of controller 12 2 1 Introduction 12 2 2 The name and functions of each part of the controller 12 2 3 LED indicating lamp 14 2 4 Security related functions 14 3 Controller specification 16 3...

Страница 5: ...EMERGENCY 29 5 4 1Emergency stop switch 30 5 4 2 Emergency stop function confirmation 30 5 4 3 Recovery from emergency shutdown 31 5 4 4 Signal configuration 31 5 4 5 Ciucuit diagram 32 5 5 RS232port...

Страница 6: ...r checking 42 6 3 Control cabinet internal composition diagram 43 6 4 Internal structure of controller 43 6 5 Maintenance Part Replacement Steps 44 6 5 1 Cautions for Part Maintenance 44 6 5 2 Parts M...

Страница 7: ...s 1 Warranty period 2 The content of the warranty 1 the products under warranty are the delivered products 2 during the warranty period of product delivery the company only repairs the faults occurred...

Страница 8: ...of any personal accident with death or serious injury damage accident or accident caused by non compliance with the warnings and precautions listed in this manual the company shall not be liable 3 it...

Страница 9: ...er robot name serial number software name version problems with the system 1 Safety 1 1 About security Please be carried out and set up the manipulator and related machines by the qualified personnel...

Страница 10: ...out Homework One person should be in a position where the emergency stop button can be pressed immediately The other person should be within the range of the robot s movement keeping alert and working...

Страница 11: ...and other behaviors to avoid accidents which may lead to major accidents Emergency generally has the following kinds 1 Low speed action suddenly becomes high speed action 2 Other operators performed...

Страница 12: ...t mistake the connection If the wrong connection is made not only will the robot system not be able to operate normally but security issues may also arise Please note the following when using I O afte...

Страница 13: ...operation is carried out with the power on In order to comply with these principles it is necessary to fully understand and observe the following considerations 1 4 Safety code LH control system desi...

Страница 14: ...ystems Part 1 general design principles EN61000 6 2 Electromagnetic compatibility EMC Part 6 2 general standards immunity tests in industrial environments EN61000 6 4 2007 A1 2011 Electromagnetic comp...

Страница 15: ...de through a lot of application experience making the application more simple 2 2 The name and functions of each part of the controller 1 POWER indicator The power indicator lights up green when the s...

Страница 16: ...inet Grounding 10 Body connector Combined connector for motor power line and encoder line Please connect to the cable that comes with the manipulator 11 Power interface For input 220V power supply 12...

Страница 17: ...mal 1 Emergency stop Emergency stop is the highest priority function in the robot system Pressing the emergency stop button will trigger the emergency stop at which time all other robot control functi...

Страница 18: ...ent feedback position 4 Speed deviation over limit detection Detect the abnormal difference between the speed command issued by the controller and the actual speed 5 AC low voltage detection Detect ab...

Страница 19: ...RC40 Control manual 16 3 Controller specification 3 1 Controller appearance and size 3 1 1 Controller appearance 3 1 2 Controller vertical mounting dimensions...

Страница 20: ...RC40 Control manual 17 Unit mm 3 1 3 Horizontal mounting dimensions of controller...

Страница 21: ...RC40 Control manual 18 3 2 System composition Robot Expand EtherCAT slave station Teach Pendant Emergency stop switch PC External Loading...

Страница 22: ...teach Manual Data Input Teaching Communication interface Ethernet Binary channel RS232 Dual interface optional Encoder acquisition module Single interface IO IO standard 16 input 16 output Expand IO o...

Страница 23: ...nnected on the body directly connected to the controller 4 2 Use environment The robot needs to be used in a relatively stable environment to ensure the service life of the manipulator Please place th...

Страница 24: ...shop please install it in the controller Install place to do dust free processing 2 The controller shall not be placed in a corrosive environment 3 No oil smoke oil mist iron dust in the air 4 The con...

Страница 25: ...e connector on the controller and the cooling of the controller please ensure the space around the controller 2 The controller is a heating device with hot air blowing out of the fan mouth Please do n...

Страница 26: ...on do not place heavy weight on the cable extreme bending forced pull or clamp the cable Otherwise cable damage disconnection or poor contact abnormal system operation or electric shock may occur 3 Th...

Страница 27: ...he plug that meets the safety standard The triangle plug GNT 10 250V BULL Please install the plug by a person with professional knowledge and skills Be sure to connect the ground line of the AC power...

Страница 28: ...s off to avoid safety accidents 5 3 IO connect 1 I O connector is the connector used to connect the user s input and output devices 2 The standard configuration of IO in the controller is PNP type 3 S...

Страница 29: ...24VDC 10 On voltage 16 5VDC Off voltage 8VDC incoming current Each point 3mA Connection circuit diagram Method 1 1 3 4 5 6 7 8 9 18 19 20 DI0 7 2 DI0 DI1 DI2 DI3 DI4 DI5 DI6 DI7 DI8 15 DI8 DI9 0v 24v...

Страница 30: ...RC40 Control manual 27 Method 2 1 3 4 5 6 7 8 9 18 19 20 DI0 7 2 DI0 DI1 DI2 DI3 DI4 DI5 DI6 DI7 DI8 15 DI8 DI9 0v 24v Common The following is the same circuit Common Omit...

Страница 31: ...RC40 Control manual 28 5 3 2 Outgoing circuit Output point 16 nominal voltage 24VDC 10 current output Max 0 5A Connection circuit diagram...

Страница 32: ...41 NC 9 DI7 26 DI15 42 NC 10 DO0 27 DO6 43 DO11 11 DO1 28 DO7 44 DO12 12 DO2 29 DO8 45 DO13 13 DO3 30 DO9 46 DO14 14 DO4 31 DO10 47 DO15 15 DO5 32 DO8 15 24V 48 NC 16 DO0 7 24V 33 DO8 15 0V 49 NC 17 D...

Страница 33: ...CY stop switch to the EMERGENCY connector be sure to confirm the function of the switch as follows before performing the manipulator action to ensure safety 1 Turn on the power and start the controlle...

Страница 34: ...configuration The following table shows the signal configuration for the EMERGENCY connector d sub25 pin Pin NO Signal Function Pin NO Signal Function 1 ESW11 Emergency Stop switch contact 1 14 NC 2 E...

Страница 35: ...nect to the same switch with 2 contacts 2 If the input time of emergency stop SW1 contact and emergency stop SW2 contact is more than 2 seconds different an error will occur Please connect to the same...

Страница 36: ...safety relay typical application 5 5 RS232port Function it is used to communicate with the external equipment It needs an intersecting serial line connection D Sub 9pin NO Desigin function 2 RXD recei...

Страница 37: ...IP address Functions 1 for upper computer software to control the manipulator 2 factory default Settings of Ethernet communication controllers for controllers and other devices Ip address 192 168 5 22...

Страница 38: ...bar project project name communication setting and open the dialog box communication setting as shown below The IP address and port number of the controller should be set in the dialog box The default...

Страница 39: ...onnect with the controller Figure5 6 1 Connecting the Controller Click the drop down list shown in figure 5 6 1 On the toolbar and click On Line to connect the controller When the output view displays...

Страница 40: ...t plug 5 7 1 Connect demonstrator Insert the connector of the display box into the controller Then set the power of the controller to ON When the power supply of the controller is ON insert the connec...

Страница 41: ...ipulator teaching etc 5 8 Operation mode 5 8 1 Operation mode outline There are two modes in the robot system TEACH mode is the mode of approaching the robot and using the TEACH box to TEACH or confir...

Страница 42: ...nning cut to teach mode The program will stop running immediately Teaching mode In the teaching mode can manually teach the movement manipulator or execute to the target point 1 After the teaching mod...

Страница 43: ...and regulations etc The company conducts training for the personnel who have completed the introduction of training and maintenance training 3 When replacing parts be sure to use special maintenance p...

Страница 44: ...hout removal may result in a short circuit and damage to components or equipment 9 When replacing the motor driver module please do not mistake the power number watts If a motor driver module with a m...

Страница 45: ...onths and 12 Months Among them if the operation and power supply time exceeds 250 hours in a month please press additional inspection items of 250 hours 750 hours 1500 hours and 3000 hours 2 inspectio...

Страница 46: ...ual 43 6 3 Control cabinet internal composition diagram 6 4 Internal structure of controller Switching Power Supply FAN Safety controller EtherCAT IO Interface Module Driver Element Adapter Filter Con...

Страница 47: ...is performed with the power supply ON or with the high voltage charging part not fully discharged it may lead to electric shock or serious safety problems 2 When opening the front panel pull out the p...

Страница 48: ...fan dustproof net is ignored the temperature inside the controller will rise which may affect the normal operation of the robot control system Please refer to 6 2 for specific time for cleaning Remov...

Страница 49: ...tallation of fan dustproof net 1 Install the fan dustproof net into the fan dust cover 2 Fix the fan dust cover with 4 screws 3 Turn on the power of the control cabinet and confirm that there is no ab...

Страница 50: ...ews 3 Pull out the fan power connector 4 Pull out the 4 screws on the fan 5 Remove the fan Installation of the fan 1 Fix the new fan with 4 screws and pay attention to the direction of the fan 2 Plug...

Страница 51: ...ws holding the controller 5 Take out the controller and remove the 4 screws of the controller fixing bracket Controller Installation 1 Fix the controller on the bracket with 4 screws 2 Fix the bracket...

Страница 52: ...xing screws on the controller panel 5 Take out the IO module and remove the 6 hexagonal copper stud of the IO module fixing bracket Installation of IO Module 1 Fix the IO module on the bracket with 6...

Страница 53: ...he power cord from the power supply module with a Phillips screwdriver 4 Remove the power supply module from the aluminum rail Installation of the power supply module 1 Install a new power supply modu...

Страница 54: ...the drive module 4 Remove the 4 screws fixed by the drive module 5 Take out the driver module Installation of driver module 1 Install the new drive module into the control cabinet and import the driv...

Страница 55: ...allation of driver module 1 Install all connection cables on the safety controller with a screwdriver 2 Install the safety controller on the guide rail 4 Install the roof 5 Power on the control cabine...

Страница 56: ...nique serial number on the robot body and the control cabinet Please make sure that the serial number corresponds to the robot body The wrong serial number will lead to safety accidents such as produc...

Страница 57: ...sage e0x0005 Wrong path to program main file The path does not exist and the file cannot be read Check to see if the files exist and try to resynchronize the project files e0x0006 There is no robot in...

Страница 58: ...e that the format is correct and then re download the point files to the controller e0x0012 An error occured while unloading the point Internal system error Contact technical support e0x0013 An error...

Страница 59: ...There is no specified file in the controller Resynchronize the file in file synchronization e0x0024 Point cannot be found The point file does not exist Resynchronize the point file in file synchroniz...

Страница 60: ...ully so the motors cannot be powered on Clear the current error state and then try to power on again If the error cannot be cleared restart the controller e0x002B An error occured while executing Powe...

Страница 61: ...er there is any abnormal in the network and whether the network cable connection is stable e0x0035 An error occured while reading system parameters There is no system configuration file in the control...

Страница 62: ...type Check whether the parameters and variables used in the instruction are valid according to the alarm line number and prompt message e0x0051 An error occurred while updating the system The control...

Страница 63: ...dinate system with the correct point to ensure that the three points of X Y O can form a right handed cartesian coordinate system and the Angle of X Y axis is 90 e0x0056 Fail to calibrate tool coordin...

Страница 64: ...system update file is damaged ask the technical support for the correct update file and update again e0x0062 Number of axises mismatch Robot body model set by project is different from the robot mode...

Страница 65: ...per computer or teacher exceeds the length of the cache Avoid writing very long data e0x0080 Tool coordinates do not exist Tool coordinates do not exist Contact technical support e0x0081 The user coor...

Страница 66: ...wrong The speed parameter or IO parameter in the motion instruction input is wrong Check whether IO parameter is wrong in the process check whether the input motion parameter exceeds the limit e0x03E...

Страница 67: ...setting error In the additional axis back zero signal the same input signal is used in the origin signal the positive and negative limit signal which will result error during back to zero Modify the...

Страница 68: ...rtesian motion instructioons use different tool coordinates Teach the target point again to avoid switch tool coordinate between the starting point and the target point e0x0BBB The data hole causes ab...

Страница 69: ...ute the trajectory movement or teaching movement Remove robot from J2 singularity position in teach mode and then run or teach e0x0BCD J2 is close to the singular position The robot is close to the J2...

Страница 70: ...osition unable to execute the trajectory movement or teaching movement Remove robot from wrist singularity position in teach mode and then run or teach e0x0BEB The robot is close to the wrist singular...

Страница 71: ...celeration or deceleration e0x0FA5 J6 speed limit trigged The target velocity of the J6 axis exceeded the maximum speed limit of the J6 joint Lower robot speed acceleration or deceleration e0x0FA6 J7...

Страница 72: ...synchronization signal loss Verify the network connection between the drives and the accuracy of the XML file e0x1005 Motor Foldback The driver s average current exceeds the rated continuous current a...

Страница 73: ...operated Contact technical support e0x1011 STO Fault When the STO signal is not connected when the drive is disabled the failure will disable the drive Check the STO connector of the driver is connect...

Страница 74: ...7 Feedback Communication Error Communication with the feedback device was not properly initialized and this failure will disable the drive Check whether the feedback device is connected correctly Veri...

Страница 75: ...ensor is out of range Restart after power off If the fault still exists contact technical support e0x2381 Motor Phase Disconnection One phase of the motor is not connected Check the phase line connect...

Страница 76: ...need maintenance contact technical support e0x5582 Self test failure Power on self test failure the driver can not operate Contact technical support e0x5583 Parameter memory and validation failed The...

Страница 77: ...feedback signal A B is not connected Check whether all signals of the second encoder are connected well e0x7182 The pulse direction input line is interrupted A pulse direction signal is not connected...

Страница 78: ...of the equivalent encoder output e0x738A Differential hall break Hall sensor disconnection Contact technical support e0x738B Encoder phase failure The target speed of J4 axis exceeded the maximum spe...

Страница 79: ...int Check the connection and gain setting of the rotation e0x8130 CAN communication heartbeat signal lost The driver detects disconnection with the CAN master station and the fault will disable the dr...

Страница 80: ...k whether the input and output of each slave station are connected in reverse and restart the controller after power failure e0x1201 Data frame lost The data frame sent by the system cannot be sent ac...

Страница 81: ...imit J1 axis is currently in the positive soft limit Remove robot from J1 positive limit in teach mode e0x1772 Reach J2 software limit J2 axis is currently in the positive soft limit Remove robot from...

Страница 82: ...negative soft limit Remove robot from J2 negative limit in teach mode e0x1787 Reach J3 software limit J3 axis is currently in the negative soft limit Remove robot from J3 negative limit in teach mode...

Страница 83: ...e robot from J2 positive limit in teach mode e0x17D7 Joint 3 approaches the positive soft limit J3 axis is approching the positive soft limit Remove robot from J3 positive limit in teach mode e0x17D8...

Страница 84: ...he negative soft limit Remove robot from J2 negative limit in teach mode e0x17EB Joint 3 approaches the negative soft limit J3 axis is approching the negative soft limit Remove robot from J3 negative...

Страница 85: ...the forbidden area The end point of the robot entered the set forbidden area Enter the teaching mode to move the robot out of the forbidden area or manually push the robot out of the forbidden area a...

Страница 86: ...e Modify the holding time to a reasonable range value 0 10000 e0x2EE3 The following error of the conveyor tracking is over the limit The following error setting value is beyond the reasonable range Mo...

Страница 87: ...ut gesture changes The posture switch between the starting position and the target position is too large which results in different joint marks between the actual target position and the target positi...

Страница 88: ...t The mechanical wrist joint is about to collide with the base of the robot Change the moving target point or direction to avoid collision e0x9102 The tool center is close to the end of the robot Robo...

Страница 89: ...ta error calibration results appear infinite or empty Adjust the calibration position and re calibrate e0x2250 Driver short circuit Drive output wiring short circuit drive damage Check the drive outpu...

Страница 90: ...position of the motor 2 Repair or replace the drive e0xFF82 Drive internal fault 1 Drive hardware exception 2 Parameter setting is abnormal 1 Replace or repair drivers 2 Check parameter Settings e0xF...

Страница 91: ...eters 2 Wrong connection of motor encoder or damaged encoder 3 Drive damaged 1 Check encoder wiring and encoder 2 repair or replace driver e0xFF2B Encoder internal communication abnormal 1 Encoder wir...

Страница 92: ...ver current U Phase 1 Short circuit of driver U phase output 2 Excessive motor load 3 Poor motor insulation 4 Drive damage 1 Inspection U connection 2 Reduce the motor load 3 Measure the motor insulat...

Страница 93: ...he resistance 3 Increase power module capacity or lower load 4 Repair or replacement drive e0x5112 24V control supply low voltage 24V supply voltage is too low Check the supply voltage e0x6010 Watchdo...

Страница 94: ...damage of the drive 1 check the motor power line connection 2 Replace or repair the motor 3 Replace or repair the drive e0xFF80 Encoder operation failed 1 The encoder connection error 2 The encoder c...

Страница 95: ...encoder connection 2 Check the encoder cables 3 Replace the encoder 4 Check the encoder parameters e0x2320 Drive hardware overcurrent Motor load is too large or control parameters setting is not corre...

Страница 96: ...ulation fault 5 Drive damage 1 Check the drive cooling system confirm the ventilation flow cooling fan running normally Or increase the external cooling measures 2 Keep the environment temperature to...

Страница 97: ...resistance capacity 1 Increase the external cooling measures 2 Prolonged deceleration 3 Replace the more powerful electric braking Resistance e0xFF1C Rectifier power module overheat 1 Drive the coolin...

Страница 98: ...stantaneous overload phaseW 1 Accelerate through large lead to drive the instantaneous flow 2 The robot collided lead to motor over current 3 Motor fault 4 Drive damage 1 The appropriate slows the add...

Страница 99: ...lowing error out of range 1 The encoder connection errors or connector contact undesirable 2 The control parameters are not appropriate 3 The external load is too large or add and subtract speed too l...

Страница 100: ...ommunication cycle is greater than the servo control cycle e0xFF0D EtherCAT process data error 1 Location target value and actual value difference transfinite 2 The speed of the target trajectory over...

Страница 101: ...instruction planning scope e0xFF16 Positive position software limit trigged 1 The position feedback value more than forward soft limit value positioning to complete the threshold 1 If you don t need...

Страница 102: ...ngs and encoder connectio e0xFF2D position following error out of range due to undervoltage 1 The motor load changes too fast change range is too big 2 Drive damage 1 Reduce the motor load rate 2 Repa...

Страница 103: ...dc bus voltage e0xFF35 HIstorical fault record missing warning 1 History fault record abnormal 2 Drive damage 1 Restart the drives or soft reset 2 Repair or replace the drive e0xFF36 Unsupported oper...

Страница 104: ...tor is disconnected If the switch cannot be opened normally check the connection of the cable harness e0xFF8D Motor blocked Robot collision leads to motor block motor failure drive damage Check the in...

Страница 105: ...8312 Safe torque cut off abnormal Safety torque thrust cut circuit fault Contact technical support e0x8311 Motor overload Effective torque thrust is too high Contact technical support e0x2220 Motor st...

Страница 106: ...ase fault One of the phase breaks in the three phase main circuit power supply Contact technical support e0x5114 CPS under voltage Control supply voltage is too low or voltage sag occurs Contact techn...

Страница 107: ...f the maximum speed Contact technical support e0x7122 Speed feedback abnormal The servo motor power line is broken Contact technical support e0x8500 Model following suppression control abnormal The in...

Страница 108: ...t e0x6320 Parameter abnormal The system parameters are beyond the set range and the motor coding is beyond the set range Contact technical support e0x5220 CPU peripheral circuit abnormal The control b...

Страница 109: ...e monkey technician for repair Name Number Switching power module 3110716050010 Driver element 3020118020004 IO module 3070220060001 Control system 2020018050259 Brake resistor 3020918020006 Interface...

Отзывы: