T: +1-613-545-0466 F: +1-613-542-8029 www.mrel.com
27
5.4 Setting Bit Depth
The
Blaster’s Ranger II™ Lt
can record and save 18- 10- or 12-bit data. The advantage of recording higher bit depths is that it gives more
flexibility in post processing the imagery. The disadvantage is that it takes more memory to record or save 10- or 12-bit data.
When saving 10- or 12-bit data (to a mass storage device) in TIFF (RAW) format, the actual
file type is a 16- bit file, so it is substantially larger than an 8-bit mono file. The 10-bit (RAW)
color image, however is not colorized--it is a RAW Bayer image (not “colorized,” which would
make it about 3x as large), so it is about 2/3 the size of the 24-bit color file (8 bits per each
of 3 color channels).
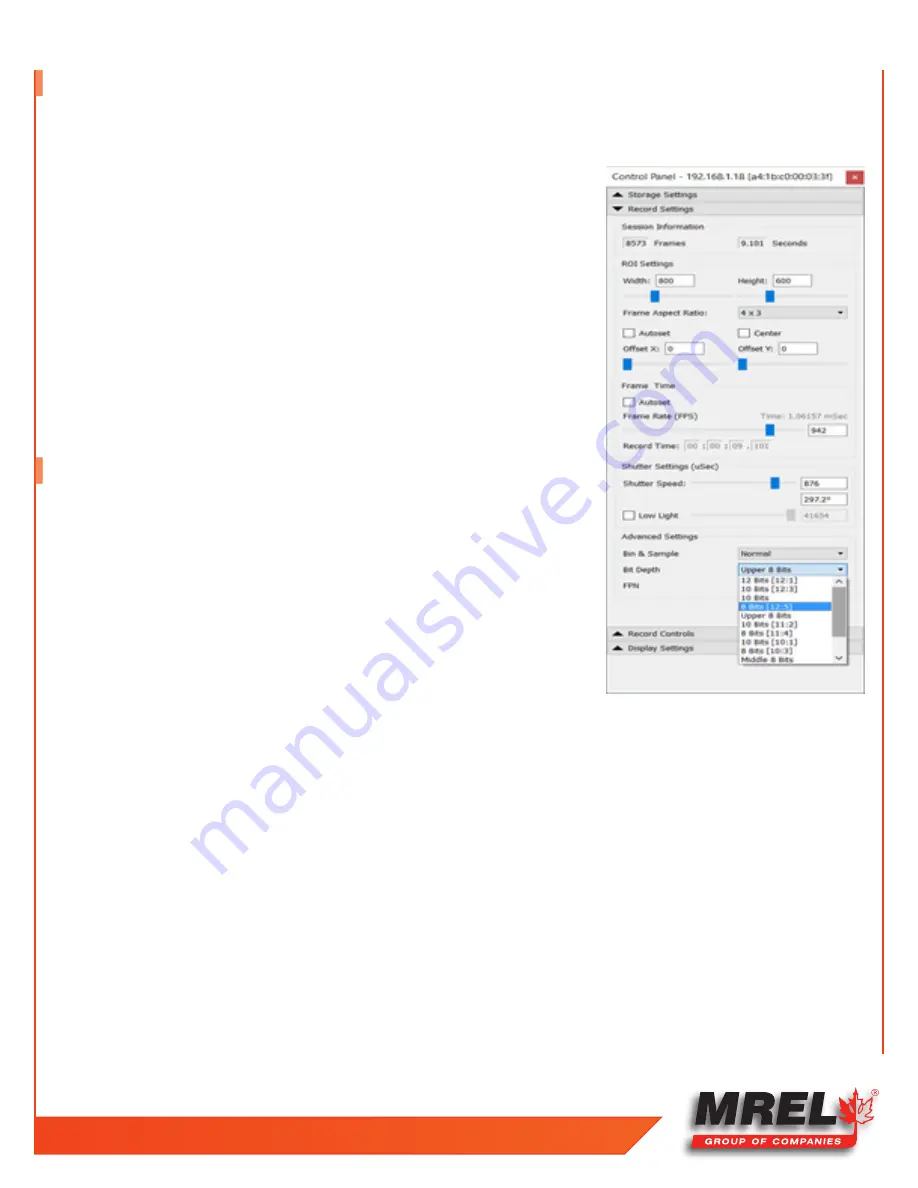
To choose the recording bit depth:
1. Navigate to the Record Menu.
2. Select Bit Depth. There are lots choices, listed on Table below.
3. Select the desired bits. Note that selection of high bits (default) always presents the
cleanest image, while selecting lower bits presents brighter images with added noise.
5.5 Configuring the Trigger
The
Blaster’s Ranger II™ Lt
uses a fixed, selectable circular buffer to record into. The session
length is determined by the user. This section explains how to set the trigger position within
the buffer.
5.5.1 To Set the Trigger Position in the Camera:
1. Open the Record Controls Tab.
2. Select either the “Use Percent” or “Use Frames” radio button. The slider and edit box
represent the session buffer, which is the camera memory you will be recording into. The
trigger position, expressed either in % or frames.
3. Set the position by moving the slider or typing into the edit box or using the spinner buttons.
5.5.2 Enabling the External Trigger
There are times when you wish to activate the trigger electrically, either to sync the trigger with other cameras or signals, or to maintain
greater precision than can be expected through the software trigger in FasMotion.
1. Open the Record Controls Tab.
2. Click on the pull-down in the External Trigger box to expose the choices, which are: Rising, Falling, or Disabled.
3. Choose “Rising” for rising signals or a switch opening and “Falling” for a falling signal or switch closure.
Содержание Blaster's Ranger II Lt
Страница 7: ...T 1 613 545 0466 F 1 613 542 8029 www mrel com 1 Chapter 1 Introduction ...
Страница 10: ...4 Blaster s Ranger II Lt Operations Manual Edition 1 1 Lt ...
Страница 11: ...T 1 613 545 0466 F 1 613 542 8029 www mrel com 5 Chapter 2 Hardware ...
Страница 15: ...T 1 613 545 0466 F 1 613 542 8029 www mrel com 9 Chapter 3 Getting Started ...
Страница 19: ...T 1 613 545 0466 F 1 613 542 8029 www mrel com 13 Chapter 4 FasMotion ...
Страница 29: ...T 1 613 545 0466 F 1 613 542 8029 www mrel com 23 Chapter 5 Recording ...
Страница 47: ...T 1 613 545 0466 F 1 613 542 8029 www mrel com 41 Chapter 6 Using the Web App ...
Страница 55: ...T 1 613 545 0466 F 1 613 542 8029 www mrel com 49 Chapter 7 Field Operations ...
Страница 57: ...T 1 613 545 0466 F 1 613 542 8029 www mrel com 51 ...
Страница 61: ...T 1 613 545 0466 F 1 613 542 8029 www mrel com 55 Chapter 8 ProAnalyst Introductory Edition Software ...
Страница 74: ...68 Blaster s Ranger II Lt Operations Manual Edition 1 1 Lt ...
Страница 75: ...T 1 613 545 0466 F 1 613 542 8029 www mrel com 69 Chapter 9 Contacting MREL for Technical Support ...
Страница 77: ...T 1 613 545 0466 F 1 613 542 8029 www mrel com 71 ...


