18
Blaster’s Ranger II Lt Operations Manual - Edition 1.1
Lt
Note:
Changing the Default Gamma setting does not change the current Gamma of the camera, it sets its reset value. To set the
Gamma of the camera to a new default, navigate to the Display Settings tab and select “Reset Light and Color Settings.”
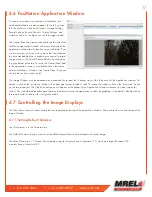
Two screen shots of a high-contrast image to demonstrate the difference in appearance between Gamma 1.0 and 2.2. These images were
displayed on a monitor with a 2.2 Gamma.
The first image, with Gamma set to 1.0, appears very dark on this display. If the lens is opened or the exposure increased, the dark areas
will gain detail, but the brighter areas will saturate.
In the second image, with Gamma set to 2.2 to match the display, the detail in the shadows is evident.
Note:
The opposite would happen if the display had a Gamma of 1.0: the first image would have looked good, while the second
would have appeared washed out.
4.7.2 Display Rate for live images:
The display rate for live images in FasMotion may be adjusted using the spinner at the top of the Image Window. This number will
automatically change according to the performance of the network and the PC.
There is also a pause/play button on the top of the Image Window. This may be used to temporarily start and stop the video stream.
4.7.3 Setting up the HDMI display:
The
Blaster’s Ranger II™ Lt
has an HDMI output that can be used for displaying both live and recorded images. The HDMI port is located
on the side of the camera between the Power and External I/O connectors.
To enable the HDMI output click on the HDMI button on the Display Settings Tab and select the resolution you wish to use.
Note:
The images from the camera will be scaled to fit the HDMI display screen while maintaining aspect ratio. This means that there
may be black borders on the sides or top and bottom of images, depending on aspect ratio and best fit.
4.8 Name the Camera
When the
Blaster’s Ranger II™ Lt
leaves the factory its default name is
Blaster’s Ranger II™ Lt
-xx, “xx” being the camera’s serial number.
The camera name can be used both for identification on a network and as part of the filename when saving images.
It may be beneficial to rename the camera according to its function, locality, field of view, etc. depending on how the camera is to be
deployed.
To change the camera name simply edit the name as it appears in the box above the image window. There are some limitations in the
character set that may be used for the camera name as it must be “legal” both as a filename and network device name. All numbers, and
upper- and lower-case numbers may be used. The only punctuation character that may be used is the “-” (not “_”).
Содержание Blaster's Ranger II Lt
Страница 7: ...T 1 613 545 0466 F 1 613 542 8029 www mrel com 1 Chapter 1 Introduction ...
Страница 10: ...4 Blaster s Ranger II Lt Operations Manual Edition 1 1 Lt ...
Страница 11: ...T 1 613 545 0466 F 1 613 542 8029 www mrel com 5 Chapter 2 Hardware ...
Страница 15: ...T 1 613 545 0466 F 1 613 542 8029 www mrel com 9 Chapter 3 Getting Started ...
Страница 19: ...T 1 613 545 0466 F 1 613 542 8029 www mrel com 13 Chapter 4 FasMotion ...
Страница 29: ...T 1 613 545 0466 F 1 613 542 8029 www mrel com 23 Chapter 5 Recording ...
Страница 47: ...T 1 613 545 0466 F 1 613 542 8029 www mrel com 41 Chapter 6 Using the Web App ...
Страница 55: ...T 1 613 545 0466 F 1 613 542 8029 www mrel com 49 Chapter 7 Field Operations ...
Страница 57: ...T 1 613 545 0466 F 1 613 542 8029 www mrel com 51 ...
Страница 61: ...T 1 613 545 0466 F 1 613 542 8029 www mrel com 55 Chapter 8 ProAnalyst Introductory Edition Software ...
Страница 74: ...68 Blaster s Ranger II Lt Operations Manual Edition 1 1 Lt ...
Страница 75: ...T 1 613 545 0466 F 1 613 542 8029 www mrel com 69 Chapter 9 Contacting MREL for Technical Support ...
Страница 77: ...T 1 613 545 0466 F 1 613 542 8029 www mrel com 71 ...


