Mitsubishi Electric LD77MH Скачать руководство пользователя страница 8


A - 6 


CAUTION

 Transport the product with the correct method according to the mass. 
 Use the servomotor suspension bolts only for the transportation of the servomotor. Do not 

transport the servomotor with machine installed on it.   

 Do not stack products past the limit.   
 When transporting the module or servo amplifier, never hold the connected wires or cables.   
 When transporting the servomotor, never hold the cables, shaft or detector. 
 When transporting the module or servo amplifier, never hold the front case as it may fall off. 
 When transporting, installing or removing the module or servo amplifier, never hold the edges.   
 Install the unit according to the instruction manual in a place where the mass can be withstood. 
 Do not get on or place heavy objects on the product. 
 Always observe the installation direction. 
 Keep the designated clearance between the module or servo amplifier and control panel inner 

surface or the module and servo amplifier, module or servo amplifier and other devices.   

 Do not install or operate modules, servo amplifiers or servomotors that are damaged or that have 

missing parts.   

 Do not block the intake/outtake ports of the servo amplifier and servomotor with cooling fan.   
 Do not allow conductive matter such as screw or cutting chips or combustible matter such as oil 

enter the module, servo amplifier or servomotor.   

 The module, servo amplifier and servomotor are precision machines, so do not drop or apply 

strong impacts on them. 

 Securely fix the module, servo amplifier and servomotor to the machine according to the 

instruction manual. If the fixing is insufficient, these may come off during operation. 

 Always install the servomotor with reduction gears in the designated direction. Failing to do so 

may lead to oil leaks. 

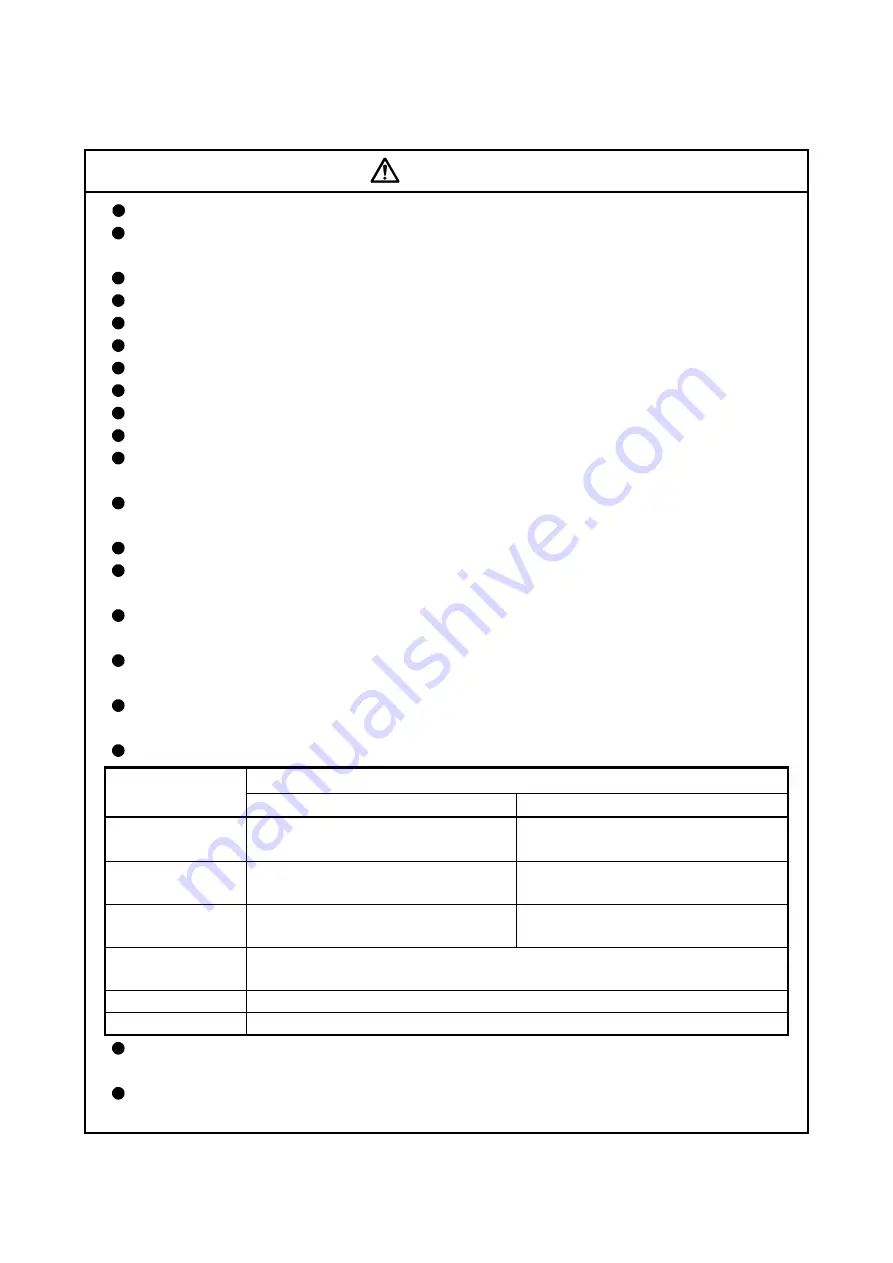
 Store and use the unit in the following environmental conditions. 

Environment 

Conditions 

Module/Servo amplifier 

Servomotor 

Ambient 
temperature 

According to each instruction manual. 

0°C to +40°C (With no freezing) 

(32°F to +104°F) 

Ambient humidity 

According to each instruction manual. 

80% RH or less 

(With no dew condensation) 

Storage 
temperature 

According to each instruction manual. 

-20°C to +65°C 

(-4°F to +149°F) 

Atmosphere 

Indoors (where not subject to direct sunlight). 

No corrosive gases, flammable gases, oil mist or dust must exist 

Altitude 

According to each instruction manual 

Vibration 

According to each instruction manual 

 When coupling with the servomotor shaft end, do not apply impact such as by hitting with a 

hammer. Doing so may lead to detector damage. 

 Do not apply a load larger than the tolerable load onto the servomotor shaft. Doing so may lead 

to shaft breakage. 

Содержание LD77MH

Страница 1: ...MELSEC Q L QD77MS QD77GF LD77MS LD77MH Simple Motion Module User s Manual Synchronous Control QD77MS2 QD77GF4 LD77MS2 LD77MH4 QD77MS4 QD77GF8 LD77MS4 LD77MH16 QD77MS16 QD77GF16 LD77MS16 ...

Страница 2: ......

Страница 3: ...he PLC system safety precautions In this manual the safety instructions are ranked as DANGER and CAUTION DANGER Indicates that incorrect handling may cause hazardous conditions resulting in death or severe injury CAUTION Indicates that incorrect handling may cause hazardous conditions resulting in medium or slight personal injury or physical damage Depending on circumstances procedures indicated b...

Страница 4: ... servomotor Failing to do so may lead to electric shocks or damage Never operate the switches with wet hands as this may lead to electric shocks Do not damage apply excessive stress place heavy things on or sandwich the cables as this may lead to electric shocks Do not touch the module servo amplifier servomotor connector or terminal blocks while the power is ON as this may lead to electric shocks...

Страница 5: ... circuit externally so that the operation can be stopped immediately and the power shut off Use the module servo amplifier servomotor and regenerative resistor with the correct combinations listed in the instruction manual Other combinations may lead to fire or faults Use the CPU module base unit and Simple Motion module with the correct combinations listed in the instruction manual Other combinat...

Страница 6: ... system application The protective functions may not function if the settings are incorrect The regenerative resistor model and capacity parameters must be set to values that conform to the operation mode and servo amplifier The protective functions may not function if the settings are incorrect Set the mechanical brake output and dynamic brake output validity parameters to values that are compati...

Страница 7: ...the external device and CPU module in case of a communication failure For the operating status of each station after a communication failure refer to the MELSEC Q QD77GF Simple Motion Module User s Manual Network Incorrect output or malfunction due to a communication failure may result in an accident Do not write any data to the system area of the buffer memory in the intelligent function module A...

Страница 8: ...w conductive matter such as screw or cutting chips or combustible matter such as oil enter the module servo amplifier or servomotor The module servo amplifier and servomotor are precision machines so do not drop or apply strong impacts on them Securely fix the module servo amplifier and servomotor to the machine according to the instruction manual If the fixing is insufficient these may come off d...

Страница 9: ...ng the programmable controller in an environment of frequent vibrations fix the module with a screw Tighten the screws within the specified torque range Undertightening can cause drop of the screw short circuit or malfunction Overtightening can damage the screw and or module resulting in drop short circuit or malfunction Do not directly touch any conductive parts and electronic components of the m...

Страница 10: ... cables combing off during operation Do not bundle the power line or cables Use applicable solderless terminals and tighten them with the specified torque If any solderless spade terminal is used it may be disconnected when the terminal screw comes loose resulting in failure Do not install the control lines or communication cables together with the main circuit lines or power cables Keep a distanc...

Страница 11: ...o never make them When using the absolute position system function on starting up and when the module or absolute position motor has been replaced always perform a home position return Before starting test operation set the parameter speed limit value to the slowest value and make sure that operation can be stopped immediately by the forced stop etc if a hazardous state occurs Before starting the ...

Страница 12: ...ifier When using the CE Mark compliant equipment design refer to the EMC Installation Guidelines data number IB NA 67339 and refer to the corresponding EMC guideline information for the servo amplifiers and other equipment Note that when the reference axis speed is designated for interpolation operation the speed of the partner axis 2nd axis 3rd axis and 4th axis may be larger than the set speed l...

Страница 13: ...omagnetic brake Shut off with the emergency stop signal EMG Shut off with servo ON signal OFF alarm electromagnetic brake signal If an error occurs remove the cause secure the safety and then resume operation after alarm release The unit may suddenly resume operation after a power failure is restored so do not go near the machine Design the machine so that personal safety can be ensured even if th...

Страница 14: ... screw and or module resulting in drop short circuit or malfunction Perform the daily and periodic inspections according to the instruction manual Perform maintenance and inspection after backing up the program and parameters for the module and servo amplifier Do not place fingers or hands in the clearance when opening or closing any opening Periodically replace consumable parts such as batteries ...

Страница 15: ... the module and base or terminal block more than 50 times IEC61131 2 compliant after the first use of the product Failure to do so may cause malfunction Do not burn or break a module and servo amplifier Doing so may cause a toxic gas 9 About processing of waste When you discard module servo amplifier a battery primary battery and other option articles please follow the law of each country area CAU...

Страница 16: ...se of the PRODUCT in Nuclear Power Plants and any other power plants operated by Power companies and or any other cases in which the public could be affected if any problem or fault occurs in the PRODUCT Railway companies or Public service purposes and or any other cases in which establishment of a special quality assurance system is required by the Purchaser or End User Aircraft or Aerospace Medi...

Страница 17: ... applicability and confirm that it will not cause system control problems Please make sure that the end users read this manual REMARK Unless otherwise specified this manual describes the program examples in which the I O numbers of X Y00 to X Y1F are assigned for a Simple Motion module I O number assignment is required for using the program examples described in the manual For I O number assignmen...

Страница 18: ... model QD77GF4 QD77GF8 Additional function Communication mode switching QD77GF Synchronous encoder via servo amplifier QD77GF Additional correction partial correction SAFETY PRECAUTIONS RELEVANT MANUALS MANUAL PAGE ORGANIZATION TERMS Synchronous encoder via servo amplifier Cam Function Slippage method smoothing Phase compensation of delay time of the input axis WARRANTY Feb 2017 IB NA 0300174 H Ad...

Страница 19: ...t axis 1 14 2 Input Axis Module 2 1 to 2 36 2 1 Servo input axis 2 2 2 1 1 Overview of servo input axis 2 2 2 1 2 Servo input axis parameters 2 4 2 1 3 Servo input axis monitor data 2 8 2 2 Synchronous encoder axis 2 10 2 2 1 Overview of synchronous encoder axis 2 10 2 2 2 Setting method for synchronous encoder 2 13 2 2 3 Synchronous encoder axis parameters 2 21 2 2 4 Synchronous encoder axis cont...

Страница 20: ...mpensation function 4 59 4 9 Output axis sub functions 4 62 5 Synchronous Control Initial Position 5 1 to 5 34 5 1 Synchronous control initial position 5 2 5 2 Synchronous control initial position parameters 5 7 5 3 Cam axis position restoration method 5 11 5 3 1 Cam axis current value per cycle restoration 5 11 5 3 2 Cam reference position restoration 5 17 5 3 3 Cam axis feed current value restor...

Страница 21: ...ngs 6 14 Appendices Appendix 1 to Appendix 18 Appendix 1 Comparisons with the Motion controller SV22 Appendix 2 Appendix 2 Sample program of synchronous control Appendix 6 Appendix 3 Lists of buffer memory addresses for synchronous control Appendix 10 ...

Страница 22: ...ance and Inspection Safety Guidelines This manual is included with the CPU module or base unit The CE mark on the side of the programmable controller indicates compliance with EMC and Low Voltage Directives 2 For the product To make this product comply with EMC and Low Voltage Directives refer to Section 4 3 1 Precautions for wiring of the following MELSEC Q QD77MS Simple Motion Module User s Manu...

Страница 23: ...d Network and specifications procedures before operation system configuration installation wiring settings functions programming and troubleshooting of the MELSEC Q series Simple Motion module MELSEC L LD77MS Simple Motion Module User s Manual Positioning Control IB 0300211 1XB961 Specifications of the LD77MS and information on how to establish a system maintenance and inspection and troubleshooti...

Страница 24: ...NG 13JZ35 Functions devices and programming of the CPU module 3 Programming tool Manual Name Manual number model code Description GX Works2 Version1 Operating Manual Common SH 080779ENG 13JU63 System configuration parameter settings and online operations common to Simple project and Structured project of GX Works2 GX Works2 Version1 Operating Manual Intelligent Function Module SH 080921ENG 13JU69 ...

Страница 25: ...rvo amplifier MR J3W 0303BN6 MR J3W _B servo amplifier SSCNET Interface Direct Drive Servo MR J3 _B RJ080W Instruction Manual SH 030079 1CW601 This manual explains the I O signals parts names parameters start up procedure and others for direct drive servo MR J3 _B RJ080W SSCNET Interface Drive Safety Integrated MR J3 _B Safety Servo Amplifier Instruction Manual SH 030084 This manual explains the I...

Страница 26: ...e communication mode compatible with CiA402 This mode corresponds to the MR J4 _GF_ RJ servo amplifier and others Representation of numerical values used in this manual Buffer memory addresses error codes and warning codes are represented in decimal X Y devices are represented in hexadecimal Setting data and monitor data are represented in decimal or hexadecimal Data ended by H or h is represented...

Страница 27: ...ynchronous encoder axis No such as the following table Synchronous encoder axis No j 1 0 2 1 3 2 4 3 Note 1 Calculate as follows for the buffer memory address corresponding to each axis Example For synchronous encoder axis No 4 34720 20j Pr 320 Synchronous encoder axis type 34720 20 3 34780 ...

Страница 28: ... 1 01B or later GX Developer The product name of the software package for the MELSEC programmable controllers Version 8 89T or later GX Configurator QP The product name of the setting and monitoring tool for the Simple Motion module Version 2 34L or later Intelligent function module A MELSEC Q L series module that has functions other than input or output such as A D converter module and D A conver...

Страница 29: ...all the items are included QD77MS 1 QD77MS2 QD77MS2 RUN ERR AX1 AX2 QD77MS2 AX2 AX1 Before Using the Product QD77MS2 2 QD77MS4 QD77MS4 RUN ERR AX1 AX4 AX2 AX3 QD77MS4 AX2 AX1 AX4 AX3 Before Using the Product QD77MS4 3 QD77MS16 QD77MS16 RUN ERR AX QD77MS16 AX2 AX1 AX4 AX3 Before Using the Product QD77MS16 ...

Страница 30: ...A 28 QD77GF 1 QD77GF4 Before Using the Product QD77GF4 2 QD77GF8 Before Using the Product QD77GF8 3 QD77GF16 QD77GF16 Before Using the Product ...

Страница 31: ...RUN ERR AX 1 2 Before Using the Product LD77MS2 2 LD77MS4 P U L S E R CN1 LD77MS4 RUN ERR AX 1 2 3 4 Before Using the Product LD77MS4 3 LD77MS16 LD77MS16 RUN ERR AX 1 9 10111213141516 2 3 4 5 6 7 8 P U L S E R CN1 LD77MS16 Before Using the Product ...

Страница 32: ...LD77MH 1 LD77MH4 P U L S E R CN1 LD77MH4 RUN ERR AX 1 2 3 4 Before Using the Product LD77MH4 2 LD77MH16 LD77MH16 RUN ERR AX 1 9 10111213141516 2 3 4 5 6 7 8 P U L S E R CN1 Before Using the Product LD77MH16 ...

Страница 33: ...er helps to understand what can be done using the positioning system and which procedure to use for a specific purpose 1 1 Outline of synchronous control 1 2 1 2 Performance specifications 1 6 1 3 Restrictions by the SERIAL No and version 1 9 1 4 Operation method of synchronous control 1 11 1 4 1 Synchronous control execution procedure 1 11 1 4 2 Starting ending for synchronous control 1 12 1 4 3 ...

Страница 34: ...l mode of speed torque control Note 2 Speed change gear can be arranged on one of Main shaft side Auxiliary shaft side or After composite auxiliary shaft gear Note 1 Servo amplifier Servo motor Servo amplifier Servo motor Servo amplifier Servo motor Servo amplifier Servo motor Cam Output axis Composite auxiliary shaft gear Main shaft clutch Composite main shaft gear Auxiliary shaft gear Auxiliary ...

Страница 35: ... 1 Input axis module can be set to one of servo input axis or synchronous encoder axis 2 Speed change gear can be arranged on one of main shaft side auxiliary shaft side or after composite auxiliary shaft gear 3 Set the travel value of input axis module as large as possible to prevent the speed fluctuation of output axis module in the synchronous control If the travel value of input axis module is...

Страница 36: ...is module 4 axis module 8 axis module 16 axis module Main shaft module Main shaft main input axis The input axis on the main side of the main shaft module The reference position on the main shaft 2 4 8 16 1 Section 4 1 Main shaft sub input axis The input axis on the sub side of the main shaft module It is used to compensate for the position of the main shaft main input axis 2 4 8 16 1 Section 4 1 ...

Страница 37: ...uxiliary shaft gear The composite travel value of the main shaft and the auxiliary shaft are transmitted 2 4 8 16 1 Section 4 2 Speed change gear module Speed change gear It is used to change the speed by setting speed change ratio during the operation 2 4 8 16 1 Section 4 4 Output axis module Output axis The cam conversion is processed based on the input travel value and the setting cam data The ...

Страница 38: ...us encoder axis 4 axes module Composite main shaft gear 1 output axis Main shaft main input axis 1 axis output axis Main shaft sub input axis 1 axis output axis Main shaft gear 1 output axis Main shaft clutch 1 output axis Auxiliary shaft 1 axis output axis Auxiliary shaft gear 1 output axis Auxiliary shaft clutch 1 output axis Composite auxiliary shaft gear 1 output axis Speed change gear 1 outpu...

Страница 39: ...ata format Coordinate number 2 to 16384 Coordinate data Input value 0 to 2147483647 Output value 2147483648 to 2147483647 Note 1 The maximum number of cam registration by the cam resolution is shown below In case it created by the same cam resolution 1 Stroke ratio data format 2 Coordinate data format Cam resolution Maximum number of cam registration Coordinate number Maximum number of cam registr...

Страница 40: ...r axis type Incremental synchronous encoder Synchronous encoder via servo amplifier QD77MS LD77MS QD77GF CiA402 mode Synchronous encoder via CPU Control unit mm inch degree PLS Possible to select the decimal places of position unit and speed unit Unit conversion Numerator 2147483648 to 2147483647 Synchronous encoder axis position unit Denominator 1 to 2147483647 PLS Length per cycle setting range ...

Страница 41: ...AL No of the Simple Motion module and the version of GX Works2 The combination of each version and function are shown below 1 QD77MS Function QD77MS2 QD77MS4 QD77MS16 Reference First five digits of SERIAL No Note 1 GX Works2 Synchronous encoder via servo amplifier 15042 or later 1 492N or later Section 2 2 Note 1 The serial number can be checked on the Product Information List screen in GX Works2 ...

Страница 42: ...ater Section 2 2 Synchronous encoder via CPU 12102 or later 1 48A or later 1 48A or later Section 2 2 Synchronous encoder control by high speed input request 12102 or later 1 48A or later 1 48A or later Section 2 2 Output axis smoothing function 12102 or later 1 48A or later 12102 or later 1 48A or later Section 4 5 Cam axis current value per cycle movement function 12102 or later 12102 or later S...

Страница 43: ...rt synchronous control Monitor the synchronous control change Complete synchronous control Monitor using GX Works2 Changing the control by the program in STEP 2 Stop the input axis by the program in STEP 2 Operate the input axis by the program in STEP 2 Operate the input axis Turn ON the target axis bit in Synchronous control start and start synchronous control by the program in STEP 2 Cd 380 Veri...

Страница 44: ...e 4 axis module from axis 1 to 8 is valid in the 8 axis module and from axis 1 to 16 is valid in the 16 axis module Starting method for synchronous control Synchronous control can be started by turning the target axis bit from OFF to ON in Cd 380 Synchronous control start after setting the parameters for synchronous control 5 Analyzing is set in Md 26 Axis operation status at the synchronous contr...

Страница 45: ... are configured for the synchronous control 2 If the input axis operates during the analysis at the synchronous control start the travel value of the input axis is reflected immediately after the synchronous control start The output axis might suddenly accelerate depending on the travel value of the input axis Start the input axis operation after confirming that are configured for synchronous cont...

Страница 46: ... control start is turned from ON to OFF Immediate stop Software stroke limit error occurrence Forced stop Stop group1 to 3 Note 1 Stop with hardware stroke limit or stop command Deceleration stop Note 1 Refer to the User s Manual Positioning control of each Simple Motion module 1 Immediate stop The operation stops without decelerate The Simple Motion module immediately stops the command but the op...

Страница 47: ...Slope of deceleration Pr 8 Speed limit value Deceleration time Sudden stop deceleration time The cam axis current value per cycle is not updated and only the feed current value is updated since the deceleration stop begins Therefore the path of the feed current value is drawn regardless the cam operation with deceleration stop The input axis must be stopped when the output axis is stop synchronizi...

Страница 48: ...1 16 Chapter1 Outline of Synchronous Control MEMO ...

Страница 49: ...d control for the servo amplifier and the synchronous encoder that is used for input axis module 2 1 Servo input axis 2 2 2 1 1 Overview of servo input axis 2 2 2 1 2 Servo input axis parameters 2 4 2 1 3 Servo input axis monitor data 2 8 2 2 Synchronous encoder axis 2 10 2 2 1 Overview of synchronous encoder axis 2 10 2 2 2 Setting method for synchronous encoder 2 13 2 2 3 Synchronous encoder axi...

Страница 50: ... Servo input axis rotation direction restriction Pr 304 Feed current value Real current value Servo command value Feedback value Servo motor position Current value of servo input axis Servo input axis rotation direction restriction amount Md 303 Servo input axis phase compensation amount Md 302 Phase compensation processing Servo input axis type Pr 300 Servo input axis current value Md 300 Servo i...

Страница 51: ...ing value of Pr 300 Servo input axis type Setting value of Pr 1 Unit setting Servo input axis speed unit Range 1 Feed current 2 Real current value 0 mm 10 2 mm min 21474836 48 to 21474836 47 mm min 1 inch 10 3 inch min 2147483 648 to 2147483 647 inch min 2 degree 10 3 degree min Note 1 2147483 648 to 2147483 647 degree min Note 1 3 PLS PLS s 2147483648 to 2147483647 PLS s 3 Servo command value 4 F...

Страница 52: ... advance time Set the time to advance or delay the phase Fetch cycle Operation cycle Set in decimal 2147483648 to 2147483647 μs 0 32802 10n 32803 10n Pr 303 Servo input axis phase compensation time constant Set the time constant to affect the phase compensation Fetch cycle At power supply ON Set in decimal 0 to 65535 ms Note 1 10 32804 10n Pr 304 Servo input axis rotation direction restriction Set...

Страница 53: ...lue based on the encoder feedback pulse from the servo amplifier 1 Feed current value 4 Feedback value Servo amplifier 3 Servo command value 2 Real current value Simple Motion module Pulse Unit conversion Unit Pulse conversion Backlash compensation Pr 301 Servo input axis smoothing time constant Set the averaging time to execute a smoothing process for the input travel value from the servo input a...

Страница 54: ...t longer time to affect the phase compensation amount in Pr 303 Servo input axis phase compensation time constant Pr 303 Servo input axis phase compensation time constant Set the time constant to affect the phase compensation amount for the first order delay 63 of the phase compensation amount are reflected in the time constant setting t Servo input axis current value t t t Servo input axis phase ...

Страница 55: ...opposite direction of the enabled direction accumulates as a rotation direction restricted amount and will be reflected when the input travel value moves in the enabled direction again Therefore the current value of servo input does not deviate when the reverse operation is repeated The rotation direction restricted amount is set to 0 when the following operations are executed for the servo input ...

Страница 56: ...te 1 Servo input axis position units Refer to Section 2 1 1 Note 2 Servo input axis speed units Refer to Section 2 1 1 Md 300 Servo input axis current value The current value for the servo input axis is stored in servo input axis position units Refer to Section 2 1 1 as follows The current value for the servo input axis is the value after processing the smoothing the phase compensation and the rot...

Страница 57: ...rotation direction is restricted for a servo input axis the accumulation for input travel value in the opposite direction of the enabled direction is stored in servo input axis position units Refer to Section 2 1 1 as follows Setting value of Pr 304 Servo input axis rotation direction restriction Storage details 1 Enable only for current value increase direction A negative accumulation is stored d...

Страница 58: ... Pr 328 Synchronous encoder axis smoothing time constant Pr 325 Synchronous encoder axis current value Synchronous encoder axis current value per cycle Synchronous encoder axis speed Md 320 Md 321 Md 322 Unit conversion Counter disable Counter enable Synchronous encoder axis rotation direction restriction amount Md 324 Phase compensation processing Rotation direction restriction Current value of s...

Страница 59: ... scale measurement mode as a synchronous encoder axis Synchronous encoder via CPU Used to operate a gray code encoder that is connected to the input module of PLC CPU as a synchronous encoder axis Control method for synchronous encoder axis The following controls can be executed for the synchronous encoder axis by using Cd 320 Synchronous encoder axis control start and Cd 321 Synchronous encoder a...

Страница 60: ...etting value of Pr 321 Synchronous encoder axis unit setting Synchronous encoder axis speed unit Range Control unit Speed time unit Number of decimal places for speed 0 mm 0 second s 0 mm s 2147483648 to 2147483647 mm s 9 10 9 mm s 2 147483648 to 2 147483647 mm s 1 minute min 0 mm min 2147483648 to 2147483647 mm min 9 10 9 mm min 2 147483648 to 2 147483647 mm min 1 inch 0 second s 0 inch s 2147483...

Страница 61: ...emental synchronous encoder input selection Pr 89 Manual pulse generator Incremental synchronous encoder input type selection POINT The synchronous encoder axis operates completely independently with the manual pulse generator operation The parameter and control data for the manual pulse generator operation except the 3 parameters listed above has not influence on control of synchronous encoder ax...

Страница 62: ...ous encoder in Pr 320 Synchronous encoder axis type for the synchronous encoder axis 2 And set the input method for incremental synchronous encoder signal in the following parameters Pr 22 Input signal logic selection Manual pulse generator input b8 0 Negative logic Pr 24 Manual pulse generator Incremental synchronous encoder input selection 0 A phase B phase multiplied by 4 Pr 89 Manual pulse gen...

Страница 63: ...y the following settings Setting item Setting method Synchronous encoder axis setting Set 101 to 116 Synchronous encoder via servo amplifier Connectable servo amplifier axis 1 to axis 16 Note 1 in Pr 320 Synchronous encoder axis type Setting method of Simple Motion Module Setting Tool Set the synchronous encoder axis parameter according to the setting below Pr 320 Type 101 Synchronous encoder via ...

Страница 64: ...ple Motion Module Setting Tool QD77MS LD77MS When the servo parameter Scale measurement mode selection PA22 is changed it is required to switch the power of servo amplifier off once after the parameter is transferred to the servo amplifier and then switch it on again If the servo amplifier set by the servo parameter Scale measurement mode selection PA22 does not support the Scale measurement mode ...

Страница 65: ... Set 101 Synchronous encoder via servo amplifier servo amplifier axis 3 in Pr 320 Synchronous encoder axis type of synchronous encoder axis 1 Set MR J4 series in Pr 100 Servo series of the axis to connect Q171ENC W8 Set 1 _ _ _ h or 2 _ _ _ h in the servo parameter Scale measurement mode selection PA22 Set ABS or INC from the External synchronous encoder input list of the amplifier setting dialog ...

Страница 66: ...encoder initial communication error 1 or AL 71 Load side encoder normal communication error 1 occurs in the servo amplifier 4 The error Synchronous encoder via servo amplifier invalid error error code 979 occurs in the following cases Other than MR J4 series is set in Pr 100 Servo series of the axis No selected as Synchronous encoder via servo amplifier in Pr 320 Synchronous encoder axis type QD77...

Страница 67: ...ncoder axis current value per cycle are restored based on Cd 325 Input value for synchronous encoder via CPU Therefore connection becomes valid and will be on the counter enabling status The synchronous encoder axis is controlled based on the amount of change of Cd 325 Input value for synchronous encoder via CPU while it is connecting Setting example The following shows an example for setting a sy...

Страница 68: ...with the smoothing function 2 The synchronous encoder current value that is restored for the synchronous encoder connection gets restored into a converted value from the following range based on the synchronous encoder travel value on disconnection Setting value of Pr 329 Resolution of synchronous encoder via CPU Range of restored synchronous encoder current value 1 or more Resolution of synchrono...

Страница 69: ...tor to convert the unit from the encoder pulse of the synchronous encoder axis into the synchronous encoder axis unit Fetch cycle At power supply ON Set in decimal 2147483648 to 2147483647 Synchronous encoder axis position units Note 2 1 34722 20j 34723 20j Pr 323 Synchronous encoder axis unit conversion Denominator Set the denominator to convert the unit from the encoder pulse of the synchronous ...

Страница 70: ... parameter to restrict the input travel value to one direction Fetch cycle At power supply ON Set in decimal 0 Without rotation direction restriction 1 Enable only for current value increase direction 2 Enable only for current value decrease direction 0 34733 20j Pr 329 Resolution of synchronous encoder via CPU Set the resolution of the synchronous encoder when the synchronous encoder axis type is...

Страница 71: ...unit setting Set the position and speed unit of the synchronous encoder axis Refer to Section 2 2 1 for details Pr 322 Synchronous encoder axis unit conversion Numerator Pr 323 Synchronous encoder axis unit conversion Denominator The input travel value of synchronous encoder is configured in encoder pulse units The units can be arbitrarily converted through unit conversation with setting Pr 322 an...

Страница 72: ...it 0 1 degree Speed unit 0 001 degree min Length per cycle 360 0 degree 1 cycle of the rotation table Setting item Setting details Setting value Pr 321 Synchronous encoder axis unit setting Control unit 2 degree 3112h Number of decimal places for position 1 Speed time unit 1 minute min Number of decimal places for speed 3 Pr 322 Synchronous encoder axis unit conversion Numerator 360 0 degree 1 360...

Страница 73: ...oder axis smoothing time constant Pr 326 Synchronous encoder axis phase compensation advance time Set the time to advance or delay the phase input response of the synchronous encoder axis Refer to Section 4 8 Phase compensation function for the peculiar time delay of the system using the synchronous encoder axis 1 to 2147483647 μs Advance the phase input response according to the setting time 0 μs...

Страница 74: ...er axis phase compensation advance time Md 323 Synchronous encoder axis phase compensation amount Pr 327 Synchronous encoder axis phase compensation time constant Pr 327 Synchronous encoder axis phase compensation time constant Current value after phase compensation Current value before phase compensation Synchronous encoder axis current value Speed after phase compensation Speed before phase comp...

Страница 75: ...avel value in the opposite direction of the enabled direction accumulates as a rotation direction restricted amount and it will be reflected when the input travel value moves in the enabled direction again Therefore the current value of synchronous encoder axis does not deviate when the reverse operation is repeated The rotation direction restricted amount is set to 0 at the synchronous encoder ax...

Страница 76: ...processed as the cycle counter within the range from 0 to resolution of synchronous encoder via CPU 1 If 0 or less is set Cd 325 Input value for synchronous encoder via CPU is processed as 32 bit counter within the range from 2147483648 to 2147483647 POINT If 1 or more is set in Pr 329 Resolution of synchronous encoder via CPU set the cycle counter within the range from 0 to resolution of synchron...

Страница 77: ...e synchronous encoder axis the error number and warning number are set to 0 and the error detection and warning detection bits status are turned OFF The Simple Motion module resets the value to 0 automatically after completion of the error reset In the case of the synchronous encoder axis parameter error even if the error is reset the setting valid flag of the synchronous encoder axis status has b...

Страница 78: ...l command valid for the specified servo amplifier axis to start from a high speed input request DI Also set the external command signal to be used in Pr 95 External command signal selection for the 16 axis module Set the control method for the synchronous encoder axis in Cd 321 Synchronous encoder axis control method The Simple Motion module resets the value to 0 automatically after completion of ...

Страница 79: ...ng are continued While these processes are valid the input axis speed may not stop immediately when the counter disable is selected 2 Counter enable Input from the synchronous encoder is valid Cd 322 Synchronous encoder axis current value setting address Set a new current value in synchronous encoder axis position units to apply to the current value change for the synchronous encoder axis Refer to...

Страница 80: ...nput value for synchronous encoder via CPU If set to 0 the synchronous encoder axis is disconnected Cd 325 Input value for synchronous encoder via CPU Use this data when 201 Synchronous encoder via CPU is set in Pr 320 Synchronous encoder axis type Set a value to be used every time as the input value for the synchronous encoder in encoder pulse units If 1 or more is set in Pr 329 Resolution of syn...

Страница 81: ...0j Md 324 Synchronous encoder axis rotation direction restriction amount While the rotation direction is restricted the accumulation for the input travel value in the opposite direction of the enabled direction is stored Refresh cycle Operation cycle Monitoring is carried out in decimal 2147483648 to 2147483647 Synchronous encoder axis position units Note 1 35208 20j 35209 20j Md 325 Synchronous e...

Страница 82: ...ynchronous encoder axis phase compensation amount The phase compensation amount for a synchronous encoder axis is stored in the synchronous encoder axis position units Refer to Section 2 2 1 The phase compensation amount for a synchronous encoder axis is the value after smoothing processing and phase compensation processing Md 324 Synchronous encoder axis rotation direction restriction amount Whil...

Страница 83: ...ng request flag This flag turns ON when a synchronous encoder axis current value change is never executed If the current value setting request flag is ON for the synchronous encoder connection the synchronous encoder axis current value starts counting with 0 This flag turns OFF when a synchronous encoder axis current value change is executed b4 Error detection flag This flag turns ON when an error...

Страница 84: ...2 36 Chapter 2 Input Axis Module MEMO ...

Страница 85: ...ion The functions to operate cam data include Cam data operation function Cam auto generation function and Cam position calculation function Refer to Chapter 4 Synchronous control for setting the output axis Refer to Section 5 5 Cam position calculation function 3 1 Control details for cam function 3 2 3 2 Create cam data 3 10 3 2 1 Memory configuration of cam data 3 10 3 2 2 Cam data operation fu...

Страница 86: ...erted from the input value cam axis current value per cycle by cam data Cam data Two way operation User created cam Cam axis current value per cycle Feed current value Cam conversion processing Feed operation Cam data User created cam Cam axis current value per cycle Feed current value Cam conversion processing t t Cam reference position At 1st cycle Cam reference position At 2nd cycle Cam referen...

Страница 87: ... to the stroke ratio data format Data read written with GX Works2 To re edit the cam data read from the Simple Motion module with GX Works2 read write both of cam data edit data and cam data converted data when reading writing the cam data If only cam data conversion data is read written re edition may not be executed or the information such as units and strokes may be missed The explanation of ea...

Страница 88: ...84 32768 256 Cd 605 Cam resolution coordinate number Cam data starting point Set the cam data point corresponding to Cam axis current value per cycle 0 0 to Cam resolution 1 0 Cd 606 Cam data starting point Stroke ratio data Set the stroke ratio from the 1st to the last point The 0th point setting is not required It is always 0 2147483648 to 2147483647 10 7 Note 1 214 7483648 to 214 7483647 0 Cd 6...

Страница 89: ...2 Setting with GX Works2 is not required 2 Coordinate data format 2 Cd 604 Cam data format Coordinate number Set the number of coordinate points in one cam cycle The coordinates are included at the 0th point 2 to 16384 2 Cd 605 Cam resolution coordinate number Cam data starting point Setting is not required with coordinate data format Cd 606 Cam data starting point Coordinate data Set all coordina...

Страница 90: ... data is created in the stroke ratio data format in the cam open area Therefore the operation specification during the control conforms to the cam using the stroke ratio data format The types of cam patterns for auto generation data format are as follows Auto generation type Features Cam for rotary cutter The cam pattern for a rotary cutter can be created easily CAUTION If the cam data is set inco...

Страница 91: ...ue per cycle 2 Coordinate data format Feed current value Cam reference position Output value corresponding to cam axis current value per cycle When the cam axis current value per cycle is in the middle of the defined cam data Stroke ratio data Coordinate data the middle value is calculated from the nearest cam data Cam data Cam axis current value per cycle Calculate the middle value from the neare...

Страница 92: ...erence position At 2nd cycle Cam reference position At 3rd cycle Stroke ratio data format Cam stroke amount Stroke ratio at last point Coordinate data format The output value corresponding to Input value Cam axis length per cycle The output value corresponding to Input value 0 Create cam data for two way cam operation as shown below 1 Stroke ratio data format Create cam data so that the stroke rat...

Страница 93: ...t value Cam reference position At 1st cycle At last point At 0th point Cam data starting point Cam reference position At 3rd cycle Cam reference position At 2nd cycle Timing of applying cam control data 1 Stroke ratio data format If Pr 440 Cam No or Pr 441 Cam stroke amount is changed during synchronous control the new value is accepted and applied when the cam axis current value per cycle passes ...

Страница 94: ... following operations Power supply turn ON Write to the cam storage area PLC READY signal Y0 OFF to ON When specifying the cam open area with the cam data operation function When executing the cam auto generation function Data is lost when turning the power supply OFF The cam data that is used in cam control is stored Previously written cam data can be used after turning the power supply OFF by wr...

Страница 95: ... 2 Note 2 Cd 608 Cam auto generation request Cd 600 Cam data operation request 3 Write Simple Motion module Stroke ratio data Rotary cutter Cd 608 Cam auto generation request Cd 600 Cam data operation request 3 Write Cd 600 Cam data operation request 2 Write Cd 600 Cam data operation request 2 Write Note 1 The operation from the engineering tool is executed toward cam storage area Note 2 Writing t...

Страница 96: ...mber 8 bytes Coordinate number 8 bytes Create in cam open area with cam data operation function Stroke ratio data format 0 byte Cam resolution 4 bytes Coordinate data format Coordinate number 8 bytes Create with cam auto generation For a rotary cutter 28 bytes Cam resolution 4 bytes When writing with the cam data operation function or when the cam auto generation function is executed the writing a...

Страница 97: ...am data Fetch cycle At requesting cam data operation Set in decimal Stroke ratio data format 1 to cam resolution Coordinate data format 0 to Coordinate number 1 0 45002 Cd 603 Number of cam data operation points Set the number of operating cam data points Fetch cycle At requesting cam data operation Set in decimal Stroke ratio data format 1 to 4096 Coordinate data format 1 to 2048 0 45003 Cd 604 C...

Страница 98: ...axis position units Refer to Section 4 5 1 Cd 600 Cam data operation request Set the following commands to write read cam data 1 Read Cam open area The cam is read from the cam open area and stored to the buffer memory 2 Write Cam storage area The cam data is written to the cam storage area and the cam open area from the buffer memory 3 Write Cam open area The cam data is written to the cam open a...

Страница 99: ...the first position to the last coordinate is read in the buffer memory Writing The warning Outside number of cam data operation points range warning code 813 occurs and writing is not executed Cd 604 Cam data format Set one of the following cam data formats 1 Stroke ratio data format 2 Coordinate data format Cd 605 Cam resolution coordinate number Set load the cam resolution the coordinate number ...

Страница 100: ...e data format Buffer memory address Item Setting value 45008 45009 At first point Input value 0 to 2147483647 Cam axis cycle unit 45010 45011 Output value 2147483648 to 2147483647 Output axis position unit 45012 45013 At second point Input value 0 to 2147483647 Cam axis cycle unit 45014 45015 Output value 2147483648 to 2147483647 Output axis position unit to to to 53196 53197 At 2048th point Input...

Страница 101: ...No Set the cam No to be generated automatically Fetch cycle At requesting cam auto generation Set in decimal 1 to 256 0 53201 Cd 610 Cam auto generation type Set the type of cam auto generation Fetch cycle At requesting cam auto generation Set in decimal 1 Cam for rotary cutter 0 53202 Cd 611 Cam auto generation data Set the parameters for each type of cam auto generation Fetch cycle At requesting...

Страница 102: ...47 Optional Same unit 0 1mm etc Set the sheet length Set this value in the cam axis length per cycle 53208 53209 Sheet synchronization width 1 to 2147483647 Optional Same unit 0 1mm etc Set the sheet length of the synchronous section 53210 53211 Synchronous axis length 1 to 2147483647 Optional Same unit 0 1mm etc Set the cycle length of the rotary cutter shaft 53212 53213 Synchronization starting ...

Страница 103: ...xis current value per cycle Sheet length Feed sheet Synchronous section acceleration ratio Cam stroke ratio Cam data by auto generation 100 Cam axis Synchronous axis speed Synchronous speed Feed sheet speed Synchronous axis cycle length Sheet length Sheet synchronization width Synchronization starting point When 0 it is as fast as synchronous speed ...

Страница 104: ...3 20 Chapter 3 Cam Function MEMO ...

Страница 105: ... 14 4 2 2 Auxiliary shaft parameters 4 15 4 2 3 Auxiliary shaft clutch parameters 4 17 4 2 4 Auxiliary shaft clutch control data 4 25 4 3 Clutch 4 26 4 3 1 Overview of clutch 4 26 4 3 2 Control method for clutch 4 26 4 3 3 Smoothing method for clutch 4 33 4 3 4 Use example of clutch 4 38 4 4 Speed change gear module 4 39 4 4 1 Overview of speed change gear module 4 39 4 4 2 Speed change gear param...

Страница 106: ...irection for the machine system etc Refer to Section 4 1 2 and Section 4 1 3 for details on setting for the main shaft module Pr 403 Main shaft gear Numerator Pr 404 Main shaft gear Denominator Pr 402 Composite main shaft gear Pr 401 Sub input axis No Main shaft sub input axis Md 400 Current value after composite main shaft gear Main shaft main input axis Composite main shaft gear Main shaft gear ...

Страница 107: ...ft gear Denominator Set the denominator for the main shaft gear Fetch cycle At start of synchronous control Set in decimal 1 to 2147483647 1 36406 200n 36407 200n n Axis No 1 Note 1 The range from axis 1 to 2 is valid in the 2 axis module from axis 1 to 4 is valid in the 4 axis module from axis 1 to 8 is valid in the 8 axis module and from axis 1 to 16 is valid in the 16 axis module Pr 400 Main in...

Страница 108: ...n and the sub input axes Pr 403 Main shaft gear Numerator Pr 404 Main shaft gear Denominator Set the numerator and the denominator for the main shaft gear to convert the input value The input value is converted as follows Input value after conversion Input value before conversion Pr 403 Main shaft gear Numerator Pr 404 Main shaft gear Denominator The input value direction can be reversed by settin...

Страница 109: ... Main shaft clutch ON address Set the clutch ON address for address mode This setting is invalid except during address mode If the address is out of the range from 0 to Cam axis length per cycle 1 the address is converted to a value within range Fetch cycle Operation cycle Set in decimal 2147483648 to 2147483647 Main input axis position units Note 2 or cam axis cycle units Note 3 0 36410 200n 3641...

Страница 110: ...n 36417 200n Pr 411 Main shaft clutch smoothing method Set the clutch smoothing method Fetch cycle At start of synchronous control Set in decimal 0 Direct 1 Time constant method Exponent 2 Time constant method Linear 3 Slippage method Exponent 4 Slippage method Linear 0 36418 200n Pr 412 Main shaft clutch smoothing time constant For smoothing with a time constant method set the smoothing time cons...

Страница 111: ...n Cd 400 Main shaft clutch command passes the leading edge from OFF to ON 3 Clutch command trailing edge The clutch is turned ON when Cd 400 Main shaft clutch command passes the trailing edge from ON to OFF 4 Address mode The clutch is turned ON when the reference address the current value after composite main shaft gear or the current value per cycle after main shaft gear reaches Pr 407 Main shaf...

Страница 112: ...ge from ON to OFF 4 Address mode The clutch is turned OFF when the reference address the current value after composite main shaft gear or the current value per cycle after main shaft gear reaches Pr 409 Main shaft clutch OFF address The travel value before passing through the OFF address is calculated as the output travel value of the clutch based on the reference address passing through thereby c...

Страница 113: ...tput after the clutch is a travel value without conversion The setting values for the following parameters are in units based on the reference address setting Pr 407 Main shaft clutch ON address Pr 409 Main shaft clutch OFF address Pr 408 Travel value before main shaft clutch ON Pr 410 Travel value before main shaft clutch OFF Pr 413 Slippage amount at main shaft clutch ON Pr 414 Slippage amount a...

Страница 114: ...ain shaft clutch ON Positive value Md 420 Main shaft clutch ON OFF status Md 400 Current value after composite main shaft gear or Md 401 Current value per cycle after main shaft gear Travel value after clutch Cd 400 Main shaft Clutch ON condition is completed Example clutch command ON Pr 409 Main shaft clutch OFF address Set the clutch OFF address when address mode is configured for the OFF contro...

Страница 115: ...h OFF condition is completed Example clutch command OFF t t Pr 410 Travel value before main shaft clutch OFF Positive value Pr 411 Main shaft clutch smoothing method Set the smoothing method for clutch ON OFF Refer to Section 4 3 3 for details 0 Direct No smoothing 1 Time constant method Exponent Smoothing with an exponential curve based on the time constant setting 2 Time constant method Linear S...

Страница 116: ...lutch reference address setting If the set amount is negative slippage amount at clutch ON is controlled as 0 direct Pr 414 Slippage amount at main shaft clutch OFF Set the slippage amount at clutch OFF when the slippage method is set in Pr 411 Main shaft clutch smoothing method The slippage amount is set in units based on the current value selected in Pr 406 Main shaft clutch reference address se...

Страница 117: ... Clutch command trailing edge The clutch OFF control mode is either 2 Clutch command leading edge or 3 Clutch command trailing edge Status is considered as clutch command OFF just before starting synchronous control If synchronous control is started while the clutch command is ON the condition is established just after starting synchronous control by setting 2 Clutch command leading edge The condi...

Страница 118: ...r the machine system etc Refer to Section 4 2 2 and Section 4 2 3 for details on setting for the auxiliary shaft module Pr 419 Composite auxiliary shaft gear Note Refer to Section 4 3 Speed change gear Output axis Auxiliary shaft clutch Note Composite auxiliary shaft gear Main shaft input Speed change gear Pr 420 Auxiliary shaft gear Numerator Pr 421 Auxiliary shaft gear Denominator Auxiliary shaf...

Страница 119: ... shaft gear Fetch cycle At start of synchronous control Set in decimal 1 to 2147483647 1 36434 200n 36435 200n n Axis No 1 Note 1 The range from axis 1 to 2 is valid in the 2 axis module from axis 1 to 4 is valid in the 4 axis module from axis 1 to 8 is valid in the 8 axis module and from axis 1 to 16 is valid in the 16 axis module Pr 418 Auxiliary shaft axis No Set the input axis No for the auxil...

Страница 120: ...for the composite auxiliary shaft gear can be changed during synchronous control It is used as a clutch to switch input values between the main and the auxiliary shafts Pr 420 Auxiliary shaft gear Numerator Pr 421 Auxiliary shaft gear Denominator Set the numerator and the denominator for auxiliary shaft gear to convert the input value The input value is converted as follows Input value after conve...

Страница 121: ...xiliary shaft clutch ON address Set the clutch ON address for address mode This setting is invalid except during address mode If the address is out of the range from 0 to Cam axis length per cycle 1 the address is converted to a value within range Fetch cycle Operation cycle Set in decimal 2147483648 to 2147483647 Auxiliary shaft position units Note 2 or cam axis cycle units Note 3 0 36438 200n 36...

Страница 122: ...6445 200n Pr 428 Auxiliary shaft clutch smoothing method Set the clutch smoothing method Fetch cycle At start of synchronous control Set in decimal 0 Direct 1 Time constant method Exponent 2 Time constant method Linear 3 Slippage method Exponent 4 Slippage method Linear 0 36446 200n Pr 429 Auxiliary shaft clutch smoothing time constant For smoothing with a time constant method set the smoothing ti...

Страница 123: ...en Cd 403 Auxiliary shaft clutch command passes the leading edge from OFF to ON 3 Clutch command trailing edge The clutch is turned ON when Cd 403 Auxiliary shaft clutch command passes the trailing edge from ON to OFF 4 Address mode The clutch is turned ON when the reference address the auxiliary shaft current value or the current value per cycle after auxiliary shaft gear reaches Pr 424 Auxiliary...

Страница 124: ... the trailing edge from ON to OFF 4 Address mode The clutch is turned OFF when the reference address the auxiliary shaft current value or the current value per cycle after auxiliary shaft gear reaches Pr 426 Auxiliary shaft clutch OFF address The travel value before passing through the OFF address is calculated as the output travel value of the clutch based on the reference address passing through...

Страница 125: ...ar Output after the clutch is a travel value without conversion The setting values for the following parameters are in units based on the reference address setting Pr 424 Auxiliary shaft clutch ON address Pr 426 Auxiliary shaft clutch OFF address Pr 425 Travel value before auxiliary shaft clutch ON Pr 427 Travel value before auxiliary shaft clutch OFF Pr 430 Slippage amount at auxiliary shaft clut...

Страница 126: ...ON condition is completed Example clutch command ON Cd 403 Auxiliary shaft Md 423 Auxiliary shaft clutch ON OFF status Auxiliary shaft current value or Md 402 Current value per cycle after auxiliary shaft gear Pr 425 Travel value before auxiliary shaft clutch ON Positive value Pr 426 Auxiliary shaft clutch OFF address Set the clutch OFF address when address mode is configured for the OFF control m...

Страница 127: ...ent value per cycle after auxiliary shaft gear Pr 427 Travel value before auxiliary shaft clutch OFF Positive value Pr 428 Auxiliary shaft clutch smoothing method Set the smoothing method for clutch ON OFF Refer to Section 4 3 3 for details 0 Direct No smoothing 1 Time constant method Exponent Smoothing with an exponential curve based on the time constant setting 2 Time constant method Linear Smoo...

Страница 128: ...h reference address setting If the set amount is negative the slippage amount at clutch ON is controlled as 0 direct Pr 431 Slippage amount at auxiliary shaft clutch OFF Set the slippage amount at clutch OFF when the slippage method is set in Pr 428 Auxiliary shaft clutch smoothing method The slippage amount is set in units based on the current value selected in Pr 423 Auxiliary shaft clutch refer...

Страница 129: ...mmand leading edge or 3 Clutch command trailing edge The clutch OFF control mode is either 2 Clutch command leading edge or 3 Clutch command trailing edge Status is considered as clutch command OFF just before starting synchronous control If synchronous control is started while the clutch command is ON the condition is established just after starting synchronous control by setting 2 Clutch command...

Страница 130: ...lutch control setting Set the clutch control method Set in hexadecimal ON control mode 0 No clutch 1 Clutch command ON OFF 2 Clutch command leading edge 3 Clutch command trailing edge 4 Address mode 5 High speed input request OFF control mode 0 OFF control invalid 1 One shot OFF 2 Clutch command leading edge 3 Clutch command trailing edge 4 Address mode 5 High speed input request High speed input ...

Страница 131: ...n of clutch command ON OFF Setting in the OFF control mode are not applicable in this mode t t Travel value after clutch Current value before clutch Clutch ON OFF status Clutch command Item Main shaft clutch Auxiliary shaft clutch Clutch command Cd 400 Main shaft clutch command Cd 403 Auxiliary shaft clutch command Clutch ON OFF status Md 420 Main shaft clutch ON OFF status Md 423 Auxiliary shaft ...

Страница 132: ... ON OFF status Clutch ON address Current value specified in clutch reference address setting Item Main shaft clutch Auxiliary shaft clutch Reference address The current value specified in Pr 406 Main shaft clutch reference address setting Md 400 Current value after composite main shaft gear or Md 401 Current value per cycle after main shaft gear The current value specified in Pr 423 Auxiliary shaf...

Страница 133: ...st signal clutch control setting Set 4 High speed input request in Pr 42 External command function selection and 1 Validates an external command in Cd 8 External command valid for the applicable axis For the 16 axis module set the external command signal in Pr 95 External command signal selection for the applicable axis t t Cd 8 External command valid Travel value after clutch Current value before...

Страница 134: ...rent value before clutch Clutch ON OFF status Clutch command Travel value before clutch OFF Item Main shaft clutch Auxiliary shaft clutch Clutch command Cd 400 Main shaft clutch command Cd 403 Auxiliary shaft clutch command Clutch ON OFF status Md 420 Main shaft clutch ON OFF status Md 423 Auxiliary shaft clutch ON OFF status Travel value before clutch OFF Pr 410 Travel value before main shaft clu...

Страница 135: ...h ON OFF status Clutch OFF address Current value specified in clutch reference address setting Item Main shaft clutch Auxiliary shaft clutch Reference address The current value specified in Pr 406 Main shaft clutch reference address setting Md 400 Current value after composite main shaft gear or Md 401 Current value per cycle after main shaft gear The current value specified in Pr 423 Auxiliary sh...

Страница 136: ...est signal clutch control setting Set 4 High speed input request in Pr 42 External command function selection and 1 Validates an external command in Cd 8 External command valid for the applicable axis For the 16 axis module set the external command signal in Pr 95 External command signal selection for the applicable axis t t Cd 8 External command valid Travel value after clutch Current value befor...

Страница 137: ...tant method Linear 3 Slippage method Exponent 4 Slippage method Linear The operation of each smoothing method is shown below Time constant method smoothing Smoothing is processed with the time constant setting value in the smoothing time constant at clutch ON OFF After clutch ON smoothing is complete smoothing is processed with the time constant setting value when the speed of the input values cha...

Страница 138: ... clutch Auxiliary shaft clutch Clutch ON OFF status Md 420 Main shaft clutch ON OFF status Md 423 Auxiliary shaft clutch ON OFF status Clutch smoothing status Md 421 Main shaft clutch smoothing status Md 424 Auxiliary shaft clutch smoothing status 2 Time constant method linear acceleration deceleration smoothing Set 2 Time constant method Linear in the clutch smoothing method t t Speed after clutc...

Страница 139: ...hing with a slippage method set the slippage amount at clutch ON Set in decimal 0 to 2147483647 Main input axis position units Note 1 auxiliary shaft position units Note 2 or cam axis cycle units Note 3 Slippage amount at clutch OFF Pr 414 Slippage amount at main shaft clutch OFF Pr 431 Slippage amount at auxiliary shaft clutch OFF For smoothing with a slippage method set the slippage amount at cl...

Страница 140: ...ON section is changed When the clutch smoothing status ON section is extended t t Clamped at low speed OFF OFF ON ON Output speed Speed after clutch processing Clutch ON OFF status Clutch smoothing status Input speed Speed before clutch processing Slippage amount at clutch ON Slippage amount at clutch OFF ON section is extended When the clutch smoothing status ON section is shortened t t Clamped a...

Страница 141: ...essing decreases the speed after clutch smoothing is controlled without exceeding the speed before clutch processing If slippage amount remains when the speed before clutch processing becomes 0 the smoothing process will be continued Then the clutch smoothing process will be executed with the remaining slippage amount when the speed before clutch processing gets faster than the speed after clutch ...

Страница 142: ...t gear Pr 408 Travel value before main shaft clutch ON 0mm Pr 410 Travel value before main shaft clutch OFF 380mm 14 96inch Pr 411 Main shaft clutch smoothing method 4 Slippage method Linear Pr 413 Slippage amount at main shaft clutch ON 100mm 3 94inch Distance between the sensor and the waiting position Pr 414 Slippage amount at main shaft clutch OFF 20mm 0 79inch t t Synchronous encoder axis spe...

Страница 143: ...axis Speed change gear Composite auxiliary shaft gear Speed change gear Main shaft clutch Speed change gear Auxiliary shaft clutch Output value Input value Speed change gear Pr 434 Speed change gear Pr 435 Speed change gear smoothing time constant Pr 436 Speed change ratio Numerator Pr 437 Speed change ratio Denominator Arrangement the speed change gear Arranged on one of Main shaft side Auxiliary...

Страница 144: ...nominator for the speed change ratio Fetch cycle Operation cycle Set in decimal 1 to 2147483647 1 36464 200n 36465 200n n Axis No 1 Pr 434 Speed change gear Set the arrangement for the speed change gear 0 No speed change gear Speed change is not processed and the input value is transmitted as is 1 Main shaft side Speed change is processed for input value after main shaft clutch based on the speed ...

Страница 145: ...change ratio Denominator can be changed during synchronous control Input values for speed change are processed as follows Input value after change Input value before change Pr 436 Speed change ratio Numerator Pr 437 Speed change ratio Denominator The input speed can be reversed by setting a negative value in Pr 436 Speed change ratio Numerator Pr 437 Speed change ratio Denominator is set within th...

Страница 146: ...ion Md 409 Cam axis feed current value Md 406 Cam axis phase compensation amount Pr 439 Cam axis length per cycle Pr 440 Cam No Pr 441 Cam stroke amount Pr 444 Cam axis phase compensation advance time Pr 445 Cam axis phase compensation time constant Pr 447 Output axis smoothing time constant Md 20 Feed current value Cam axis phase compensation processing Input value Md 410 Execute cam No Md 411 Ex...

Страница 147: ...setting Pr 438 Cam axis cycle unit setting Table 4 2 Cam axis cycle units Setting value of Pr 438 Cam axis cycle unit setting Cam axis cycle unit Range Unit setting selection Control unit Number of decimal places 0 Use units of main input axis Servo input axis position unit Refer to Section 2 1 1 Synchronous encoder axis position unit Refer to Section 2 2 1 1 Use units of this setting 0 mm 0 mm 21...

Страница 148: ...a format This is ignored for cams using the coordinate data format Fetch cycle At start of synchronous control At passing through the 0th point of cam data Set in decimal 2147483648 to 2147483647 Output axis position units Note 2 QD77MS QD77GF LD77MS 4194304 LD77MH 262144 36476 200n 36477 200n Pr 444 Cam axis phase compensation advance time Set the time to advance or delay the phase of the cam axi...

Страница 149: ...h the 0th point of cam data or is on the 0th point Pr 441 Cam stroke amount Set the cam stroke amount corresponding to a 100 stroke ratio in output axis position units Refer to Section 4 5 1 for cam control using the stroke ratio data format The cam stroke amount can be changed during synchronous control The value set in Pr 441 Cam stroke amount is valid when the cam axis current value per cycle p...

Страница 150: ...nt value per cycle Cam axis feed current value Input speed after phase compensation Input speed before phase compensation Current value per cycle after phase compensation Current value per cycle before phase compensation Pr 445 Cam axis phase compensation time constant Pr 444 Cam axis phase compensation advance time Speed before phase compensation Pr 446 Synchronous control deceleration time Set t...

Страница 151: ... moderate sudden speed fluctuation for cams using the coordinate data format etc The input response is delayed depending on the time corresponding to the setting by smoothing process setting t t t Md 407 Cam axis current value per cycle Md 409 Cam axis feed current value Pr 447 Output axis smoothing time constant Md 20 Feed current value Md 22 Feedrate Md 20 Feed current value Speed before smoothi...

Страница 152: ...details on each change command Synchronous control change command Application Output axis operation Cam reference position movement Adjust the cam reference position by travel value Operated Change cam axis current value per cycle Change the cam axis current value per cycle None Change current value per cycle after main shaft gear Change the current value per cycle after main shaft gear None Chang...

Страница 153: ... Change cam axis current value per cycle 2 Change current value per cycle after main shaft gear 3 Change current value per cycle after auxiliary shaft gear 4 Cam axis current value per cycle movement 0 44087 20n Cd 408 Synchronous control change value Set the change value for synchronous control change processing Fetch cycle At requesting synchronous control change Set in decimal 2147483648 to 214...

Страница 154: ...Cd 409 Synchronous control reflection time for its output Set a long reflection time when a large travel value is used since the cam axis feed current value moves with the travel value t t Cd 406 Synchronous control change request Cd 407 Synchronous control change command Md 407 Cam axis current value per cycle Md 408 Cam reference position Md 409 Cam axis feed current value Feed current value 0 C...

Страница 155: ...nce position 3 Change current value per cycle after main shaft gear The current value per cycle after main shaft gear is changed to the value set in Cd 408 Synchronous control change value This operation is completed within one operation cycle Clutch control is not executed if the current value per cycle after main shaft gear the value before being changed and after being changed has already passe...

Страница 156: ...flection time 4 Cam axis current value per cycle movement Cd 408 Synchronous control change value Set the change value for synchronous control change processing as follows Cd 407 Synchronous control change command Cd 408 Synchronous control change value Setting range Unit Setting details 0 Cam reference position movement 2147483648 to 2147483647 Output axis position unit Set the travel value of th...

Страница 157: ...ronous control reflection time 0 Cam reference position movement The time to reflect the travel value to the cam reference position 1 Change cam axis current value per cycle Setting not required 2 Change current value per cycle after main shaft gear 3 Change current value per cycle after auxiliary shaft gear 4 Cam axis current value per cycle movement The time to reflect the travel value to the ca...

Страница 158: ...e current value per cycle after the main shaft gear is stored One cycle is considered the cam axis length per cycle Value is stored even after system s power supply OFF Refresh cycle Operation cycle During synchronous control only Monitoring is carried out in decimal display 0 to Cam axis length per cycle 1 Cam axis cycle units Note 2 42802 40n 42803 40n Md 402 Current value per cycle after auxili...

Страница 159: ...ain shaft clutch is stored Refresh cycle Operation cycle During synchronous control only Monitoring is carried out in decimal display 0 Not on clutch smoothing 1 On clutch smoothing 42829 40n Md 422 Main shaft clutch slippage accumulative The accumulative slippage of the main shaft clutch smoothing with slippage method is stored as a signed value Refresh cycle Operation cycle During synchronous co...

Страница 160: ...ixed feed control Change method 1 Speed position switching control Note 1 Change method 1 Position speed switching control Note 1 Change method 1 Connection to servo amplifier Change method 2 Change method 1 Connection to synchronous encoder Change method 1 Note 1 When 2 Clear feed current value to zero is set in Pr 21 Feed current value during speed control only Change method 1 The new current va...

Страница 161: ...on amount after smoothing processing with Pr 445 Cam axis phase compensation time constant is stored Md 407 Cam axis current value per cycle The cam axis current value per cycle is stored within the range from 0 to Cam axis length per cycle 1 The current value after cam axis phase compensation processing can be monitored The unit is in cam axis cycle units Refer to Section 4 5 1 The value is resto...

Страница 162: ... is 1 On clutch smoothing till the clutch accumulative slippage amount reaches the slippage at clutch ON when the clutch is turned ON The status will change to 0 Not on clutch smoothing when the clutch accumulative slippage amount reaches the slippage at clutch ON The status is 1 On clutch smoothing till the clutch accumulative slippage amount reaches 0 when the clutch is turned OFF The status wil...

Страница 163: ...time peculiar to the system is shown below 1 Delay time peculiar to the system for a servo input axis a QD77MS Operation cycle ms Pr 300 Servo input axis type Feed current value Real current value Command to servo amplifier Feedback value 0 88 0 μs 1833 μs 0 μs 3611 μs 1 77 0 μs 1833 μs 0 μs 5389 μs b QD77GF RJ010 mode Operation cycle ms Pr 300 Servo input axis type Feed current value Real current...

Страница 164: ...236 μs 10236 Scan time μs c QD77GF CiA402 mode Operation cycle ms Pr 320 Synchronous encoder axis type Incremental synchronous encoder Synchronous encoder via servo amplifier Synchronous encoder via CPU 1 00 2819 μs 4822 μs 2819 Scan time μs 2 00 5814 μs 8767 μs 5814 Scan time μs 4 00 11814 μs 16768 μs 11814 Scan time μs d LD77MS Operation cycle ms Pr 320 Synchronous encoder axis type Incremental ...

Страница 165: ... is auto tuning mode 1 or 2 The model loop gain must not be changed on the axis executing phase compensation through preventing change with the manual mode or interpolation mode setting Setting example When axis 1 is synchronized with an incremental synchronous encoder axis the phase compensation advance time is set as follows If the operation cycle is as 1 77 ms and model loop gain of axis 1 is a...

Страница 166: ...limit value Hardware stroke limit function Controlled the same as positioning control Forced stop function Same control as other methods Speed change function Setting is ignored Override function Acceleration deceleration time change function Torque change function Same control as other methods Absolute position system Step function Setting is ignored Skip function M code output function M code is...

Страница 167: ...ous control after establishing an OP Servo ON OFF Servo OFF request is ignored during synchronous control similar to positioning control Valid Invalid POINT Sub functions for an input axis in synchronous control conform to the specification of each control OPR control Positioning control Manual control Speed torque control Refer to the User s Manual Positioning control of each Simple Motion module...

Страница 168: ...4 64 Chapter 4 Synchronous Control MEMO ...

Страница 169: ...nitial position 5 2 5 2 Synchronous control initial position parameters 5 7 5 3 Cam axis position restoration method 5 11 5 3 1 Cam axis current value per cycle restoration 5 11 5 3 2 Cam reference position restoration 5 17 5 3 3 Cam axis feed current value restoration 5 19 5 4 Synchronous control analysis mode 5 22 5 5 Cam position calculation function 5 24 5 5 1 Cam position calculation control ...

Страница 170: ...ycle Restored according to Pr 462 Cam axis position restoration object Md 408 Cam reference position Md 409 Cam axis feed current value Cam axis current value per cycle Md 407 Cam axis feed current value Md 409 Cam reference position Md 408 Current value per cycle after auxiliary shaft gear Md 402 Composite main shaft gear Main shaft gear Output axis Auxiliary shaft gear Composite auxiliary shaft ...

Страница 171: ...oration method 1 The new current value after composite main shaft gear is calculated based on the current value of the main input axis Current value after composite main shaft gear Main input direction of composite main shaft gear Main input axis current value Restoration method 2 The travel value of the main input axis from the last synchronous control session is reflected to the current value af...

Страница 172: ...1 Speed position switching control Note 1 Restoration method 1 Position speed switching control Note 1 Restoration method 1 Connection to servo amplifier Restoration method 2 Restoration method 1 Connection to synchronous encoder Restoration method 1 Others Restoration method 2 Restoration method 2 Note 1 When Pr 300 Servo input axis type is either 1 Feed current value or 2 Real current value and ...

Страница 173: ...t gear from the last synchronous control session Auxiliary shaft Current value per cycle after auxiliary shaft gear Current value per cycle after auxiliary shaft gear at the last synchronous control session Auxiliary shaft gear ratio Amount of change of auxiliary shaft current value from the last synchronous control session The current value per cycle after main shaft gear current value per cycle ...

Страница 174: ...m axis position restoration as shown in Table 5 1 Refer to Section 5 2 for the setting details Table 5 1 Setting list for cam axis position restoration parameters Pr 462 Cam axis position restoration object Pr 463 Setting method of cam reference position Pr 467 Cam reference position Initial setting Pr 464 Setting method of cam axis current value per cycle Pr 468 Cam axis current value per cycle I...

Страница 175: ...estoration Fetch cycle At start of synchronous control Set in decimal 0 Previous value 1 Initial setting value of cam reference position 2 Feed current value 2 36503 200n Pr 464 Setting method of cam axis current value per cycle Select the setting method for the cam axis current value per cycle Set for the cam reference position restoration or the cam axis feed current value restoration Fetch cycl...

Страница 176: ...vious value The current value per cycle after main shaft gear from the last synchronous control session is stored 1 Initial setting value of current value per cycle after main shaft gear The value set in Pr 465 Current value per cycle after main shaft gear Initial setting is stored 2 Calculate from input axis The value calculated based on the current value after composite main shaft gear is stored...

Страница 177: ...revious value The cam reference position from the last synchronous control session is stored The feed current value is stored when the cam reference position from the last synchronous control session is not saved 1 Initial setting value of cam reference position The value set in Pr 467 Cam reference position Initial setting is stored 2 Feed current value The value set in Md 20 Feed current value i...

Страница 178: ...467 Cam reference position Initial setting Set the initial setting value of the cam reference position in output axis position units Refer to Section 4 5 1 when Pr 463 Setting method of cam reference position is set to 1 Cam reference position Initial setting Pr 468 Cam axis current value per cycle Initial setting Set a value according to the setting for Pr 462 Cam axis position restoration object...

Страница 179: ...urrent value Md 407 Cam axis current value per cycle Pr 463 Setting method of cam reference position 0 Previous value 1 Initial setting value of cam reference position 2 Feed current value Md 408 Cam reference position Cam axis feed current value Cam axis current value per cycle Cam reference position Search the cam pattern It is also possible to search from the middle of the cam axis current valu...

Страница 180: ... per cycle Cam data starting point 0 Cam axis feed current value Feed current value Cam reference position Restore to the first current value that matches The restoration is done on the second Cam axis current value per cycle Pr 468 Cam axis current value per cycle Initial setting Search from the value in the middle Preceding values are searched later c Search from a value in the middle of the cam...

Страница 181: ...nt value Feed current value Cam reference position Search from Cam axis current value per cycle 0 Restore to the first feed current value that matches Other values are not restored b Search from a value in the middle of the cam axis current value per cycle Cam data starting point 0 Cam axis feed current value Feed current value Cam axis current value per cycle New cam reference position Cam refere...

Страница 182: ...rch begins for the second time Cam axis feed current value Feed current value Cam axis current value per cycle New cam reference position Once the restoration fails in the first search the new cam reference position is automatically updated to set Feed current value New cam reference position to be within the feed stroke amount and the search process starts again Feed stroke Cam reference position...

Страница 183: ...3 Setting item Setting value Pr 439 Cam axis length per cycle 1000 PLS Pr 441 Cam stroke amount 200 PLS Pr 462 Cam axis position restoration object 0 Cam axis current value per cycle restoration Pr 463 Setting method of cam reference position 1 Initial setting value of cam reference position Pr 464 Setting method of cam axis current value per cycle 0 Previous value Pr 467 Cam reference position In...

Страница 184: ...ontrol Initial Position Cam operation Feed current value PLS Cam operation restarts from Feed current value 123 PLS when the previous forced stop occurred Cam axis current value per cycle PLS 200 peak Time ms Time ms 123 1000 0 0 ...

Страница 185: ... main shaft gear 3 Current value per cycle after auxiliary shaft gear Md 407 Cam axis current value per cycle Md 409 Cam axis feed current value Md 408 Cam reference position Cam axis feed current value Cam axis current value per cycle Cam reference position Restored by the equation of Feed current value Cam axis current value per cycle Example The following shows an example of starting operation ...

Страница 186: ... start of synchronous control Feed current value PLS Time ms Time ms Cam starting point is set to feed current value 0 PLS The estimated cam pattern for Cam axis current value per cycle 0 PLS as the origin is determined Cam reference position becomes 0 200 200 PLS Cam axis current value per cycle PLS Cam axis length per cycle 0 PLS 1000 0 0 Cam operation Feed current value PLS Cam operation starts...

Страница 187: ...Cam axis feed current value 0 Previous value 1 Initial setting value of cam reference position 2 Feed current value Md 408 Cam reference position Cam axis current value per cycle Cam reference position Cam axis feed current value Restrictions The cam axis feed current value moves to its restored value just after starting synchronous control when the cam axis feed current value to be restored is di...

Страница 188: ...method of cam axis current value per cycle 1 Initial setting value of cam axis current value per cycle Pr 467 Cam reference position Initial setting None Pr 468 Cam axis current value per cycle Initial setting 0 PLS Move to synchronous control starting point Feed current value PLS Time ms Move to the position of 150 PLS by return to cam starting position or by home position return 0 150 Restore op...

Страница 189: ...nt value PLS The time when cam axis current value per cycle is 0 PLS Cam axis current value per cycle PLS With the feed current value 150 PLS position as the start point the cam operates for the amount of Cam reference position cam stroke amount Time ms Time ms 0 150 1000 350 0 ...

Страница 190: ...0 Synchronous control start turns OFF The busy signal is not turned ON during synchronous control analysis mode When starting synchronous control with synchronous control analysis mode the following error does not occur Cam axis feed current value restoration disable error code 769 Positioning start Check synchronization position in synchronous control analysis mode BUSY signal OFF during analyzin...

Страница 191: ...e 8 axis module and from axis 1 to 16 is valid in the 16 axis module Example The following shows a procedure of aligning the synchronous position of an output axis that references the input axis 1 Set the following values in the synchronous control initial position parameters Setting item Setting value Pr 460 Setting method of current value per cycle after main shaft gear 2 Calculate from input ax...

Страница 192: ...ion based on the feed current value and the cam reference position of axis 1 2 Calculate the cam axis feed current value of axis 2 with this function based on the cam axis current value per cycle that was calculated in 1 3 Calculate the cam axis feed current value of axis 3 with this function based on the cam axis current value per cycle that was calculated in 1 4 Execute positioning on axis 2 to ...

Страница 193: ...alculation Fetch cycle At requesting cam position calculation Set in decimal 1 to 2147483647 Cam axis cycle units Note 3 0 53784 53785 Cd 616 Cam position calculation Cam reference position Set the cam reference position for the cam position calculation Fetch cycle At requesting cam position calculation Set in decimal 2147483648 to 2147483647 Output axis position units Note 2 0 53786 53787 Cd 617 ...

Страница 194: ...on calculation If 0 is set for the cam No the cam position is calculated as a linear cam Cd 614 Cam position calculation Stroke amount Set the cam stroke amount for the cam position calculation Cd 615 Cam position calculation Cam axis length per cycle Set the cam axis length per cycle for the cam position calculation Cd 616 Cam position calculation Cam reference position Set the cam reference posi...

Страница 195: ...ly by the cam position calculation function Search for the cam axis current value per cycle When calculating the cam axis current value per cycle using cam data the position corresponding to Cd 618 Cam position calculation Cam axis feed current value is searched using cam data based on the position specified by Cd 617 Cam position calculation Cam axis current value per cycle The following shows th...

Страница 196: ...oint At the 0th point At the 256th point Search order Cd 617 Cam position calculation Cam axis current value per cycle Searches until between the 255th point and the 256th point last point in order of the cam data between the 0th point and the 1st point and between the 1st point and the 2nd point Example When Cd 617 Cam position calculation Cam axis current value per cycle is corresponding to the ...

Страница 197: ...ot found even though the range of 1 to 3 has been searched the warning Cam position calculation cam axis 1 cycle current value calculation disable warning code 834 will occur in reciprocated cam pattern For the feed cam calculates Cd 618 Cam position calculation Cam axis feed current value by the stroke difference and searches again from the 0th point to the whole range If the corresponding positi...

Страница 198: ...he warning Cam position calculation cam axis 1 cycle current value calculation disable warning code 834 will occur in reciprocated cam pattern For the feed cam calculates Cd 618 Cam position calculation Cam axis feed current value by the stroke difference and searches again from the 0th point to the whole range If the corresponding position is not found even though the search process starts again ...

Страница 199: ...between the 2nd point and the 3rd point searches from the range of 3 3 The range from the last point of cam data to the cam axis length per cycle When the last point of cam data Cd 617 Cam position calculation Cam axis current value per cycle cam axis length per cycle the position corresponding to Cd 618 Cam position calculation Cam axis feed current value is searched from the last point of the ca...

Страница 200: ...ing to the last point of cam data 0 Cam reference position Cam axis length per cycle Cam axis cycle units At the 1st point At the 3rd point At the 4th point 1 2 1 Search starting point At the 0th point Search order At the 5th point 3 At the 2nd point Cd 617 Cam position calculation Cam axis current value per cycle Searches from the range of 3 ...

Страница 201: ...servo input axis axis 1 as the reference position Press conveyance device Main shaft gear Axis 3 Axis 1 Main shaft gear Axis 2 Axis 1 Pressing position Axis 1 X axis of workpiece conveyance Axis 2 Y axis of workpiece conveyance Axis 3 1 Procedure for synchronous control first time 1 Execute OPR for axis 1 2 and 3 and position to the synchronization starting point 2 Set the synchronous control init...

Страница 202: ...evious value Pr 464 Setting method of cam axis current value per cycle 2 Current value per cycle after main shaft gear 2 Turn ON the bits for axes 2 and 3 in Cd 381 Synchronous control analysis mode and then turn ON the bits for axes 2 and 3 in Cd 380 Synchronous control start to execute the synchronous control analysis The analyzed result is updated in Md 400 to Md 425 3 Position axes 2 and 3 to ...

Страница 203: ...is detected check the status details and then proceed with the countermeasures 6 1 Error and warning details 6 2 6 2 Error and warning of input axis 6 3 6 2 1 List of input axis errors 6 4 6 2 2 List of input axis warnings 6 5 6 3 Error and warning of output axis 6 6 6 3 1 List of output axis errors 6 6 6 3 2 List of output axis warnings 6 10 6 4 Warning of cam operation 6 11 6 4 1 List of cam dat...

Страница 204: ... control input axis errors Section 6 2 1 700 to 799 Synchronous control output axis errors Section 6 3 1 2 Warning Warnings related to synchronous control are shown below Refer to the User s Manual Positioning Control of each Simple Motion module for other warnings The warning definitions can be found from the warning codes Confirming them requires GX Works2 Refer to the Simple Motion Module Setti...

Страница 205: ...d Changing of Md 26 Axis operation status from Error to Standby Axis warning detection Md 31 Status b9 is turned OFF Error and warning of synchronous encoder axis 1 Error detection b4 Error detection flag of Md 325 Synchronous encoder axis status for target axis turns ON and the input axis error number is stored in Md 326 Synchronous encoder axis error No 2 Warning detection b5 Warning detection f...

Страница 206: ...verflow occurred because the unit conversion ratio unit conversion Numerator unit conversion Denominator of the input axis is too large The input axis operation is immediately stopped and a connection becomes invalid Set a smaller unit conversion ratio unit conversion Numerator unit conversion Denominator of the input axis Decrease the input axis speed 609 261h Speed position switching control sta...

Страница 207: ...of the rotation direction restriction setting The setting may be reversed Check if the input axis moves to the reverse direction of the enabled direction 682 2AAh Input axis speed display over Monitor speed display of input axis is equal or lower than the minimum value 2147483648 or exceeding the maximum value 2147483647 The input axis operation continues The minimum or maximum value is displayed ...

Страница 208: ... axis errors Error No Error name Error Operation status at error occurrence Corrective action 700 2BCh Outside main input axis No range Setting value of the synchronous parameter Pr 400 Main input axis No is outside the setting range The same servo input axis No as the output axis is set in the synchronous parameter Pr 400 Main input axis No Synchronous control does not start Set within the range ...

Страница 209: ...r range The synchronous parameter Pr 421 Auxiliary shaft gear Denominator is set to 0 or lower Set a value within the range of 1 to 2147483647 723 2D3h Auxiliary shaft gear operation overflow Overflow sign reversion occurred in input values because the auxiliary shaft gear ratio is too large Synchronous control is immediately stopped Set a smaller absolute value for the synchronous parameter Pr 42...

Страница 210: ...nge of 0 to 5000 760 2F8h Outside setting method of current value per cycle after main shaft gear range The synchronous parameter Pr 460 Setting method of current value per cycle after main shaft gear is set to other than 0 to 2 Set a value within the range of 0 to 2 761 2F9h Outside current value per cycle after main shaft gear Initial setting range The synchronous parameter Pr 465 Current value ...

Страница 211: ...s in reciprocated cam pattern Start synchronous control after moving the feed current value as to fit within the stroke of two way operation cam pattern Set the cam reference position as to fit within the stroke of two way operation cam pattern 769 301h Cam axis feed current value restoration disable Restoration could not be completed when the synchronous parameter Pr 462 Cam axis position restora...

Страница 212: ...ch during the synchronous control Synchronous control continues by the previous auxiliary shaft clutch control setting 741 2E5h Outside speed change ratio denominator range The synchronous parameter Pr 437 Speed change ratio Denominator is set to 0 or lower during synchronous control Synchronous control continues by the previous speed change ratio Denominator Set a value within the range of 1 to 2...

Страница 213: ...ation occurs for an axis 1 without any condition Judge whether it was completed normally by confirming a warning state of axis after the completion of cam operation 6 4 1 List of cam data operation warnings Warning No Warning name Warning Operation status at warning occurrence Corrective action 810 32Ah Outside operation cam No range Cd 601 Operation cam No is other than 1 to 256 Cam data writing ...

Страница 214: ...data format cam during the cam data writing operation Set a value within the range of 256 512 1024 2048 4096 8192 16384 32768 for the stroke ratio data format cam Set a value within the range of 2 to 16384 for the coordinate data format cam 816 330h Outside cam data starting position range Cd 606 Cam data starting point is outside the range of 0 to Cam resolution 1 during the cam data writing oper...

Страница 215: ...ms cam resolution and coordinate number Erase the cam data and rewrite it 823 337h Cam auto generation cam open area capacity over The free area in the cam open area is insufficient The writable area is insufficient due to the decoupling of free area 824 338h Outside cam auto generation data range Cd 611 Cam auto generation data is outside the setting range Set a value within the setting range for...

Страница 216: ...rea 832 340h Outside cam position calculation cam axis length per cycle range Cd 615 Cam position calculation Cam axis length per cycle is set to 0 or lower Set a value within the range of 1 to 2147483647 833 341h Outside cam position calculation cam axis current value per cycle range Cd 617 Cam position calculation Cam axis current value per cycle is outside the range of 0 to Cam axis length per ...

Страница 217: ...dices Appendices Appendix 1 Comparisons with the Motion controller SV22 Appendix 2 Appendix 2 Sample program of synchronous control Appendix 6 Appendix 3 Lists of buffer memory addresses for synchronous control Appendix 10 ...

Страница 218: ...ry input 1 axis Total 3 axes of main shaft 2 axes and auxiliary input 1 axis Virtual servo motor axis 8 axes Command unit PLS None It can be substituted by the servo input axis setting to the virtual servo amplifier Servo input axis None Use the servo amplifier as the drive module input axis It is possible to use without connecting the servo amplifier by setting to the virtual servo amplifier Comm...

Страница 219: ...al system Linear system Speed change gear Speed change ratio 0 to 655 35 Smoothing Exponential system Numerator of speed change ratio 2147483648 to 2147483647 Denominator of speed change ratio 1 to 2147483647 Smoothing Linear system Differential gear Use main shaft and auxiliary input Main shaft side Auxiliary shaft side Use composite main shaft gear and composite auxiliary shaft gear Select a com...

Страница 220: ... operation is continued An error is detected by stroke limit and the operation is stopped Stop command Invalid Valid Cam ball screw switching Provided Operate the ball screw by inputting the command pulse from the drive axis None Operate the ball screw by the positioning control after the synchronous control stop of each axis Cam axis starting point 1 Cam reference position setting ON Start from t...

Страница 221: ... Works2 Motion SFC program BMOV command New pattern cannot be added Programming software GX Works2 Sequence program Cam data operation by buffer memory New pattern can be added Cam auto generation None Cam pattern for rotary cutter can be generated automatically Cam position calculation None Cam axis feed current value and cam axis current value per cycle can be calculated before starting synchron...

Страница 222: ...m of executing synchronous control on the axis 1 with the axis 4 as an input axis The axis 4 is configured as the virtual servo amplifier 1 Set MR J4 W B RJ on the axis 1 and the virtual servo amplifier on the axis 4 in the system setting 2 Set the axis 4 as the servo input axis in the input axis parameter ...

Страница 223: ...Appendix 7 Appendices 3 Create the cam data cam No 1 4 Set the synchronous parameter of the axis 1 ...

Страница 224: ...t rol star t All axes servo O N Y31 X31 Flag for synchro nization 0 PLC READ Y signal Y30 M100 3 JOG spee d of axi s 4 X3C Axis 1 BUSY DMOVP K20000 U3 G1818 K15 U3 G809 X3C Axis 1 BUSY SET Y3E Forward run JOG start of axis 4 M100 22 X3C Axis 1 BUSY K15 U3 G809 RST Y3E Forward run JOG start of axis 4 RST U3 G36320 0 Synchron ous cont rol star t X3F Axis 4 BUSY Start sy nchronou s contro l Start sy ...

Страница 225: ...l Y30 M100 3 JOG spee d of axi s 4 X40 Axis 1 BUSY DMOVP K20000 U3 G4618 K15 U3 G2409 X40 Axis 1 BUSY SET Forward run JOG start of axis 4 M100 22 X40 Axis 1 BUSY K15 U3 G2409 RST Forward run JOG start of axis 4 RST U3 G36320 0 Synchron ous cont rol star t X43 Axis 4 BUSY Start sy nchronou s contro l Start sy nchronou s contro l Axis 1 in drivi ng Axis 1 in drivi ng U3 G30131 0 U3 G30131 0 ...

Страница 226: ...00 Servo input axis type 32800 10n Section 2 1 2 Pr 301 Servo input axis smoothing time constant 32801 10n Pr 302 Servo input axis phase compensation advance time 32802 10n 32803 10n Pr 303 Servo input axis phase compensation time constant 32804 10n Pr 304 Servo input axis rotation direction restriction 32805 10n n Axis No 1 3 Servo input axis monitor data Item Buffer memory address Reference sect...

Страница 227: ...30 20j 34731 20j Pr 327 Synchronous encoder axis phase compensation time constant 34732 20j Pr 328 Synchronous encoder axis rotation direction restriction 34733 20j Pr 329 Resolution of synchronous encoder via CPU 34734 20j 34735 20j j Synchronous encoder axis No 1 5 Synchronous encoder axis control data Item Buffer memory address Reference section Cd 320 Synchronous encoder axis control start 350...

Страница 228: ...24 Synchronous encoder axis rotation direction restriction amount 35208 20j 35209 20j Md 325 Synchronous encoder axis status 35210 20j Md 326 Synchronous encoder axis error No 35211 20j Md 327 Synchronous encoder axis warning No 35212 20j j Synchronous encoder axis No 1 7 Synchronous parameter Item Buffer memory address Reference section Pr 400 Main shaft Main input axis No 36400 200n Section 4 1 ...

Страница 229: ...iary shaft Auxiliary shaft axis No 36430 200n Section 4 2 2 Pr 419 Composite auxiliary shaft gear 36431 200n Pr 420 Auxiliary shaft gear Numerator 36432 200n 36433 200n Pr 421 Auxiliary shaft gear Denominator 36434 200n 36435 200n Pr 422 Auxiliary shaft clutch control setting 36436 200n Section 4 2 3 Pr 423 Auxiliary shaft clutch reference address setting 36437 200n Pr 424 Auxiliary shaft clutch O...

Страница 230: ...6 Synchronous control deceleration time 36485 200n Pr 447 Output axis smoothing time constant 36486 200n Pr 460 Synchronous control initial position Setting method of current value per cycle after main shaft gear 36500 200n Section 5 2 Pr 461 Setting method of current value per cycle after auxiliary shaft gear 36501 200n Pr 462 Cam axis position restoration object 36502 200n Pr 463 Setting method ...

Страница 231: ...ous control reflection time 44090 20n n Axis No 1 9 Synchronous control monitor data Item Buffer memory address Reference section Md 400 Current value after composite main shaft gear 42800 40n 42801 40n Section 4 7 Md 401 Current value per cycle after main shaft gear 42802 40n 42803 40n Md 402 Current value per cycle after auxiliary shaft gear 42804 40n 42805 40n Md 406 Cam axis phase compensation...

Страница 232: ...42834 40n 42835 40n n Axis No 1 10 Cam operation control data Item Buffer memory address Reference section Cd 600 Cam data operation Cam data operation request 45000 Section 3 2 2 Cd 601 Operation cam No 45001 Cd 602 Cam data first position 45002 Cd 603 Number of cam data operation points 45003 Cd 604 Cam data format 45004 Cd 605 Cam resolution coordinate number 45005 Cd 606 Cam data starting poin...

Страница 233: ...Cd 616 Cam position calculation Cam reference position 53786 53787 Cd 617 Cam position calculation Cam axis current value per cycle 53788 53789 Cd 618 Cam position calculation Cam axis feed current value 53790 53791 Note 1 The item details on the cam auto generation are shown below 1 Cam auto generation parameters for rotary cutter Buffer memory address Details 53204 Cam resolution 53206 53207 She...

Страница 234: ...Appendix 18 Appendices MEMO ...

Страница 235: ...en avoided if functions or structures judged as necessary in the legal safety measures the user s device is subject to or as necessary by industry standards had been provided 4 Failure that could have been avoided if consumable parts battery backlight fuse etc designated in the instruction manual had been correctly serviced or replaced 5 Failure caused by external irresistible forces such as fires...

Страница 236: ... trademarks or trademarks of Microsoft Corporation in the United States and or other countries The company names system names and product names mentioned in this manual are either registered trademarks or trademarks of their respective companies In some cases trademark symbols such as or are not specified in this manual ...

Страница 237: ......

Страница 238: ...ithout notice When exported from Japan this manual does not require application to the Ministry of Economy Trade and Industry for service transaction permission HEAD OFFICE TOKYO BUILDING 2 7 3 MARUNOUCHI CHIYODA KU TOKYO 100 8310 JAPAN NAGOYA WORKS 1 14 YADA MINAMI 5 CHOME HIGASHI KU NAGOYA JAPAN ...

Отзывы: