- 4.6 -
Correcting the dot positions after adjusting the head height [PRINTadjust]
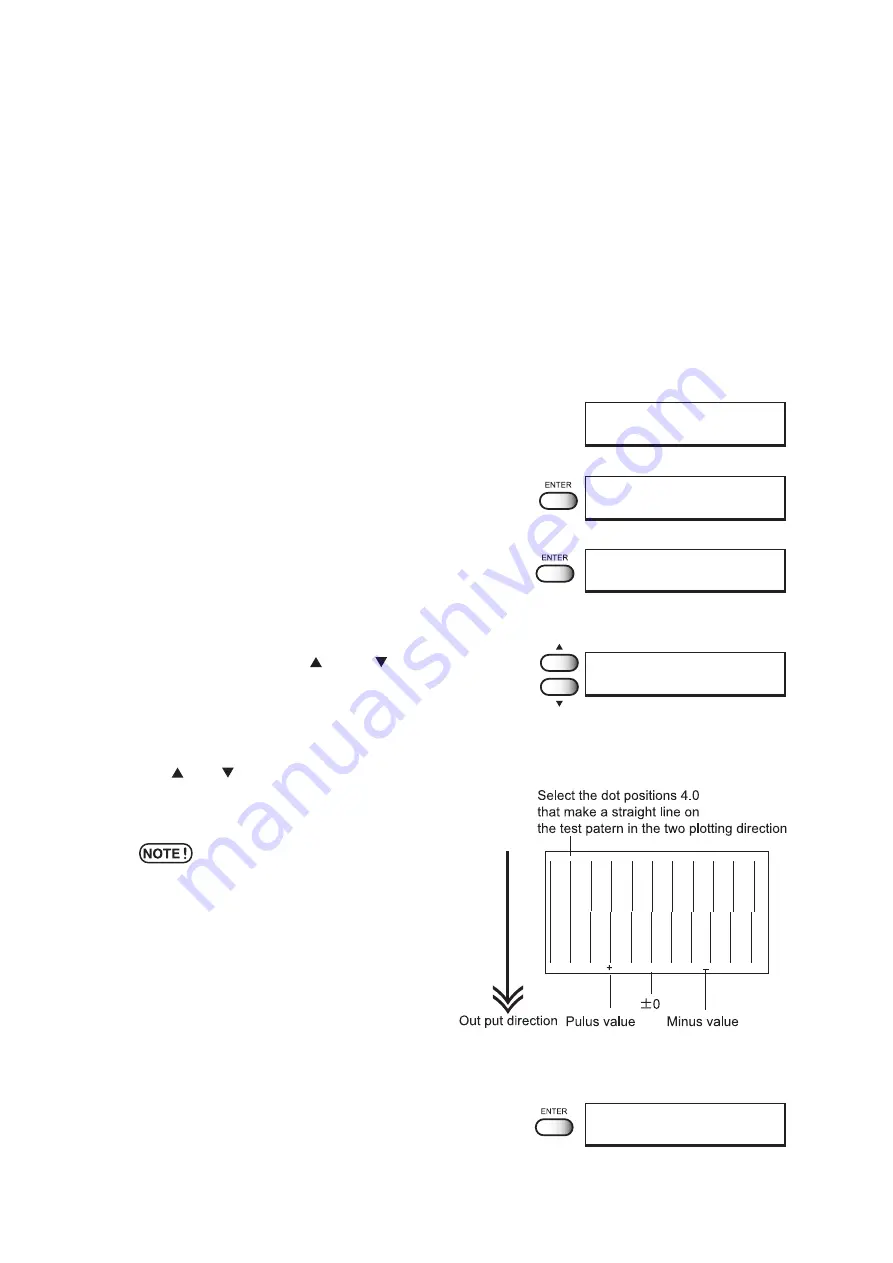
When the head height is adjusted, be sure to correct the dot positions.
Since the adjustment of head height is done by hand, the head will slightly deviate from the
correct position (See page 1.30). This function corrects the dot positions to ensure that the
accurate printing result is obtained.
The dot positions are corrected by comparing the ink dropping positions on each of the seven
test patterns between the two printing directions.
STEPS:
1.
Select [
PRINTadjust
] from [MAINTENANCE].
(See page 4.3)
2.
Press the [ENTER] key.
3.
Press the [ENTER] key.
Printing of the test patterns for the correction of dot position
starts. There are seven types of test patterns that are plotted.
4.
Press the JOG keys [ ] and [ ] to correct the
dot position of pattern 1.
The seven test patterns that are output are sequentially named
[Pattern 1], [Pattern 2], [Pattern 3], and [Pattern 4].
Select the correct dot positions on Pattern 1 using the JOG
keys [ ] and [ ].
Select the dot positions that make a straight line on the test
pattern in the two printing directions.
• If the pattern correction value for
straight lines is not within -15 through
+15, adjust the head height and then
correct it again with [PRINTadjust].
5.
Press the [ENTER] key.
M A I N T E N A N C E
P R I N T a d j u s t < e n t >
P R I N T a d j u s t
P R I N T
S T A R T
: e n t
P R I N T a d j u s t
P A T T R N 1
=
0 . 0
P R I N T a d j u s t
P A T T R N 2
=
0 . 0
P R I N T I N G
P L E A S E W A I T
Содержание DS-1600
Страница 2: ......
Страница 110: ......
Страница 146: ...4 36...
Страница 171: ......
Страница 172: ...Printed in Japan D201421 MIMAKI ENGINEERING CO LTD 2006 NH...


