background image

- 4.21 -

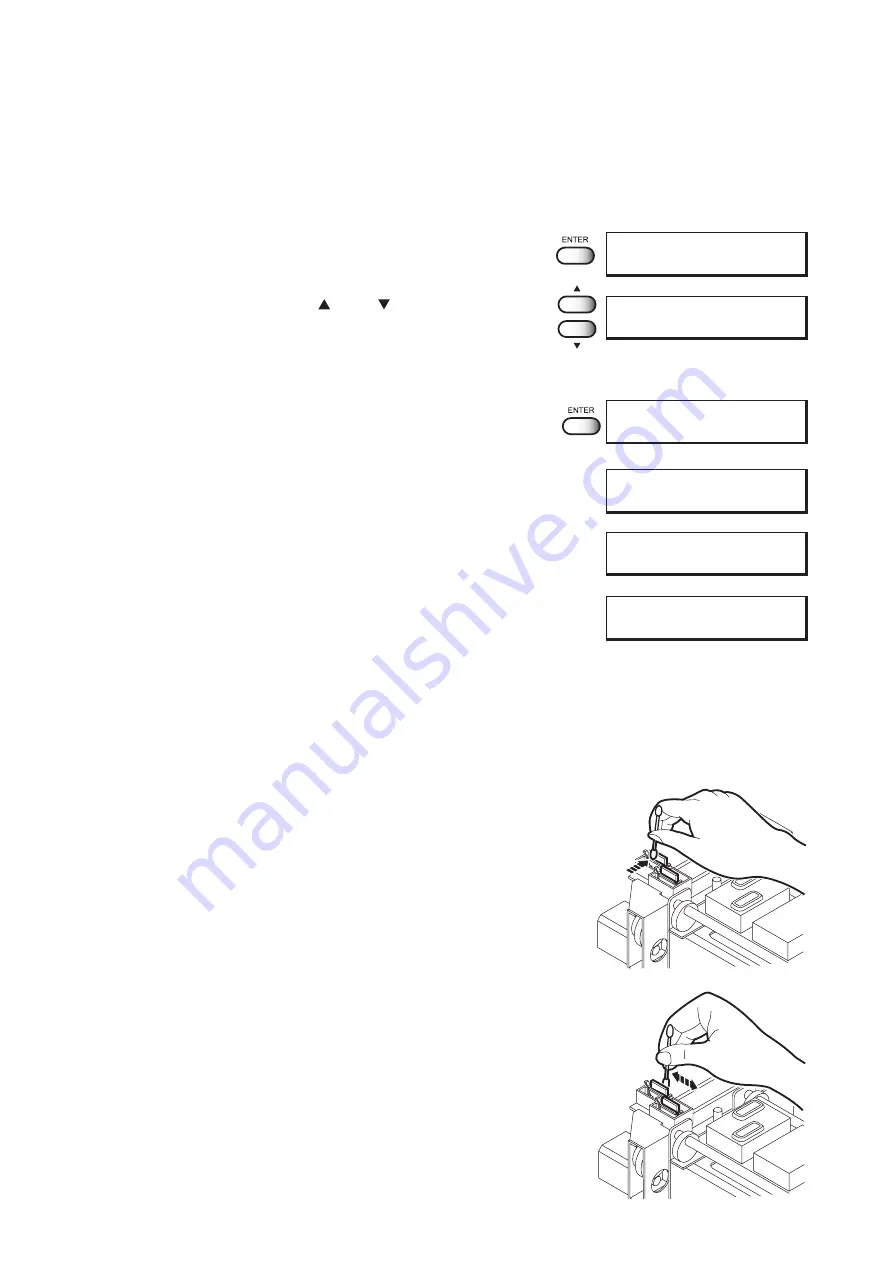
12. Close the maintenance cover.

13. Press the [ENTER] key.

14. Press the JOG keys [ ] and [ ] to select the time

to leave. (1-99 minutes: 1 min unit)

Normally set 1 min.

15. Press the [ENTER] key.

The initial operation is performed.

Remaining time is displayed.

After remaining time is over, execute cleaning.

Remaining cleaning time is displayed.

After cleaning the nozzles, the Y-bar moves to the top. The

wiper moves toward you and the carriage moves away from

the station.

16. Open the maintenance cover.

17. Clean the wiper.

Use and push a  swab contained cleaning liquid

to take off some dust on the felt surface.

Use a swab contained cleaning liquid to take off

some inks on the rubber surface.

Do not rub the
felt surmace

Rubber surface

N OZ Z L E

C L E AN I NG

W A I T

T I ME R =

1m i n

N OZ Z L E

C L E AN I NG

W A I T

T I ME R = 1 0m i n

I N T I A L I Z I N G

P L E A S E WA I T

S TO RA G E W A SH

0 0 : * * : * *

C L E A N I N G

0 0 : * * : * *

W I P ER

C L E A N I NG

C OM P L E T E D

: en t

Содержание DS-1600

Страница 1: ...uilding 5 9 41 Kitashinagawa Shinagawa ku Tokyo 141 0001 Japan Phone 81 3 5420 8671 Fax 81 3 5420 8687 URL http www mimaki co jp E mail trading mimaki co jp D201421 OPERATION MANUAL Color Inkjet Plott...

Страница 2: ......

Страница 3: ...R CUSTOMERS OF ANY PRODUCT On this Operation Manual The plotter is equipped with a high speed print head and other high performance part that may be dangerous Please be sure to read this manual carefu...

Страница 4: ...C rules can be exceeded To prevent this use of MIMAKI recommended cable is essential for the connection of this plotter Interference to televisions and radios The product covered by this Operation Man...

Страница 5: ...ition of the warning label xvi Chapter 1 Setup Installation of the plotter 1 2 Where to install the plotter 1 2 Precautions in installation 1 3 Moving the plotter 1 4 Checking the accessories 1 5 Conf...

Страница 6: ...24 Display of ink type 1 25 Setting ink cartridges 1 26 Fabric for printing 1 28 Types of fablic that can be used 1 28 Precautions in handling the fabric 1 29 Limited media 1 29 Before setting the fab...

Страница 7: ...eaning penetrated ink 2 14 Cleaning penetrated ink 2 15 Maintenance for frame components 2 15 To replenish ink set a new ink cartridge in the ink station 2 16 Chapter 3 How to use the application func...

Страница 8: ...ing the take up unit TAKE UP 3 26 Resetting printing conditions by type SETUP RESET 3 27 Chapter 4 Maintenance functions Maintenance of the plotter 4 2 Function menu MAINTENANCE 4 2 Before starting ma...

Страница 9: ...of failure 5 2 The plotter cannot be energized 5 2 The plotter cannot perform printing 5 2 Paper jamming arises fabric is soiled 5 3 If image quality declines 5 4 White lines thin spots are obvious In...

Страница 10: ...Applicable to wide fabrics On DS 1600 fabrics with up to 1650mm width can be set and printing for up to 1620mm width is possible On DS 1800 fabrics with up to 1900mm width can be set and printing for...

Страница 11: ...ink Even with printing to a coarse textured fabric the backing fabric is not stained by penetrated ink Removable platen boards are prepared for fabrics without ink penetration Slip sheet can be used O...

Страница 12: ...e operation procedure See page 2 2 Operate the plotter while confirming the display on the LCD Display on the LCD The content of display is shown in characters in a box as shown at right Operate the p...

Страница 13: ...numbers starting from 1 Notes to sentences caution on plotter operation and hints for effective use of the plotter are given The item to select from the setting menu before each plotter operation is...

Страница 14: ...a potentially hazardous situation which if not avoided could result in death or serioous injury CAUTION indicates a potentially hazardous situation which if not avoided may result in minor or moderat...

Страница 15: ...ion functions This chapter describes the application functions of the plotter such as the function menu for setting printing conditions Chapter 4 Maintenance functions This chapter describes functions...

Страница 16: ...al signs The symbol indicates the case where some phenomenon that requires a CAUTION sign including DANGER and WARNING signs exists A concrete precaution precaution against an electric shock in the ca...

Страница 17: ...tely and detach the plug from the receptacle Check first to be sure that the plotter no longer produces smoke and contact a distributor in your district for repair Never repair your plotter by yoursel...

Страница 18: ...he warning given on the labels In the case where any of the warning label has become so soiled that the warning message is illegible or has come off purchase a new one from your local distributor or o...

Страница 19: ...guration and function 1 7 Names and function of the parts under the front cover 1 9 About other setup 1 14 Connecting the cables 1 18 Switching ON OFF the power supply 1 20 Front cover and maintenance...

Страница 20: ...space is required not only for the plotter itself but also for printing operation Length Width Height Gross weight DS 1600 2750 mm 710 mm 940 mm 1350 mm About 230 kg DS 1800 3040 mm 710 mm 940 mm 1350...

Страница 21: ...which temperature and humidity vary by a great margin Use the plotter under the following environment Operating environment 15 to 30 C 35 to 65 Rh 1 1 40 to 65 Rh to use a TPink A place exposed to dir...

Страница 22: ...xcessive shock to it and it must be held up by at least two persons After moving the plotter be sure to lock the caster stoppers STEPS 1 Unlock each of the casters by raising up the caster stopper 2 H...

Страница 23: ...ing up feeding unit on AMFmodel on AMFmodel Stand stay M8 cap bolt M8x60 cap bolt for fitting the main unit for fitting the stand stay 8 pcs Use the bolt for packing C base reinforcing arm ASSY M5 Scr...

Страница 24: ...e ink hose Waste ink tank Ink Cartridge Option Printing film Power cable Grouding adapter for adjustment of the plotter Empty fabric core Phillips screwdriver Hexagonal wrench IEEE1394 Device Driver 6...

Страница 25: ...t It is provided with casters that are used to move the plotter 9 Waste ink hose It is the hose to discharge the waste ink 10 Waste ink tank It is the tank to store the waste ink 11 Take up unit It su...

Страница 26: ...is made to go up down the pinch roller for holding fabric 4 Feeding unit It supports to feed the fabric 5 Feeding tension bar It supports to adjust the tension to feed the roll fabric 6 Lapel bar The...

Страница 27: ...ccording to the thickness of the fabric used The carriage moves during plotting and fabric detection When cleaning the capping station execute the STATION MAINTENANCE function to move the carriage See...

Страница 28: ...s replace it immediately The pinch roller and feed roller This plotter retains a fabric with the pinch roller and the feed roller During plotting operation the feed roller feeds the fabric forward Whi...

Страница 29: ...e part of fabric is not on fabric the fabric can not be detected If a transparent fabric or a fabric whose reverse side is colored in black the sheet sensors may fail to detect the sheet In this case...

Страница 30: ...620mm width DS 1800 up to 1850 mm width is possible by setting the fablic ratainer to a position apart from the edge If a fablic retainer is stained by ink it can be removed for washing Remove it from...

Страница 31: ...ard to the projection at the edge of the ditch for penetrated ink The width of the ditch for penetrated ink can be changed in three steps de pending on the way of attachment Pattern1 Amount of penetra...

Страница 32: ...on the hanger on the inner side of the stand In case of DS 1600 1800 model In case of DS 1600 1800AMF model Attaching the waste ink tank STEPS 1 Insert the end of the two waste ink hoses at tached in...

Страница 33: ...ition Even with the same cloth type media characteristics change depending on the pre treatment and the presence or absence of the gumming processing at both ends of the cloth Be sure to perform test...

Страница 34: ...e slide plate toward the rear side of the plotter and then turn the thumb screws to secure them Attaching the platen boards Attach the platen boards when using a fabric without ink penetration Set the...

Страница 35: ...do so may cause damage to the head Installing IEEE1394 output driver When connecting the plotter using the host computer and IEEE1394 interface it may be necessary to install the IEEE1394 output driv...

Страница 36: ...ows 2000 or XP with IEEE1394 or USB2 0 interface use an IEEE1394 or USB2 0 interface cable to connect the computer and the plotter to gether It is possible to use an IEEE1284 interface cable for conne...

Страница 37: ...cable into an approriately grounded receptacle If not there is a fear of arising electric shock hazards and damage to the plotter Use a outlet which power breaker applicable to the 50A and 0 01 second...

Страница 38: ...front cover kept open the carriage does not move even when the power is switched on When the power is switched on the LCD first displays BOOT and then displays the firmware version number The message...

Страница 39: ...f the power of the plotter the function to prevent nozzle clogging is not performed If the power is turned off while the plotter is engaged in printing the head may fail to be retracted in the capping...

Страница 40: ...t open the maintenance cover except when it is necessary to clean the station interior When opening the cover during plotting If you open the front cover or the maintenance cover during plotting opera...

Страница 41: ...mediately rinse it off with a plenty of running water and consult a medical doctor Be sure to store the ink cartridges in a cold and dark place Do not store the cartridge in too high low temperature o...

Страница 42: ...color ink cartridge differs according to the ink type Before setting a new ink cartridge of different ink type or color be sure to wash the ink line and print head See to page 4 26 F row ink station C...

Страница 43: ...er these relationships when checking the heads for clogged nozzles and replenishing inks Display of ink type Ink type is displayed when an ink cartridge is newly set an ink cartridge of different type...

Страница 44: ...ink station No 1 8 A and H because the sublimation dye ink is 6 color composition Any color of sublimation dye ink can be used as the dummy ink but BLACK is reccomended to install into the ink statio...

Страница 45: ...CK is reccomended to install into the ink station No 1 and A because it is easier to check the dot position when operating print adjustment Do not use the washing cartridges as the dummy ink It may ca...

Страница 46: ...ric be careful about the setting position of leaf fabric Sizes of fabric that can be used DS 1600 AMF DS 1800 AMF Maximum 1650 mm 1900 mm Minimum 200 mm Printing width 1620 mm 1850 mm Thickness 7 0 mm...

Страница 47: ...r plotting Heavily curled fabric affect the plotted picture quality Do not use fabrics with extremely coarse fixture The plotter may not detect the fabric properly Limited media With the following med...

Страница 48: ...height with the fabric kept set on the platen the fabric gets caught on the carriage during carriage out operation causing damage to the head If you set the head height to 1 2mm minimum value from th...

Страница 49: ...then set the fabric to be used on the platen 9 Move the carriage to a position where adjustment is easy The carriage can be moved manually 10 Adjust the head height 1 Loosen the support screw 1 turn t...

Страница 50: ...on the preceding page to raise the head 3 Turn the head height adjustment screw in the direction shown and move the head downward With the head height adjustment rod kept pushed lower the head till t...

Страница 51: ...abric remains unchanged even when the head is raised To avoid fluffing of the fabric surface warp of the fabric edge or waving of the fabric during printing the distance between the head and the print...

Страница 52: ...slip sheet is used to prevent ink penetration of the fabric which is not dried after plotting STEPS 1 Set the fabric core of the slip sheet to the slip sheet bar hanger In case of DS 1600 1800 model...

Страница 53: ...g a roll fablic In case of DS 1600 1800AMF model STEPS 1 Open the roll shaft cover of the taking up unit and take the roll shaft out 2 Remove the roll holder attached to the roll shaft Remove one of t...

Страница 54: ...ric core support to bend the plate in an arc to touch on the inner wall of the paper core and then fix the fabric core support with the hexagonal wrench Fine adjustment can be performed by rotating th...

Страница 55: ...t to the right stand 9 Make sure the gear interlocks with the unit and then close the roll shaft cover Be sure to lock the roll shaft cover to avoid the roll shaft falls down 10 Adjust the paper core...

Страница 56: ...he edge of the roll is placed between the media set position 12 On the feeding unit set the ROTATION to the feeding position and set the MANUAL to feed the fabric approximately 3 meters To stop feedin...

Страница 57: ...ill be clamped 15 Open the front cover and the pull up the clamp lever with holding the leading edge of the fabric 16 Pull out the fabric and set the fabric straight If the edge of the fabric is curle...

Страница 58: ...the edge of the fabric is located in the same position of the take up pa per core When settin AUTO the rotation will be stopped 18 Move up the taking up tension bar to the upper position of the paper...

Страница 59: ...d automatically and then the mode enters the LOCAL mode In case of Leaf fabric a Press the JOG key on the operation panel The status of the feeding unit and the take up unit is dis played The fabric w...

Страница 60: ...osition and set the MANUAL to take up the fabric approximately once around the paper core When set MANUAL rotation will be stopped in a few seconds Repeat switching MANUAL and AUTO to take up the fabr...

Страница 61: ...ss the JOG key to feed the fabric so that the taking up tension bar is lowered 29 Press the ENTER key The origin is set and then the mode enters the LOCAL mode O R I G I N S E TU P 0 0 0 0 O R I G I N...

Страница 62: ...t both ends of the fabric STEPS 1 Move up the clamp lever on the front face The pinch roller comes up 2 Loosen the hand screws on both sides of the pinch roller to be removed 3 Pull out the pinch roll...

Страница 63: ...weight shaft of each feeding tension bar and taking up tension bar The weight of each tension bar is approxi mately 1500g and one counter weight is ap proximately 100g Install the quantity of the cou...

Страница 64: ...f 100g 1 counter weight x 6 2100g Install 8 counter weights to B position 1500g Tension bar itself 100g 1 counter weight x 8 2 1100g Half weight is applied to the tension bar 2 Attach the clip to the...

Страница 65: ...is obtained by excluding the margin from the printing fabric The margin at the front and rear edges of the fabric can be reduced using a guiding fabric The margin may be changed as required The effect...

Страница 66: ...abric that provides a wider printing area it is necessary to re establish another origin See page 3 15 STEPS 1 After the fabric detection is completed press the JOG keys and to move the car riage to t...

Страница 67: ...he basic functions of the keys on the operation panel and the modes in which the menus are displayed on the LCD Table of contents Operation 2 2 Setting the display language 2 6 Printing an image from...

Страница 68: ...t lights up in green when the power to the device is turned on DATA CLEAR key Used to erase the data that has been input to the device REMOTE key It is used to change the operation mode between the RE...

Страница 69: ...LCD in one of the following three modes Each of the three modes is explained below LOCAL mode This is the mode in which the preparations for printing operation are made When the power is switched on...

Страница 70: ...20 2 Invoke the local mode on the LCD 3 To set up a specific function from the operation panel follow the procedure shown below 1 Press the appropriate operation key on the operation panel 2 Select t...

Страница 71: ...ed The type and number of ink being used is displayed The height of head is displayed The version command and printer name are displayed The current setup condition is displayed The currently occured...

Страница 72: ...he ENTER key 5 Press the JOG key and to select the lan guage to be used for the indication on the dis play There are seven different languages from which you can select one as the display language ENG...

Страница 73: ...OCAL mode 3 Press the REMOTE key 4 The plotter receives the data from the computer The printing conditions that have been set for the data are displayed For the method of data transmission see the man...

Страница 74: ...Feed Comp function is displayed During the plotting performance is suspended some function could not be operated and the error will be displayed as follows In this case complete plotting operation or...

Страница 75: ...lable to alter the fabric feed rate 3 Press the JOG key or as needed to set the amount of correction Setting value is available from 500 to 500 Press END key to return to the REMOTE display The altere...

Страница 76: ...E when the setting value has changed Interrupting the printing operation To interrupt the printing operation that has been started stop the carriage and erase the receive data from the plotter STEPS 1...

Страница 77: ...mode This function can be executed even during host data printing In this case however some host data will be missing The amount of miss ing data depends on the medium width num ber of paths resolutio...

Страница 78: ...missing portions STEPS 1 Make sure the mode is LOCAL mode See page 1 20 2 Press the CLEANING key 3 Press the JOG keys and to select the ink head to be cleaned Each time a JOG key is pressed the row o...

Страница 79: ...tric shock hazards and breakage of the plotter Prevent moisture from entering inside the plotter If the inner part of the plotter becomes wet electric shock hazards and breakage of the plotter can res...

Страница 80: ...riodically For the procedure for cleaning the wiper refer to page 4 10 Cleaning the wiper shaft The dirty wiper shaft may cause the wiper malfunction and resulting an error display Cleaning penetrated...

Страница 81: ...on or when replacing the media If printing continuously or using a loose weave fabric the ink is collected faster In this case make sure to wipe up the ink when it gathered into liquid form Spread out...

Страница 82: ...ink completely runs out during printing The amount of ink of the cartridge number indicated has com pletely run out Install a new ink cartridge into Slot C of the right ink station STEPS 1 Either of t...

Страница 83: ...printing conditions 3 8 Improving the density of ink color INK LAYERS 3 11 Setting the ink drying time DRYING TIME 3 12 Deciding the priority of settings by the computer or the plotter PRIORITY 3 13...

Страница 84: ...operations In setup of the function menu allocate printing methods to be set to types 1 to 4 before detailed setting of the individual printing conditions so that you can use the printing conditions r...

Страница 85: ...Printing Conditions at a Time Selecting a Type Register a sequence of printing conditions set in the FUNCTION mode in the memory of the plotter By allocating the the sequence of printing conditions to...

Страница 86: ...r operation first stop the device See page 2 7 and then select the desired type in the LOCAL mode Only the setting of the following items can be changed during printing MM INCH MEDIA COMP TAKE UP If y...

Страница 87: ...erse types of media with appropriate tension which best suits each media it is neces sary to adjust the mount position of the lapel bar and the number of bars mounted Changing the winding angle of the...

Страница 88: ...e previous page 3 Adding the weight of the feeding tension bar 4 Lighten the weight of the taking up tension bar 3 1 Reduce the resistance of the lapel bar Reduce the number of lapel bars Change the m...

Страница 89: ...he ENTER key 3 Press the ENTER key 4 Press the ENTER key Test printing for correction of the fabric feed rate starts Seven types of fabric correction patterns are plotted 5 Enter a correction value fr...

Страница 90: ...igh speed High printing speed and slightly inferior image quality STEPS 1 Select a type see page 3 3 Here select Type 1 2 Press the ENTER key 3 Press the JOG keys and to select PRINT MODE 4 Press the...

Страница 91: ...laced on printing carriage STEPS 1 Select a type see page 3 Here select Type 1 2 Press the ENTER key 3 Press the JOG keys and to select PRINT MODE 4 Press the ENTER key 5 Press the JOG keys and to set...

Страница 92: ...nd to select PRINT MODE 4 Press the ENTER key 5 Press the JOG keys and to select RET SPD UP 6 Press the ENTER key 7 Press the JOG keys and to set a return ing speed ON or OFF Here select OFF 8 Press t...

Страница 93: ...head may catch the cloth to press it to a position resulting in cloth jam STEPS 1 Select a type see page 3 3 Here select Type 1 2 Press the ENTER key 3 Press the JOG keys and to select INK LAYERS 4 P...

Страница 94: ...DRYING TIME 4 Press the ENTER key 5 Press the JOG keys and to set a drying time after the scanning This is the drying time from the instant at which the carriage returns to the capping station till th...

Страница 95: ...y given to the printing conditions set on the plotter Priority needs to be specified for each of the following items PRINT MODE INK LAYERS DRYING TIME INK TYPE REFRESH MEDIA COMP STEPS 1 Select a type...

Страница 96: ...he refresh Here select PLOT 14 Press the ENTER key 15 Press the JOG keys and to select the priority HOST or PLOT of the media comp Here select PLOT 16 Press the ENTER key 17 Press the END key twice Th...

Страница 97: ...ect MARGIN 4 Press the ENTER key 5 Press the ENTER key 6 Press the JOG keys and to set a maigin You can set a margin in the range 9 mm to 95 mm in mm unit Here set 10 mm 7 Press the ENTER key 8 Select...

Страница 98: ...rns to the LOCAL mode This plotter sets the width of the printing area by detecting the position of the fabric retainer The left and right margins can be changed by changing the position of the fabric...

Страница 99: ...is normal LEVEL 2 Frequency of refreshing is slightly high LEVEL 3 Frequency of refreshing is high STEPS 1 Select a type See page 3 3 Here select Type 1 2 Press the ENTER key 3 Press the JOG keys and...

Страница 100: ...in millimeters INCH Numerics are expressed in inches STEPS 1 Select a type See page 3 3 Here select Type 1 2 Press the ENTER key 3 Press the JOG keys and to select MM INCH 4 Press the ENTER key 5 Pres...

Страница 101: ...limation dye ink TPig Textile pigment ink If the same type of ink is set in the ink stations on both sides the type of ink cannot be set since INK TYPE is not displayed on the LCD STEPS 1 Select a typ...

Страница 102: ...ing cleaning without removing the ink around the head it may cause the nozzle condition worse STEPS 1 Select a type See page 3 3 Here select Type 1 2 Press the ENTER key 3 Press the JOG keys and to se...

Страница 103: ...nting In this case change the setting to OFF or change the cleaning type to Soft STEPS 1 Select a type See page 3 3 Here select Type 1 2 Press the ENTER key 3 Press the JOG keys and to select AUTO CLE...

Страница 104: ...and to select the length to execute the cleaning performance 0 1 to 10 0m in 0 1m unit 10 Press the ENTER key 11 Press the END key twice The menu returns to the LOCAL mode L O C A L w i d t h 1 2 7 2...

Страница 105: ...nk stations this function cannot be used since PRINT CONT is not displayed on the LCD If Ink End occurs during printing printing is stopped STEPS 1 Select a type See page 3 3 Here select Type 1 2 Pres...

Страница 106: ...key 7 Press the JOG keys and to set a back feed length 8 Press the ENTER key 9 Press the END key twice The menu returns to the LOCAL mode S E T U P S E L E C T TY PE 1 T Y P E 1 M E D I A COM P e n t...

Страница 107: ...pe See page 3 3 Here select Type 1 2 Press the ENTER key 3 Press the JOG keys and to select FEEDING 4 Press the ENTER key 5 Press the JOG keys and to select ON or OFF of the FEEDING Here select ON 6 P...

Страница 108: ...elect a type See page 3 3 Here select Type 1 2 Press the ENTER key 3 Press the JOG keys and to select TAKE UP 4 Press the ENTER key 5 Press the JOG keys and to select ON or OFF of the TAKE UP Here sel...

Страница 109: ...select Type 1 2 Press the ENTER key 3 Press the JOG keys and to select SETUP RESET 4 Press the ENTER key 5 Press the ENTER key The current printing conditions are reset to the factory set print ing co...

Страница 110: ......

Страница 111: ...otter periodically This chapter describes the functions that help solve the problem of deteriora tion in image quality and replace a waste ink tank The plotter needs maintenance when it is left out of...

Страница 112: ...perations FUNCTION See Chapter 2 How to use the basic functions SET UP FUNCTION LIST MAINTENANCE DATA DUMP PRINT adjust PRINT START PATTERN 1 to 7 Adjust value 15 to 15 STATION CARRIAGEout WIPER EXCHG...

Страница 113: ...ation panel You have to understand how to invoke the desired maintenance function to carry out maintenance STEPS 1 Make sure the mode is LOCAL mode Press the REMOTE key and put the menu back into the...

Страница 114: ...UNCTION 2 PRINTadjust Indicates a correction value for dot position 3 REPLACE COUNTER Indicates the number of times the ink cartridges are replaced 4 VERSION Indicates the version of the firmware and...

Страница 115: ...th the long side set horizontally DATA DUMP automatically feeds line according to the size of paper used STEPS 1 Select DATA DUMP from MAINTENANCE See page 4 3 2 Press the ENTER key Transfer data from...

Страница 116: ...t patterns for the correction of dot position starts There are seven types of test patterns that are plotted 4 Press the JOG keys and to correct the dot position of pattern 1 The seven test patterns t...

Страница 117: ...right indication is shown 7 Press the END key twice The menu returns to the LOCAL mode L O C A L w i d t h 1 2 7 2mm P R I N T a d j u s t P A T T R N 7 0 0 P R I N T a d j u s t P A T T R N 2 0 0 P...

Страница 118: ...ore performing STATION be sure to move down the clamp lever on the front side of this plotter STEPS 1 Move down the clamp lever on the front face of the plotter 2 Select STATION from MAINTENANCE See p...

Страница 119: ...the plotter is left unused for a long period of time STEPS 1 Execute the station maintenance CARRIAGEout to move the carriage See the steps 1 to 4 on page 4 8 2 Open the maintenance cover 3 Remove sta...

Страница 120: ...bbing the felt side surface will make it fluffy and result in clogged nozzle Wipe ink off the rubber side surface with a swab When executing this function the carriage will come out of the capping sta...

Страница 121: ...distributor or our office Do not press the ENTER key other than the case of replacing wipers The number of wiper operations that is counted in the plotter will be reset Do not select Replace Wiper unl...

Страница 122: ...on the left as viewed fromyour position 8 Clean the wiper guide shaft using a swab or cloth If dirt is hard to remove use a swab of cloth damepened with water Extremely dirty wiper guide shaft may ca...

Страница 123: ...per shaft too STEPS 1 Select STATION from MAINTENANCE See page 4 3 2 Press the ENTER key 3 Press the ENTER key The carrige will come out of the capping station 4 Open the maintenance cover 5 Clean the...

Страница 124: ...nction Page 4 25 if the inks are mixed Operate it in the head only with the nozzle clogging Cleaning Tools Cleaning liquid bottle kit A29 SPC 0137 Option Syringe STEPS 1 Select STATION from MAINTENANC...

Страница 125: ...urface Use a swab contained cleaning liquid to take off some inks on the rubber surface 8 Clean the wiper and press the ENTER key 9 Fill the cap with the cleaning liquid using a syringe 10 Close the m...

Страница 126: ...emaining time is displayed After remaining time is over execute cleaning It displays the remaining cleaning time Cleaning is completed the menu returns the LOCAL mode N OZ Z L E CL E AN I NG WA I T T...

Страница 127: ...0137 Option Syringe STEPS 1 Select STATION from MAINTENANCE See page 4 3 2 Press the ENTER key 3 Press the JOG keys and to select DRAIN WASH 4 Press the ENTER key The table moves backward the Y bar mo...

Страница 128: ...cleaning liquid until just before it overflows from the cap 7 Close the maintenance cover 8 Press the ENTER key Dry suction continues for 30 seconds and the initial operation is performed The menu ret...

Страница 129: ...P INK function page 4 25 if the inks are mixed Cleaning Tools Cleaning liquid bottle kit SPC 0137 Option Syringe STEPS 1 Select STATION from MAINTENANCE See page 4 3 2 Press the ENTER key 3 Press the...

Страница 130: ...uid to clean off ink blots on wiper and bracket If dirt of curl is serious replace the wiper with a new one At the time of replacement be sure to terminate the machine operation and follow the wiper r...

Страница 131: ...to the top The wiper moves toward you and the carriage moves away from the station 16 Open the maintenance cover 17 Clean the wiper Use and push a swab contained cleaning liquid to take off some dust...

Страница 132: ...of pause Repeat the performance of the air aspiration several times to clean up the ink discharge way Perform the operation for the each cap 21 Close the station cover and press the ENTER key Carrige...

Страница 133: ...ion 4 Remove the left maintenance cover Lossen the 3 screws attached at the bottom of the main unit and remove 1 screw on the left maintenance cover and then remove the left maintenance cover 5 Do the...

Страница 134: ...appear on the LCD after the initialization The menu enters the LOCAL mode Adjusting the head height when the fabric used is changed HEAD HEIGHT See page 1 30 Before adjusting the head height be sure...

Страница 135: ...or F to R The upper eight of test printing indicates the R row of heads and the lower eight indicates the F row of heads 4 types of head row can be selected 1234 5678 ABCD and EFGH 4 Press the ENTER...

Страница 136: ...page 4 3 2 Press the ENTER key The ink type currently filled in the ink station is shown 3 Press the JOG keys and to set the type of ink to be filled in the R row ink station Sub Sublimation dye ink...

Страница 137: ...is started automatically 15 When the LCD shown on the righti appears take out the washing liquid cartridge from the ink station When all the washing liquid cartridges are taken out discharge of the w...

Страница 138: ...the right will be displayed when all the car tridges are inserted normally 19 Press the ENTER key Filling of ink is started automatically When filling of ink is completed the display shown on the righ...

Страница 139: ...er with the whole ink station to continue printing ALL Uses both the Front and Rear rows REAR Uses only the Rear row FRONT Uses only the Front row If different ink types are set in the two ink station...

Страница 140: ...Stretch check method The printing goes as the following order cruciform fill pattern square mark The stretch condition of the cloth can be verified by the gap between the cruciform and the square mar...

Страница 141: ...color 1A 2B 3C 4D 5E 6F 7G 8H 8 Press the ENTER key Start printing the check pattern Screen will return to the color selection screen at the end of printing 9 Press the END key four times The menu ret...

Страница 142: ...NCE See page 4 3 2 Press the ENTER key 3 Press the ENTER key 4 Press the JOG key and to select ON or OFF of the ROUTINE FLUSHING Here select ON 5 Press the ENTER key 6 Press the JOG keys and to select...

Страница 143: ...select ON 6 Press the ENTER key 7 Press the JOG keys and to select time interval 8 Press the ENTER key 9 Press the END key three times The menu returns to the LOCAL mode M A I N TE N A N C E R O U T I...

Страница 144: ...he MAINTE NANCE See page 4 3 2 Press the ENTER key 3 Press the ENTER key again Current machine name is displayed 4 Press the JOG keys and to select the machine number 01 to 99 5 Press the ENTER key Re...

Страница 145: ...key 3 Press the ENTER key again The firmware version is displayed 4 Press the END key The menu returns to the Version 5 Press the JOG keys and to select the Serial No 6 Press the ENTER key 7 Press the...

Страница 146: ...4 36...

Страница 147: ...sures to be taken in the case where an abnormal phenomenon arises on the plotter and where an error mes sage is given on the display Table of contents Before taking a phenomenon as a sign of failure 5...

Страница 148: ...n properly connected to the power outlet and the computer The plotter cannot perform printing This occurs when the data is not being transmitted to the plotter properly It can also occur when any of t...

Страница 149: ...c is set improperly Is a pre processed cloth which suits the ink used Is the cloth wrinkled or folded at both edges Use cloths which do not become elastic with water Use a pre processed cloth which su...

Страница 150: ...White lines thin spots are obvious In the direction of travel of the head Corrective measure Execute the head cleaning See page 2 12 Corrective measure Clean the interior of the station See page 4 8...

Страница 151: ...is tered Time to replace the batery Attach the ink cartridge s corre sponding with the number s shown on the display Printing can be continued in file by file basis by pressing the RE MOTE key However...

Страница 152: ...d The feeding motor cover is opened Printing will be enabled by pressing the REMOTE key Close the front cover or the maintenance cover Adjust environmental tempera ture Lower the clamp lever Close the...

Страница 153: ...for a certain period of time or more Check the fabric and lower the take up tension bar Check the rotation of the take up unit Check the fabric rotation of the take up unit and condition of the tensio...

Страница 154: ...mmand is abnormal Irregular in receiving data Color command is abnormal Turn off the power to the plotter an turn it on after a while If the same error message appears again on the LCD contact your lo...

Страница 155: ...contact your local distributor to call for service Install the I F board Check to be sure that the cable is securely connected to the host computer and interface board Also check to ascertain that no...

Страница 156: ...ributor to call for service Check the connection Turn off the power to the plotter and check the connection of the cable of the take up unit When the same error message appears again on the LCD even i...

Страница 157: ...Ink guidance Chapter 6 describes procedures for printing process by ink types and so on Table of contents Emergency measures 6 2 Printing procedures 6 3 Sublimation dye ink recipe 6 4 Textile pigment...

Страница 158: ...yes immediately with plenty of water longer than 10 minutes occasionally lifting the upper and lower Consult with a doctor for a medical advice Ingestion In case that ink is swallowed Rinse out with w...

Страница 159: ...e pigment ink Pre treatment Inkjet print Post treatment Apply the pre treatment to the fabric Print on the fabric with the plotter Apply the heat treatment to the printed fabric Washing Wash the fabri...

Страница 160: ...ckup rate with roller 2 Dry up the fabric at 100 130 C This procedures is one such example Depending on the facilities you use or material and thickness of the fabric adjust the ratio of material mixt...

Страница 161: ...minute Depending on the facilities you use adjust the processing temperarure and processing time In case the fabric is used for textile remove the dye and agent by washing STEPS 1 Sorping processing P...

Страница 162: ...plotter Post treatment Fix the printed pigment to the fabric by heat Depending on the material of fabric processing is different Cotton for T shirt Heater press at 160 C for 60 seconds Cotton broadcl...

Страница 163: ...dix This appendix describes the specifications and components the plotter function menu structure Table of contents Basic specifications A 2 Speification for ink A 4 Optional extras A 4 Function flow...

Страница 164: ...tem of ink Tube supplying from the ink cartridge Displaying the remaining amount of ink is provided INK END detection function is provided Ink cartridge replacement method Capacity of ink cartrige 220...

Страница 165: ...tage 50 60 Hz 1Hz Power consumption 500 W or less Recomended Temperature 15 30 C Enviroment Humidity 35 65 Rh No condensation Accuracy guaranteed 18 25 C temperature Temperature change 10 C h or less...

Страница 166: ...Within six months after opening the package Within the expiration period described on the cartridge Storage temperature 0 to 40 C During storage Storage at temperature of 40 C is permitted within a m...

Страница 167: ...4 F Sub 8 DS 01 Ver1 00 MRL 1E MEDIA SET ROLL LEAF Setting fabric MEDIA X Y LOCAL width 1620mm Detecting MEDIA PLEASE WAIT ORIGN SET UP ORIGIN SETUP TYPE1 Display V Key ENTER v ENTER TEST CLEANING ENT...

Страница 168: ...E DIRECTION ent TYPE MODE RET SPD UP ent v v ENTER ENTER ENTER ENTER ENTER ENTER TYPE DRYING TIME ent TYPE EACH LINE 0 0 s 0 0 to 9 9 sec ENTER TYPE DRYING TIME HOST HOST PLOT ENTER ENTER ENTER v TYPE...

Страница 169: ...May Mix Up ContinueOK ent WIPER CLEANING COMPLETED ent NOZZLE CLEANING WAIT TIMER 1 min 1 to 99 min INITIALIZING PLEASE WAIT WAITING 0 0 CLEANING 0 0 ENTER ENTER ENTER ENTER STATION MAINT MENT DRAIN...

Страница 170: ...CTR ent ROUTINE CONTROL SELECT FLUSHING ROUTINE CONTROL SELECT CLEANING ROUTINE FLUSHING INTERVAL 1 h 1 to 24 h ROUTINE FLUSHING FLUSHING ON ON OFF ROUTINE CLEANING CLEANING ON ON OFF ROUTINE CLEANIN...

Страница 171: ......

Страница 172: ...Printed in Japan D201421 MIMAKI ENGINEERING CO LTD 2006 NH...

Отзывы: