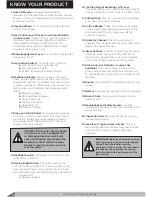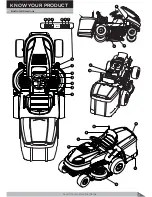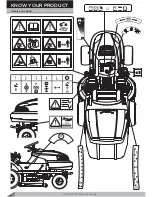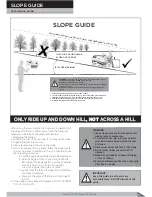
Lawn Tractor Rear Discharge
9
•
Before you leave the mower, stop the engine.
Remove
the key. Disengage and lower any attachment. Set the
parking brake. Never mount or dismount from the seat
while the engine is running. An accident can occur if you
touch the brake, shift lever, throttle, and clutch or blade
control while the engine is running.
•
Make sure you are in good condition when you mow.
:KHQ\RXPRZIRUVHYHUDOKRXUV\RXUUHµH[HVZLOO
decrease and your mind will not be as alert. Take a short
break or an accident can occur. If the temperature is hot,
use caution to prevent dehydration. If you are tired, angry
or not completely alert, do not operate the mower. If you
use alcohol, medication or drugs, do not use the mower
or any type of power equipment.
•
Engine speed is a key to safe mowing and to a good
looking lawn.
7KHPD[LPXPVSHHGRIWKHHQJLQHZDVVHW
at the factory. Do not change the setting of the engine
governor.
•
Select the maximum engine and ground speed that is
right for the terrain and the height of the grass.
The blade
FXWVEHVWZKHQWKHHQJLQHLVRSHUDWLQJDWPD[LPXP
speed. The engine and transmission will also run cooler at
PD[LPXPHQJLQHVSHHG
•
Also, the grass bagger will function better when the
engine is operating at maximum speed.
On slopes,
decrease the ground speed and use care making sure the
mower feels safe to operate.
• I
f the weather conditions are bad, do not mow.
If weather
FRQGLWLRQVEHFRPHEDGVWRSFXWWLQJDQG´QLVKODWHU,WLV
GDQJHURXVWRFXWJUDVVLQWKHUDLQ$OZD\V´QGSURWHFWLRQ
LQDQHOHFWULFDOVWRUP,IWKHZHDWKHUFRQGLWLRQVDUHH[WUD
dry, protect your eyes with safety glasses from the dust
and from the objects discharged by the mower. Also, a
dust or a pollen mask can help.
•
Your mower is equipped with a number of safety devices
which are important to the safety of the operator and
bystanders and must never be changed or removed from
the mower.
If a safety device is lost, damaged or no longer
functions, repair or replace the device before you operate
the mower.
•
It is best to mow during the day.
If you must mow at night,
make sure there is enough light for safe operation.
•
Your mower will require regular maintenance and service.
The maintenance schedule depends on the hours of use.
Also, mowing conditions can change the schedule. Check
the Instruction Manual for more information. Correct
maintenance will help the mower function safely.
•
Do not service the mower (except for the carburetor
adjustment) while the engine is running.
Before you
service the unit, even with the engine stopped, always
disconnect the wire from the spark plug to prevent the
engine from starting.
•
If you hit a large object during operation, stop the
engine.
Remove the wire from the spark plug. Carefully
inspect the mower for damage. Before you start the
engine again, make the necessary repairs. If you feel
QHZRUH[FHVVLYHYLEUDWLRQLPPHGLDWHO\VWRSWKHHQJLQH
and check for the problem. Vibration can be a warning
of a problem. Keep all nuts, bolts and screws tight.
•
The blade is the most dangerous part of the mower.
Frequently check the blade and the blade mounting
fasteners. Keep the fasteners tight. If the blade hits a
solid object, stop the engine. Remove the wire from
the spark plug. Check for a blade that is bent, cracked
or for other damages. Before you start the engine,
replace a damaged blade(s). For safety, replace the
blade every two years.
•
A sharp blade decreases the workload on the engine
and more evenly cuts grass.
Frequently sharpen the
blade for a better looking cut. Ensure to use every side
of the mower housing to trim near an object.
•
A grass bagger is a good accessory for your mower.
For best performance and safety, make sure the grass
bagger is approved for use with your mower. Follow
the assembly and operation instructions included with
the grass bagger.
•
Some grass baggers require a special blade for best
performance.
Before you attach, check, or empty the
grass bagger, always stop the engine. Before each use
of the grass bagger, check for cracks, wear or
deterioration. Before you use the grass bagger, replace
a damaged part with a replacement part approved by
the factory.
•
For you to have a good green lawn, follow the mowing
procedures below.
Do not cut the grass too short. If you
cut the grass too short you can cause the grass to
become yellow or make the lawn look brown. Use a
lower height of cut in cool months when the grass is
thicker. Raise the height of cut in hot dry periods. If you
cut the grass with a blade that is not sharp or at a slow
engine speed you can damage the grass. Move the
throttle control to the FAST position when mowing and
using the grass bagger. Also, use a proper ground
speed when using the grass catcher.
•
If you change the direction or pattern of cut slightly
every time you mow will make the grass grow stronger
and thicker.
Do not add oil or gasoline to the mower
while on the lawn. Spilled oil or gasoline can kill the
grass. In high or thick grass, do not try to cut all the
JUDVVWKH´UVWWLPH5DLVHWKHKHLJKWRIFXWRQWKH´UVW
FXWWLQJDQGORZHUWKHKHLJKWIRUWKHQH[WFXWWLQJ
Another way is to cut only part of the width of the
mower and decrease your ground speed (not the
engine) to move more slowly so that the mower can
discharge the grass as it moves forward.
Содержание Gizmow T130
Страница 12: ...KNOW YOUR PRODUCT Lawn Tractor Rear Discharge 12 Decals and Labels ...
Страница 37: ...PARTS SCHEDULE Lawn Tractor Rear Discharge 37 T130 T140 T160 T180 Lawn Tractor Rear Discharge ...
Страница 38: ...PARTS SCHEDULE Lawn Tractor Rear Discharge 38 ...
Страница 40: ...Lawn Tractor Rear Discharge 40 PARTS SCHEDULE T130 T160 T140 T180 LAWN TRACTOR 1A ...
Страница 44: ...T130 T160 T140 T180 LAWN TRACTOR 1B PARTS SCHEDULE Lawn Tractor Rear Discharge 44 ...
Страница 49: ...T130 T160 LAWN TRACTOR 1C Lawn Tractor Rear Discharge 49 PARTS SCHEDULE ...
Страница 50: ...T140 T180 LAWN TRACTOR 1C PARTS SCHEDULE Lawn Tractor Rear Discharge 50 ...
Страница 53: ...T130 T160 T140 T180 LAWN TRACTOR 1D Lawn Tractor Rear Discharge 53 PARTS SCHEDULE ...
Страница 56: ...T130 T160 T140 T180 CUTTING DECK 2 PARTS SCHEDULE Lawn Tractor Rear Discharge 56 ...
Страница 60: ...T130 T160 FRONT AXLE 7 PARTS SCHEDULE Lawn Tractor Rear Discharge 60 ...
Страница 61: ...T140 T180 FRONT AXLE 7 Lawn Tractor Rear Discharge 61 PARTS SCHEDULE ...
Страница 63: ...T130 T160 T140 T180 LIFTING LEVER 11 Lawn Tractor Rear Discharge 63 PARTS SCHEDULE ...
Страница 65: ...T130 T160 T140 T180 HUB 14 Lawn Tractor Rear Discharge 65 PARTS SCHEDULE ...
Страница 67: ...T130 T160 T140 T180 REAR AXLE 15A Lawn Tractor Rear Discharge 67 PARTS SCHEDULE ...
Страница 69: ...T130 T160 T140 T180 REAR AXLE 15B Lawn Tractor Rear Discharge 69 PARTS SCHEDULE ...
Страница 73: ...T130 T160 T140 T180 HOOD 24 Lawn Tractor Rear Discharge 73 PARTS SCHEDULE ...
Страница 75: ...T130 T160 T140 T180 PANEL 25 Lawn Tractor Rear Discharge 75 PARTS SCHEDULE ...
Страница 77: ...T130 T160 T140 T180 ELECTRICAL SYSTEM 27 Lawn Tractor Rear Discharge 77 PARTS SCHEDULE ...
Страница 78: ...T130 T160 T140 T180 ELECTRICAL SYSTEM 27a PARTS SCHEDULE Lawn Tractor Rear Discharge 78 ...
Страница 80: ...T130 T160 T140 T180 SEAT 32 PARTS SCHEDULE Lawn Tractor Rear Discharge 80 ...
Страница 82: ...T130 T160 T140 T180 BUNKER 34 PARTS SCHEDULE Lawn Tractor Rear Discharge 82 ...
Страница 84: ...T130 T160 T140 T180 GEAR SHIFTING 35 PARTS SCHEDULE Lawn Tractor Rear Discharge 84 ...
Страница 86: ...T130 T160 T140 T180 SEGMENT 36 PARTS SCHEDULE Lawn Tractor Rear Discharge 86 ...
Страница 88: ...T130 T160 T140 T180 PLATE 37 PARTS SCHEDULE Lawn Tractor Rear Discharge 88 ...
Страница 90: ...T130 T160 T140 T180 DECALS 38 PARTS SCHEDULE Lawn Tractor Rear Discharge 90 ...


