Lawn Tractor Rear Discharge
19
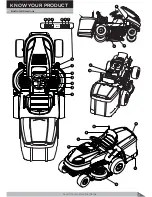
1.
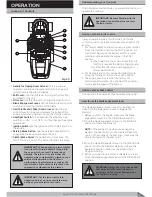
Handle for Tipping Grass Catcher:
This is a manual
operation and allows the grass catcher to be tipped in
order to empty the grass clippings.
2.
Shift Lever:
Use the shift lever to change the direction
and speed of the unit.
3.
Lift Lever:
Use the lift lever to change the height of cut.
4.
Blade Engagement Lever:
Use the blade rotation control
to start and stop the rotation of the blade.
5.
Gas (throttle and choke) Control Lever:
Use the gas
control lever to increase or decrease the speed of the
engine. And when gold starting use the throttle position.
6.
Headlight Switch:
The independant headlight can be
switched <<ON>> or <<OFF>> without having the engine
operational.
7.
Ignition Switch:
Use the ignition switch to start and stop
the engine.
8.
Parking Break Button:
Use the parking brake button to
engage the brake when you leave the unit.
9.
Clutch/Brake Pedal:
The pedal has two functions. The
´UVWIXQFWLRQLVDFOXWFK7KHVHFRQGIXQFWLRQLVDEUDNH
The following section will help you understand the how to
operate the controls.
OPERATION
Locatios of Controls
Understanding your Controls
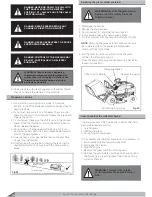
IMPORTANT:
When operating a lawn tractor
it can result in foreign objects thrown into
the eyes, which can result in severe eye
damage. Therefore, it is critical that the
operator always wears safety glasses or eye
shields while operating the tractor or
performing any adjustments or repairs. We
recommend a wide vision safety mask over
spectacles or standard safety glasses.
IMPORTANT:
Put the lawn tractor into
operation only at an open ventilated area
as the engine exhalations are toxic.
IMPORTANT:
Become familiar with the
operation of controls before you start
the lawn tractor.
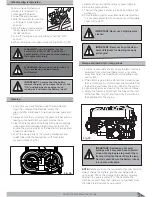
Always operate engine at full throttle. The throttle
control is used to increase or decrease the speed of the
engine.
1. For normal operation and when using a grass catcher,
move the throttle control to the FAST position. For
maximum charging of the battery and for a cooler
running engine, operate the engine in the FAST
position.
a. When operating the engine at less than full
throttle, it reduces the battery charging rate.
b. Full throttle offers the best bagging and
mower performance.
2. For transport and to tow pull behind attachments,
move the throttle control to the SLOW position.
3. The engine governor is set at the factory for
maximum performance. Do not adjust the governor
to increase the speed of the engine.
WARNING:
Always keep your hands and
IHHWDZD\IURPWKHEODGHGHµHFWRU
opening, and the mower housing when
the engine is running.
1
2
3
4
5
6
7
8
9
Fig 23
How to use the throttle control
How to use the choke control
How to use the blade engagement lever
You can start the engine at choke position when cold.
The blade engagement lever is next to the steering
wheel. Use the engagement lever to engage the
blade(s).
1. Before you start the engine, make sure the blade
engagement lever is in the DISENGAGE position.
2. Move the blade engagement lever to the ENGAGE
position to rotate the blade(s).
NOTE:
If the engine stops when you engage the
blade(s), the seat switch is not activated. Make sure
you sit in the middle of the seat. Also, make sure the
wire is connected to the seat switch.
3. Move the blade engagement lever to the DISENGAGE
position to stop the blade(s). Before you leave the
operator’s position, make sure the blade(s) has
stopped rotating.
4. Before you ride the unit across a sidewalk or a road,
move the blade engagement lever to the DISENGAGE
position.
Содержание Gizmow T130
Страница 12: ...KNOW YOUR PRODUCT Lawn Tractor Rear Discharge 12 Decals and Labels ...
Страница 37: ...PARTS SCHEDULE Lawn Tractor Rear Discharge 37 T130 T140 T160 T180 Lawn Tractor Rear Discharge ...
Страница 38: ...PARTS SCHEDULE Lawn Tractor Rear Discharge 38 ...
Страница 40: ...Lawn Tractor Rear Discharge 40 PARTS SCHEDULE T130 T160 T140 T180 LAWN TRACTOR 1A ...
Страница 44: ...T130 T160 T140 T180 LAWN TRACTOR 1B PARTS SCHEDULE Lawn Tractor Rear Discharge 44 ...
Страница 49: ...T130 T160 LAWN TRACTOR 1C Lawn Tractor Rear Discharge 49 PARTS SCHEDULE ...
Страница 50: ...T140 T180 LAWN TRACTOR 1C PARTS SCHEDULE Lawn Tractor Rear Discharge 50 ...
Страница 53: ...T130 T160 T140 T180 LAWN TRACTOR 1D Lawn Tractor Rear Discharge 53 PARTS SCHEDULE ...
Страница 56: ...T130 T160 T140 T180 CUTTING DECK 2 PARTS SCHEDULE Lawn Tractor Rear Discharge 56 ...
Страница 60: ...T130 T160 FRONT AXLE 7 PARTS SCHEDULE Lawn Tractor Rear Discharge 60 ...
Страница 61: ...T140 T180 FRONT AXLE 7 Lawn Tractor Rear Discharge 61 PARTS SCHEDULE ...
Страница 63: ...T130 T160 T140 T180 LIFTING LEVER 11 Lawn Tractor Rear Discharge 63 PARTS SCHEDULE ...
Страница 65: ...T130 T160 T140 T180 HUB 14 Lawn Tractor Rear Discharge 65 PARTS SCHEDULE ...
Страница 67: ...T130 T160 T140 T180 REAR AXLE 15A Lawn Tractor Rear Discharge 67 PARTS SCHEDULE ...
Страница 69: ...T130 T160 T140 T180 REAR AXLE 15B Lawn Tractor Rear Discharge 69 PARTS SCHEDULE ...
Страница 73: ...T130 T160 T140 T180 HOOD 24 Lawn Tractor Rear Discharge 73 PARTS SCHEDULE ...
Страница 75: ...T130 T160 T140 T180 PANEL 25 Lawn Tractor Rear Discharge 75 PARTS SCHEDULE ...
Страница 77: ...T130 T160 T140 T180 ELECTRICAL SYSTEM 27 Lawn Tractor Rear Discharge 77 PARTS SCHEDULE ...
Страница 78: ...T130 T160 T140 T180 ELECTRICAL SYSTEM 27a PARTS SCHEDULE Lawn Tractor Rear Discharge 78 ...
Страница 80: ...T130 T160 T140 T180 SEAT 32 PARTS SCHEDULE Lawn Tractor Rear Discharge 80 ...
Страница 82: ...T130 T160 T140 T180 BUNKER 34 PARTS SCHEDULE Lawn Tractor Rear Discharge 82 ...
Страница 84: ...T130 T160 T140 T180 GEAR SHIFTING 35 PARTS SCHEDULE Lawn Tractor Rear Discharge 84 ...
Страница 86: ...T130 T160 T140 T180 SEGMENT 36 PARTS SCHEDULE Lawn Tractor Rear Discharge 86 ...
Страница 88: ...T130 T160 T140 T180 PLATE 37 PARTS SCHEDULE Lawn Tractor Rear Discharge 88 ...
Страница 90: ...T130 T160 T140 T180 DECALS 38 PARTS SCHEDULE Lawn Tractor Rear Discharge 90 ...

