background image

Operation   –   Chapter 4

34

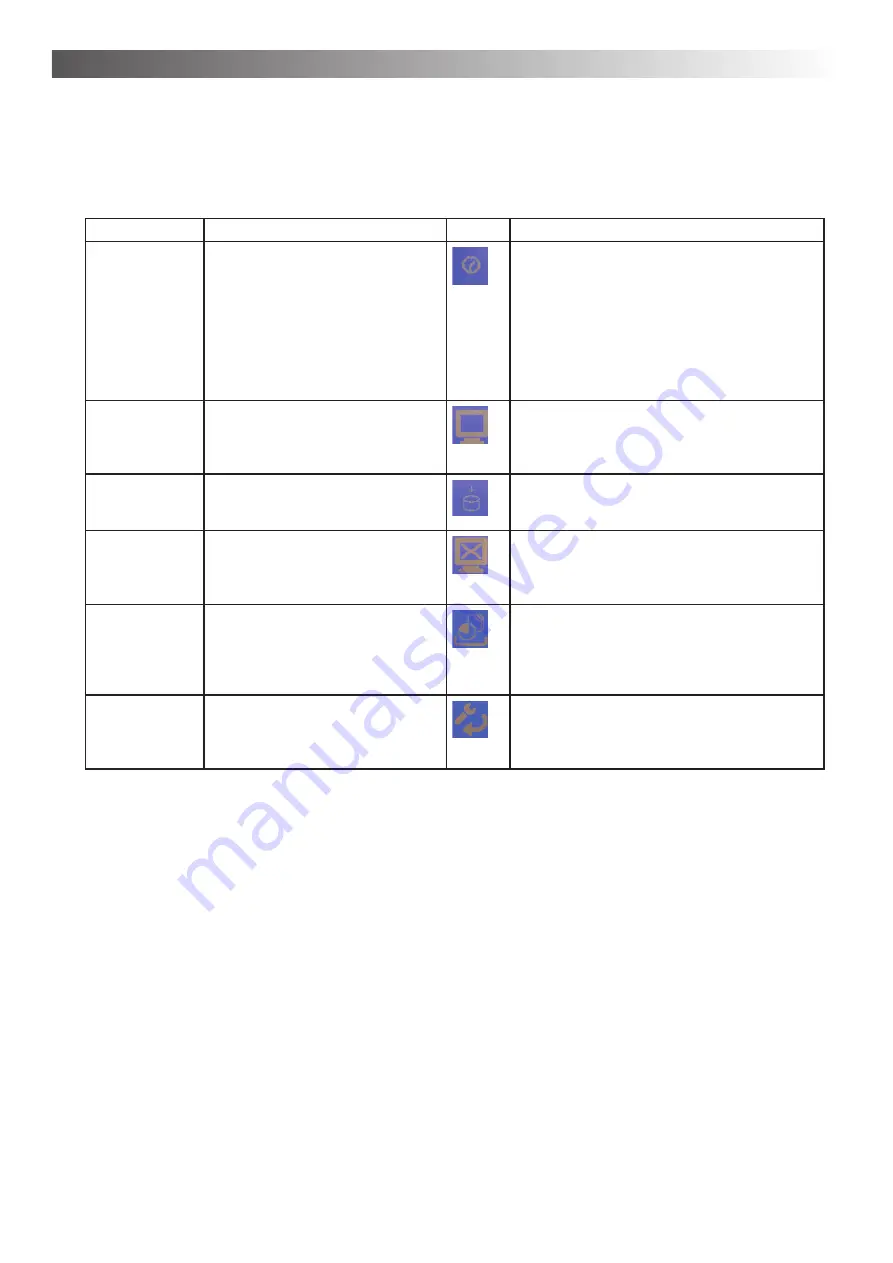
Approach for the extra settings

1.  Select the option, which you would like to change (table - column menu). 
2.  Make the desired changes (table - column procedure (key sequence)

Menu 

Explanation 

Symbol Procedure (key sequence) > Press: 

Clock settings

Change the date and the time - im-
portant for storing results.

1. T1

 (switch to clock settings submenu) 

2.  T1 to switch to date adjustment, T2 to 

switch to time adjustment, T3 to de

fi

 ne 

summer/winter time
Alternatively: T13/T16 Allow you to toggle 
between these parameter 

3.  T12/T15 allow you to adjust each parame-

ter

4.  T14 (save settings)

Display bright-
ness

Change luminosity displays/the 
contrast between writing and back-
ground in the display. e.g. with other 
lighting conditions

1. T2

 (switch to display brightness submenu) 

2.  T12: increase T15: decrease * 
3.  T14 (save settings) 

Continuous keys Change the advancing speed with 

long pressures of a key. Are mar-
kings to jump fast or slowly?

1. T3

 (switch to quickselect key submenu)

2.  T12: faster; T15: slower * 
3.  T14 (save settings)

Parameter an-
nouncement

Announcement of current settings 
under/over the symbols in a subme-
nu. z. B. Volumes, on/out

1. T4

 (switch to the parameter display sub-

menu) 

2.  T12: turn on; T15: turn off * 
3.  T14 (save settings) 

Free memory

Calculation of the free storage loca-
tion. Pure information. Release from 
storage location (=stored by clients 
or), if the storage location is below 
25%.

1. T6

 (switch to free memory submenu) 

2.  T14 or any key to return to the extras 

menu.

Factory settings

Delete all changed on-positions 
to volume, PDT,… Put back to ex 
factory de

fi

 ned settings - for the 

straight selected persons!

1. T5

 (to switch to reset submenu) 

2.  T5 for reset factory settings

T8 to maintain current settings 

     * 

You may press the T12 / T15 several times or for an extended period of time.

3.  Press T9 to return to the main menu.
4.  Press T11 in order to save the settings you adjusted. 

Further background information and advice on the extras menu

Clock settings ...

• 

Typically you only need to adjust time and date when using the AphaTrainer in different time zone. 
Factory setting is Standard Central European Time (Berlin).

• 

Adjusting the de

fi

 nition for summer/winter time is only necessary, if exact times in the entry screen or 

when saving training sessions are important to you. 

Menu: Extras

Содержание AlphaTrainer Home

Страница 1: ...Manual for AlphaTrainer Professional AlphaTrainer Home...

Страница 2: ...arted 9 4 2 Display 9 4 3 Functions in the main menu 10 4 4 General information on submenus 11 4 5 Special function keys 11 4 6 Menu Volume 12 4 7 Menu Lateralization lateral movement from side to sid...

Страница 3: ...essing auditory and visual stimuli in the trainee By alternating between left and right the brain and its respective he mispheres are forced to acquire a higher level of performance and brain coordina...

Страница 4: ...onsists of two essential cable sets 1 Connects CD player and or computer line out as input device line in for the AlphaTrainer 2 Connects the student microphone into MIC in of both the computer and th...

Страница 5: ...f you use an AlphaTrainer Home and you also want to have access to the additional functions of the Alpha Trainer Professional please get in contact with the MediTECH or your domestic MediTECH represen...

Страница 6: ...gainst wetness and humidity They or third could be injured In addition the device could be damaged effectively and strongly Caution Just use the plug power pack provided It was developed particularly...

Страница 7: ...he AlphaTrainer The following diagram shows all elements of the AlphaTrainer which you can apply when using this lateral training device Navigation keys and enter key Menu selection keys Menu selectio...

Страница 8: ...re allocated correctly to client s and trainer Attention In order to avoid dangers technical problems and disfunctions during the employment of the AlphaTrainer it is very important that you ensure th...

Страница 9: ...he black rocker switch to the left on the back of the device After short time a welcome screen in the display appears on the front of the device 4 2 Display If this announcement is to be seen in the d...

Страница 10: ...lasses only Synchronization of auditory and visual signals Audio settings Presettings for microphones and head phones Dummy head stereophony MCVF Multi Channel Voice fusion Mono Stereo Volume settings...

Страница 11: ...y switch to the desired function The submenu opens and the corresponding options show on the display 2 If you are in a submenu press T9 to return to the upper menu 4 5 Special function keys Return to...

Страница 12: ...example describes how to adjust the trainer s microphone volume 1 Press T2 over the corresponding symbol The symbol is now highlighted In the center of the display you now see the text relevant for ad...

Страница 13: ...ck to the upper menu level Trainer Head phones Volume L Volume R Volume for the headphones of the trainer s settings per ear left right 1 T6 switch to desired submenu 2 T1 switch to left ear settings...

Страница 14: ...volume for all other sources such as CD player MP3 player etc in the same fashion Do not rely on the numbers showing on the display xx xx as they serve only for orientation purpo ses Your decision sh...

Страница 15: ...requirements Press T12 in order to increase the transfer time The values in the display will grow bigger and both eyeglass lenses will be open longer in parallel Press T15 in order to decrease the tra...

Страница 16: ...T14 save settings Video hold time R Defines for how long the right lense of the LCD glasses stays open 1 T2 switch to Video submenu 2 T2 switchto video hold time R submenu 3 T15 decrease T12 increase...

Страница 17: ...s for the LCD shutter glasses Limitation AlphaTrainer HOME With the AlphaTrainer HOME the shutter glasses can be used With the AlphaTrainer Professional the level of darkness intensity is scalable Not...

Страница 18: ...find further information on this currently active component 2 Press T15 to scroll through the list 3 Continue to press T15 until the arrow is in front of the headphones you are currently using 4 Pres...

Страница 19: ...switch to enhancement submenu 2 T12 increase T15 decrease 3 T14 save settings MCVF Multi Channel Voice Fusion Limitation HOME Special extended hearing training Frequency band training in which model v...

Страница 20: ...ining With the MCVF function the corresponding bands are cut full length into two and or four thin strips High frequencies are on one strip low frequencies on the other Now half of the bands switch si...

Страница 21: ...ss T15 T12 in order to scroll through the title list Files with the ending mp3 can be played The arrow in front of the first entry indi cates the first title to be played A small small box in front of...

Страница 22: ...play You will be asked if you wish to apply that list or create a new one Press T5 to create a new list 2 Press T2 Thus you select the attached USB stick as the media source The files stored on the US...

Страница 23: ...the AlphaTrainer 1 T3 switch to file selection 2 T5 to create a new list or 3 T8 to extend an existing list 4 follow example 2 starting from step 3 MP3create play list USB mass memory Allows you to cr...

Страница 24: ...bey example 2 in this section example 2 It pro vides a MP3 Liste with files on an external USB stick with the change that you press in the step 1 T8 for no no new list Consider it particularly here th...

Страница 25: ...ent T5 switch to delete client submenu 2 T5 to delete T8 to abort deletion process Auditory threshold Individual settings of the auditory threshold for volume definition here you can readjust the volu...

Страница 26: ...fining a client group rather than an individual client please ensure to com plete the entry for first name date of birth and gender This is mandatory in order to be able to process data in and with Me...

Страница 27: ...client is female T15 if your client is male You will find your selection in the display 19 Press T14 in order to save your entry and return to client data over view End of entry 20 Press T9 to return...

Страница 28: ...your training selection 3 Press T15 until you found the first VCV word that you want to add to your training list 4 Press T14 in order to add the currently marked word into the word list 5 Repeat thes...

Страница 29: ...hen ist to be seen to see individual word lists 2 T15 to select an individually created word list content is shown in the display 3 T9 to activate selected list for training Delete word group Delete a...

Страница 30: ...ice in a sample 1 T3 switch to submenu 2 T15 off T12 on 3 T14 save settings Left right Only available with level Defines if the two items shall be presented on opposing ears or based upon the standard...

Страница 31: ...order to perceive his VCV words 1 Select a word group predefined or individual and preset your training parameters as needed as described on the previous pages 2 Start the training sequence To do so p...

Страница 32: ...wered at all 7 tasks minus 5 correct ones minus 1 repetition 1 Its own list was offered to the client which consisted of the words ebi edi efi eki and eti The word ebi was offered answered correctly f...

Страница 33: ...ow marks the entry which you can change straight Press T12 and or T15 if you liked to change another entry 2 Press T14 in order to be able to change the current entry Date 3 In the lower part of the d...

Страница 34: ...ement Announcement of current settings under over the symbols in a subme nu z B Volumes on out 1 T4 switch to the parameter display sub menu 2 T12 turn on T15 turn off 3 T14 save settings Free memory...

Страница 35: ...urer contact details 1 T1 switch to information submenu 2 Press any key to return to help submenu Device version Shows the device type home or professional the current firmware version and the device...

Страница 36: ...ear him on the identical side as the MP3 CD signal The microphone may be switched off or connected to the wrong socket Ve rify if the microphone is turned on Check i fit is connected to the right sock...

Страница 37: ...dures on your own Please contact our service department to discuss the details of how to proceed Do you have further questions are you experiencing errors or problems when operating the AlphaTrainer C...

Страница 38: ...ements can be bought in typical specialist shops or directly from MediTECH the contact details are in the back of this manual 5 2 Maintenance and storage 1 Make sure that only you switch off the devic...

Страница 39: ...ce identification plate 2012 123XXX Manufacturer name and contact details Technical data regarding in and output voltage Prior to first connecting your power adapter ensure to mount the correct connec...

Страница 40: ...dimensions 101 mm x 82 mm In operation Ambient temperature 5 C up to 40 C Relative air humidity 40 65 Air pressure 700 1060 hPa Storage and transportation Ambient temperature 20 C bis 50 C Relative a...

Страница 41: ...well as an ear surrounding pair of headphones This way the client has the possibility to select his her preferred set of headphones MediTECH microphone Specially adapted dynamic microphone Jack 6 35...

Страница 42: ...tions and problems around lateral training for the entire time in which you work with the device You can reach the telephone hotline at 49 0 5130 97778 0 Naturally you can also send in your questions...

Страница 43: ..._____________________________________________________________________________ ___________________________________________________________________________________ ______________________________________...

Страница 44: ...ort about experiances the the devide or the method Please contact us MediTECH Electronic GmbH Langer Acker 7 D 30900 Wedemark Germany Tel 49 0 51 30 9 77 78 0 Fax 49 0 51 30 9 77 78 22 Email service m...

Отзывы: