65
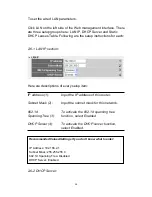
These settings are only available when DHCP Server in the LAN IP
section is enabled. Here are descriptions of every setup item:
Lease Time (1): Choose a lease time (the duration that every
computer can keep a specific IP address) of
every IP address assigned by this router from
the drop-down menu.
Start IP (2):
Input the Start IP address of the IP range.
End IP (3):
Input the End IP address of the IP range.
Domain Name (4): You can also input the domain name for your
network. This is optional.
Recommended Values/ Settings if you don’t know what to enter:
Lease Time: Two Weeks (or Forever, if you have fewer than 20 computers)
Start IP: 192.168.2.100
End IP: 192.168.2.200
Domain Name: (leave it blank)
NOTE:
1. The number of the last field (the aforementioned “d” field) of End IP
must be greater than that of Start IP, and can not be the same as the
router’s IP address.
2. The other three fields of the IP address of Start IP and End IP and
the IP address of the LAN IP section (the aforementioned a, b and c
fields) should be the same.
3. These settings will affect wireless clients too.
1
3
4
2
Содержание 525541
Страница 15: ...15 3 Connect the power adapter to the wall outlet then connect it to the power jack of the router...
Страница 18: ...18 2 Select Obtain an IP address automatically and Obtain DNS server address automatically then click OK...
Страница 20: ...20 2 Select Obtain an IP address automatically and Obtain DNS server address automatically then click OK...
Страница 22: ...22 2 Select Obtain an IP address automatically and Obtain DNS server address automatically then click OK...
Страница 24: ...24 2 Select Obtain an IP address automatically and Obtain DNS server address automatically then click OK...
Страница 139: ...139 Click Apply to reset your router It will be available again after a few minutes...
Страница 140: ...140 Chapter IV Appendix 4 1 For Specifications refer to the datasheet at manhattan products com...


