en
|
10
|
CWL-20E
Operation
8.3
Prepare the lift units
It is important to prepare the lift units so they can be
used safely together.
1.
Make sure the lift system is appropriate for the type
and weight of the vehicle to be lifted. Determine that it
is safe to raise the vehicle by calculating the weight of
the vehicle and the load applied to each lift unit when
the vehicle is raised. NEVER exceed the rated
capacity of an individual lift unit. Also, the lift system
is to be only used in sets where lift units are
positioned on opposite ends of the same axle–
NEVER as a single lift unit or on only one side of a
vehicle.
2.
Before each use, you should inspect each lift unit for
any visible signs of wear or damage. See the
“Structural Inspection” section on page 21 for details
about how to inspect the lift unit.
WARNING!
WARNING!
WARNING!
WARNING! If you see any signs of wear or damage,
or if there is any indication that the lift unit is not
performing normally, immediately take it out of service
and contact the manufacturer. NEVER use a lift unit
that appears damaged in any way.
3.
Before each use, make sure the battery is fully
charged (see the “Charging the batteries” section on
page 17 of this manual). If the battery has not been
given time to fully charge, charge the battery before
use. Failure to fully charge the battery before use can
reduce the life of the battery.
4.
Transport the lift units to the work area by wheeling
them manually. A lift unit should be wheeled to the
work area over smooth, level surfaces avoiding any
obstacles or unsafe situations.
WARNING!
WARNING!
WARNING!
WARNING! Jolting caused by the lift unit’s wheels
catching on uneven surfaces can cause physical
strain and personal injury.
5.
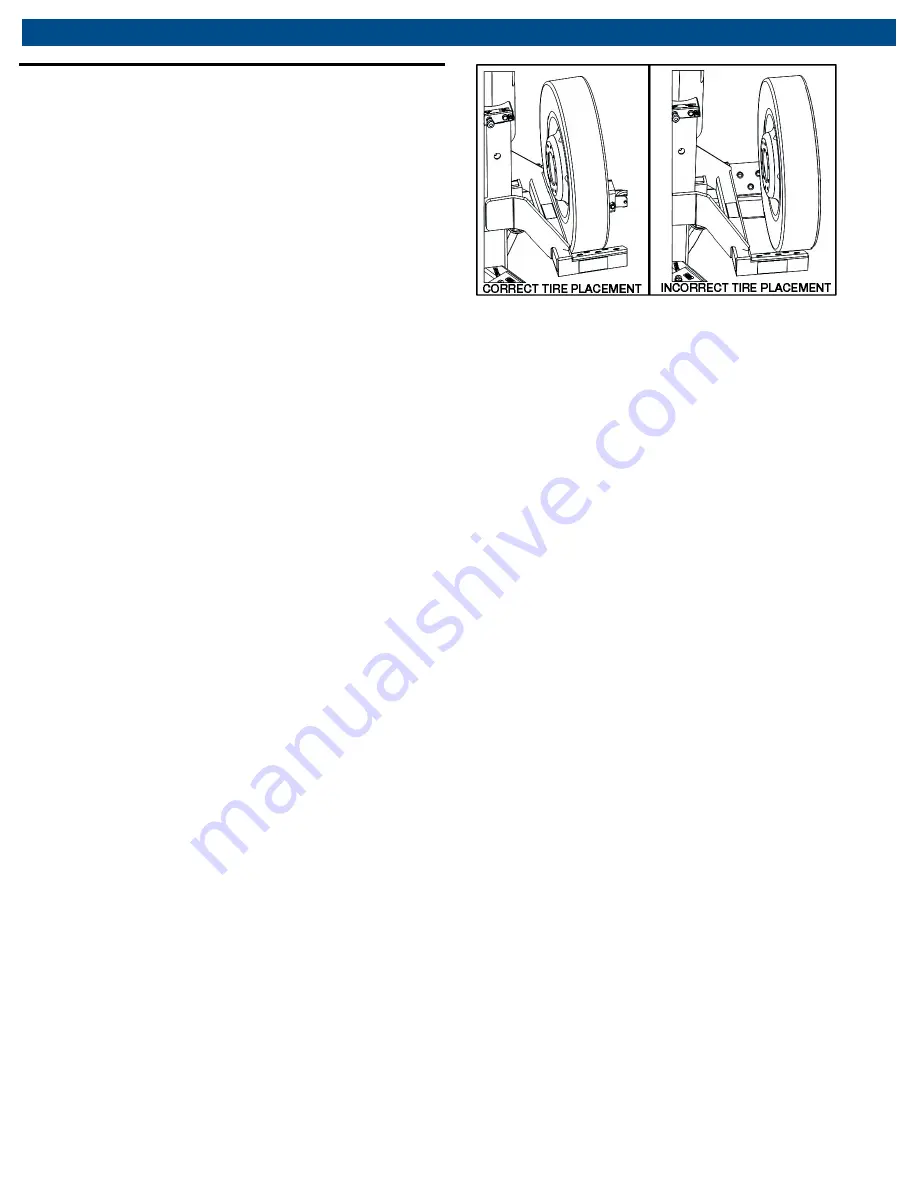
Position the lift units so the lift pads cradle the tires at
opposite ends of the same axle. Make sure the lift
pads cradle the tires evenly and are parallel with the
wheel and tire. Position the lift pads under the tire so
the lift table tube contacts the tire (see Fig. 5).
Fig. 5: Position lift table tube against tire
6.
Connect an air hose from a compressed air source to
one of the lifts. The air hose from that lift can be
connected to the next lift and so on to daisy chain
them all together. The air hose on the last lift can stay
wrapped on its hose brackets. If desired, separate air
hoses from a compressed air source can be brought
in for multiple lifts. In general, performance will
increase with the number of air hoses brought in.
7.
Place the vehicle transmission in neutral and release
the parking brake.


