116
BA023001-en
specifications with regard to installation height (e.g. impact protection, escape route).
5
After installing the wall mount, the pointer display can be installed.
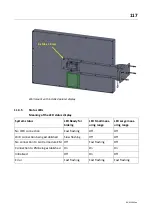
Installing the pointer display
•
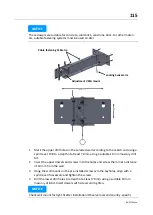
Hole pattern of the pointer display is identical to VESA standard 200 x 100
(VESA = Video Electronics Standards Association).
•
4x fastening holes M6 internal thread, max. 10 mm screw-in depth
•
4 pcs. M6x12 fastening screws are supplied with the optional MAHA wall mount.
•
Weight of the display approx. 13 kg
•
Display is fixed to the bracket via the 4 threads of the VESA wall mount.
•
After completion of commissioning, self-adhesive cover is glued on with the cable
gland facing downwards to protect against moisture and dust. Adhesive surface
must be free of dust and grease.
4x Thread closed
M6
Self-adhesive cover
Strain relief
with cable tie
Cable gland
Содержание CONNECT Series
Страница 19: ...19 BA023001 en 2 3 2 Set up diagram Set up diagram I ...
Страница 20: ...20 BA023001 en Set up diagram II ...
Страница 22: ...22 BA023001 en 2 4 1 Wiring diagram ...
Страница 23: ...23 BA023001 en 2 4 2 Control cabinet structure Basic variant ...
Страница 24: ...24 BA023001 en 2 4 3 Control cabinet structure Full equipment ...
Страница 25: ...25 BA023001 en ...
Страница 26: ...26 BA023001 en 2 4 4 Connection and termination of the central module ZM Connection of the central module ...
Страница 53: ...53 BA023001 en ...
Страница 138: ...138 BA023001 en 13 Annex 13 1 Naming convention ...

