


AERO.100 User Guide
©2016 TLS Corp. ALL RIGHTS RESERVED
Oct 2016
Page 30
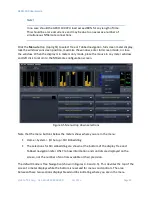
preset, automatically recalls your saved settings. Each Display Setting is saved on the local PC
so every PC that connects can have 6 unique metering configurations instantly available.
4.3
4.3
4.3
4.3
Ethernet Setup
Ethernet Setup
Ethernet Setup
Ethernet Setup
The Ethernet connection, like a reference signal, must be stable and should always be present.
Although initially configured for DHCP (auto-IP address), DHCP can be disabled and a static IP
addresses can be entered. We recommend a static IP so that NfRemote and any PCs that need
to access configuration, metering, control, or logs will always find the AERO.100 at the same IP
address.
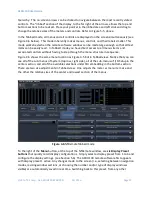
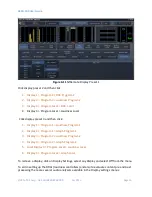
To enter a static IP address:
Starting from the Tabbed NfRemote display select:
1.
System > Network Access > IP Configuration
2.
If the Use DHCP button is lit the IP input selections will be grayed out. Click the Use
DHCP button to toggle DHCP off.
3.
Enter the fixed IP address of the AERO, the subnet mask and the Gateway address.
4.
If there is no Gateway enter the AERO’s address with the last octet = 1, as shown below
in Figure 4-7.
5.
Click Apply
6.
If the PC with NfRemote is connected to the AERO, or to a network switch, using a
different subnet and/or IP address then change the address on your PC to one in the
same subnet as the new AERO IP address.
7.
Change the AERO address in the NfRemote start menu and click Update to update the
AERO’s entry.
8.
Double click the entry or click connect to reconnect to the AERO.


