Menu item
Description
Auto Convert Color Faxes to
Mono Faxes
On*
Off
Convert all outgoing color faxes to black and white.
Confirm Fax Number
Off*
On
Ask the user to confirm the fax number.
Dial Prefix
Set a dialing prefix.
Dialing Prefix Rules
Establish a dialing prefix rule.
Note:
An asterisk (*) next to a value indicates the factory default setting.
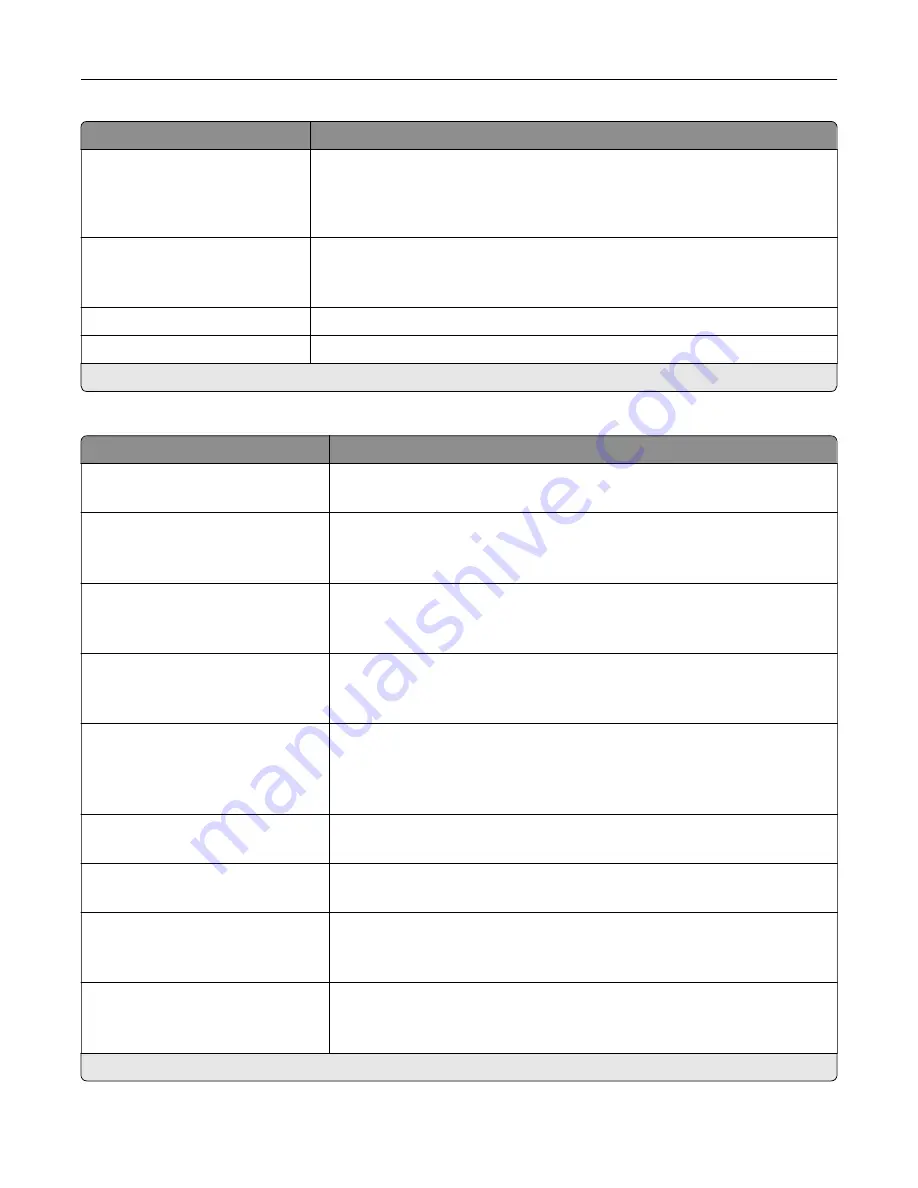
Fax Receive Settings
Menu item
Description
Rings to Answer
1–25 (3*)
Set the number of rings for incoming fax.
Auto Reduction
On*
Off
Scale incoming fax to fit on the page.
Paper Source
Tray [X]
Auto*
Set the paper source for printing incoming fax.
Sides
On
Off*
Print on both sides of the paper.
Separator Sheets
None*
Before Job
After Job
Specify whether to insert blank separator sheets when printing.
Separator Sheet Source
Tray [X] (1*)
Specify the paper source for the separator sheet.
Output Bin
Standard Bin
Specify the output bin for received faxes.
Fax Footer
On
Off*
Print the transmission information at the bottom of each page from a received
fax.
Fax Footer Time Stamp
Receive*
Print the time stamp at the bottom of each page from a received fax.
Note:
An asterisk (*) next to a value indicates the factory default setting.
Understanding the printer menus
97
Содержание XC4140
Страница 60: ...5 Touch Scan Here If necessary change the scan settings 6 Scan the document Scanning 60 ...
Страница 154: ...4 Insert the new toner cartridge 5 Close door B Replacing the imaging unit 1 Open door B Maintaining the printer 154 ...
Страница 155: ...2 Remove the waste toner bottle 3 Remove the imaging kit Maintaining the printer 155 ...
Страница 157: ...8 Insert the black toner cartridge 9 Insert the imaging kit Maintaining the printer 157 ...
Страница 158: ...10 Insert the waste toner bottle 11 Close door B Replacing the imaging kit 1 Open door B Maintaining the printer 158 ...
Страница 159: ...2 Remove the waste toner bottle 3 Remove the imaging kit Maintaining the printer 159 ...
Страница 161: ...8 Insert the toner cartridges 9 Insert the new imaging kit Maintaining the printer 161 ...
Страница 173: ...4 Insert the new ADF separator roller until it clicks into place 5 Close door E Maintaining the printer 173 ...
Страница 187: ...2 Remove the jammed paper Note Make sure that all paper fragments are removed Clearing jams 187 ...
Страница 189: ...2 Open the duplex cover 3 Remove the jammed paper Note Make sure that all paper fragments are removed Clearing jams 189 ...
Страница 190: ...4 Close the duplex cover and door A Clearing jams 190 ...
Страница 236: ...4 Insert the memory card until it clicks into place Upgrading and migrating 236 ...
Страница 239: ...5 ISP extended cable 4 Install the ISP into its housing Upgrading and migrating 239 ...
Страница 240: ...5 Attach the housing to the controller board access cover Upgrading and migrating 240 ...
Страница 246: ...5 Open door B 6 Open door C Upgrading and migrating 246 ...


