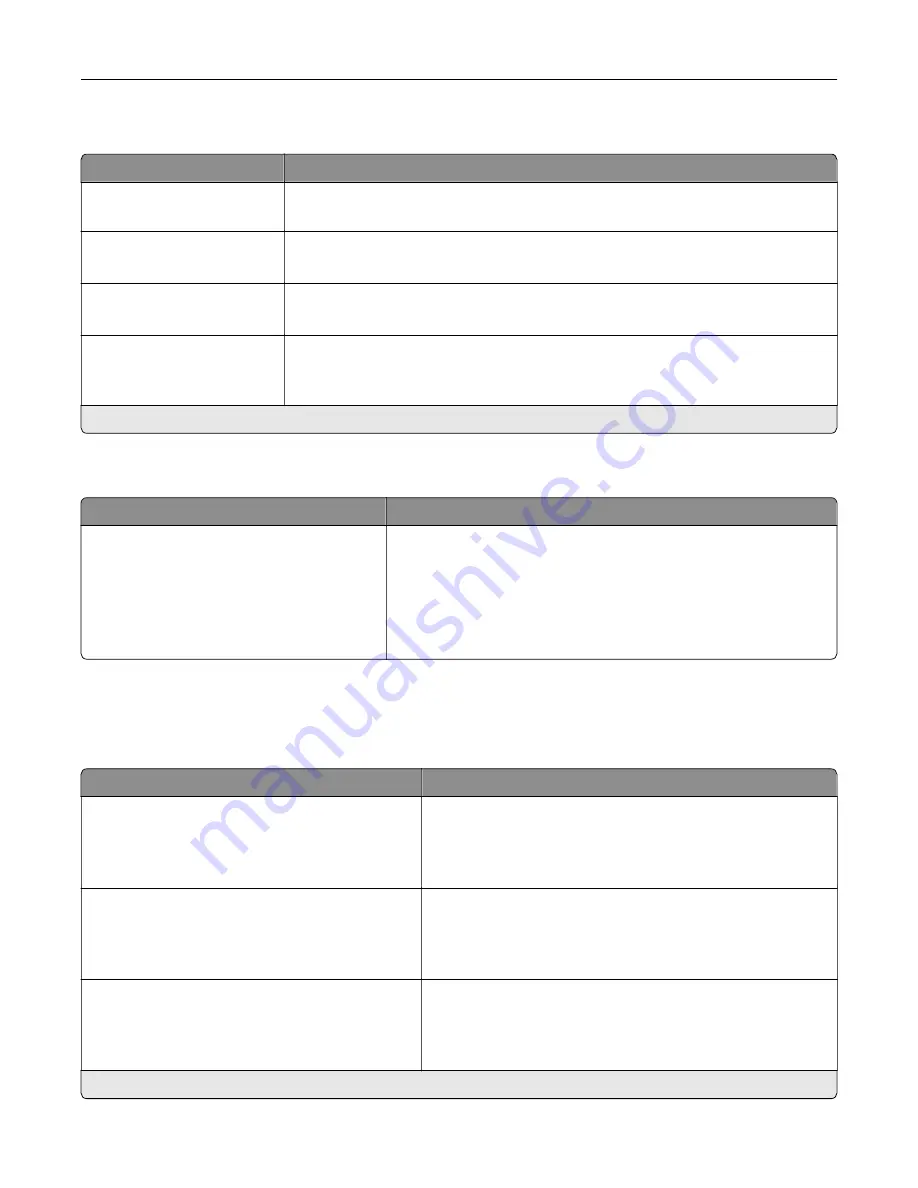
Accessibility
Menu item
Description
Duplicate Key Strike Interval
0–5 seconds (0*)
Set the interval during which the printer ignores duplicate key presses on an
attached keyboard.
Key Repeat Initial Delay
0.25–5 seconds (1*)
Set the initial length of delay before a repeating key starts repeating.
Note:
Appears only when a keyboard is attached to the printer.
Key Repeat Rate
0.5–30 (30*)
Set the number of presses per second for a repeating key.
Note:
Appears only when a keyboard is attached to the printer.
Prolong Screen Timeout
Off*
On
Let the user remain in the same location and reset the Screen Timeout timer when
it expires instead of returning to the home screen.
Note:
An asterisk (*) next to a value indicates the factory default setting.
Restore Factory Defaults
Menu item
Description
Restore Settings
Restore all settings
Restore printer settings
Restore network settings
Restore fax settings
Restore app settings
Restore the printer factory default settings.
Maintenance
Configuration Menu
Menu item
Description
USB Configuration
USB PnP
1*
2
Change the USB driver mode of the printer to improve its
compatibility with a personal computer.
USB Configuration
USB Scan to Local
On*
Off
Set whether the USB device driver enumerates as a USB
Simple device (single interface) or as a USB Composite device
(multiple interfaces).
USB Configuration
USB Speed
Full
Auto*
Set the USB port to run at full speed and disable its high
‑
speed
capabilities.
Note:
An asterisk (*) next to a value indicates the factory default setting.
Understanding the printer menus
70
Содержание XC4140
Страница 60: ...5 Touch Scan Here If necessary change the scan settings 6 Scan the document Scanning 60 ...
Страница 154: ...4 Insert the new toner cartridge 5 Close door B Replacing the imaging unit 1 Open door B Maintaining the printer 154 ...
Страница 155: ...2 Remove the waste toner bottle 3 Remove the imaging kit Maintaining the printer 155 ...
Страница 157: ...8 Insert the black toner cartridge 9 Insert the imaging kit Maintaining the printer 157 ...
Страница 158: ...10 Insert the waste toner bottle 11 Close door B Replacing the imaging kit 1 Open door B Maintaining the printer 158 ...
Страница 159: ...2 Remove the waste toner bottle 3 Remove the imaging kit Maintaining the printer 159 ...
Страница 161: ...8 Insert the toner cartridges 9 Insert the new imaging kit Maintaining the printer 161 ...
Страница 173: ...4 Insert the new ADF separator roller until it clicks into place 5 Close door E Maintaining the printer 173 ...
Страница 187: ...2 Remove the jammed paper Note Make sure that all paper fragments are removed Clearing jams 187 ...
Страница 189: ...2 Open the duplex cover 3 Remove the jammed paper Note Make sure that all paper fragments are removed Clearing jams 189 ...
Страница 190: ...4 Close the duplex cover and door A Clearing jams 190 ...
Страница 236: ...4 Insert the memory card until it clicks into place Upgrading and migrating 236 ...
Страница 239: ...5 ISP extended cable 4 Install the ISP into its housing Upgrading and migrating 239 ...
Страница 240: ...5 Attach the housing to the controller board access cover Upgrading and migrating 240 ...
Страница 246: ...5 Open door B 6 Open door C Upgrading and migrating 246 ...


