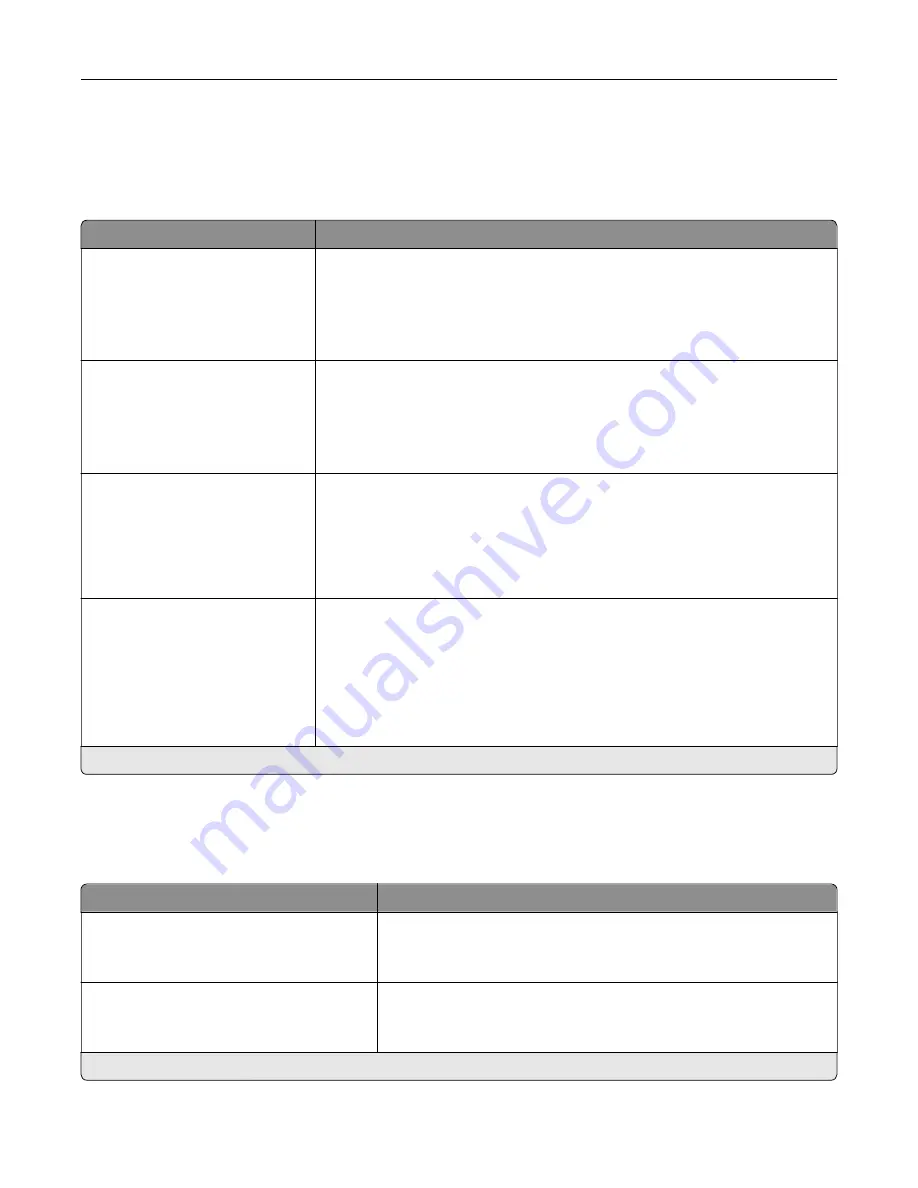
Paper
Tray Configuration
Menu item
Description
Default Source
Tray [x] (1*)
Multipurpose Feeder
Manual Paper
Manual Envelope
Set the paper source for all print jobs.
Paper Size/Type
Tray [x]
Multipurpose Feeder
Manual Paper
Manual Envelope
Specify the paper size or paper type loaded in each paper source.
Substitute Size
Off
Letter/A4
All Listed*
Set the printer to substitute a specified paper size if the requested size is not
loaded in any paper source.
Notes:
•
Off prompts the user to load the required paper size.
•
All Listed allows all available substitutions.
Configure MP
Cassette*
Manual
First
Determine the behavior of the multipurpose feeder.
Notes:
•
Cassette configures the multipurpose feeder as the automatic paper
source.
•
Manual sets the multipurpose feeder only for manual-feed print jobs.
•
First configures the multipurpose feeder as the primary paper source.
Note:
An asterisk (*) next to a value indicates the factory default setting.
Media Configuration
Universal Setup
Menu item
Description
Units of Measure
Inches
Millimeters
Specify the unit of measurement for the universal paper.
Note:
Inches is the U.S. factory default setting. Millimeters is the
international factory default setting.
Portrait Width
3–52 inches (8.5*)
76–1321 mm (216*)
Set the portrait width of the universal paper.
Note:
An asterisk (*) next to a value indicates the factory default setting.
Understanding the printer menus
86
Содержание XC4140
Страница 60: ...5 Touch Scan Here If necessary change the scan settings 6 Scan the document Scanning 60 ...
Страница 154: ...4 Insert the new toner cartridge 5 Close door B Replacing the imaging unit 1 Open door B Maintaining the printer 154 ...
Страница 155: ...2 Remove the waste toner bottle 3 Remove the imaging kit Maintaining the printer 155 ...
Страница 157: ...8 Insert the black toner cartridge 9 Insert the imaging kit Maintaining the printer 157 ...
Страница 158: ...10 Insert the waste toner bottle 11 Close door B Replacing the imaging kit 1 Open door B Maintaining the printer 158 ...
Страница 159: ...2 Remove the waste toner bottle 3 Remove the imaging kit Maintaining the printer 159 ...
Страница 161: ...8 Insert the toner cartridges 9 Insert the new imaging kit Maintaining the printer 161 ...
Страница 173: ...4 Insert the new ADF separator roller until it clicks into place 5 Close door E Maintaining the printer 173 ...
Страница 187: ...2 Remove the jammed paper Note Make sure that all paper fragments are removed Clearing jams 187 ...
Страница 189: ...2 Open the duplex cover 3 Remove the jammed paper Note Make sure that all paper fragments are removed Clearing jams 189 ...
Страница 190: ...4 Close the duplex cover and door A Clearing jams 190 ...
Страница 236: ...4 Insert the memory card until it clicks into place Upgrading and migrating 236 ...
Страница 239: ...5 ISP extended cable 4 Install the ISP into its housing Upgrading and migrating 239 ...
Страница 240: ...5 Attach the housing to the controller board access cover Upgrading and migrating 240 ...
Страница 246: ...5 Open door B 6 Open door C Upgrading and migrating 246 ...


