Menu item
Description
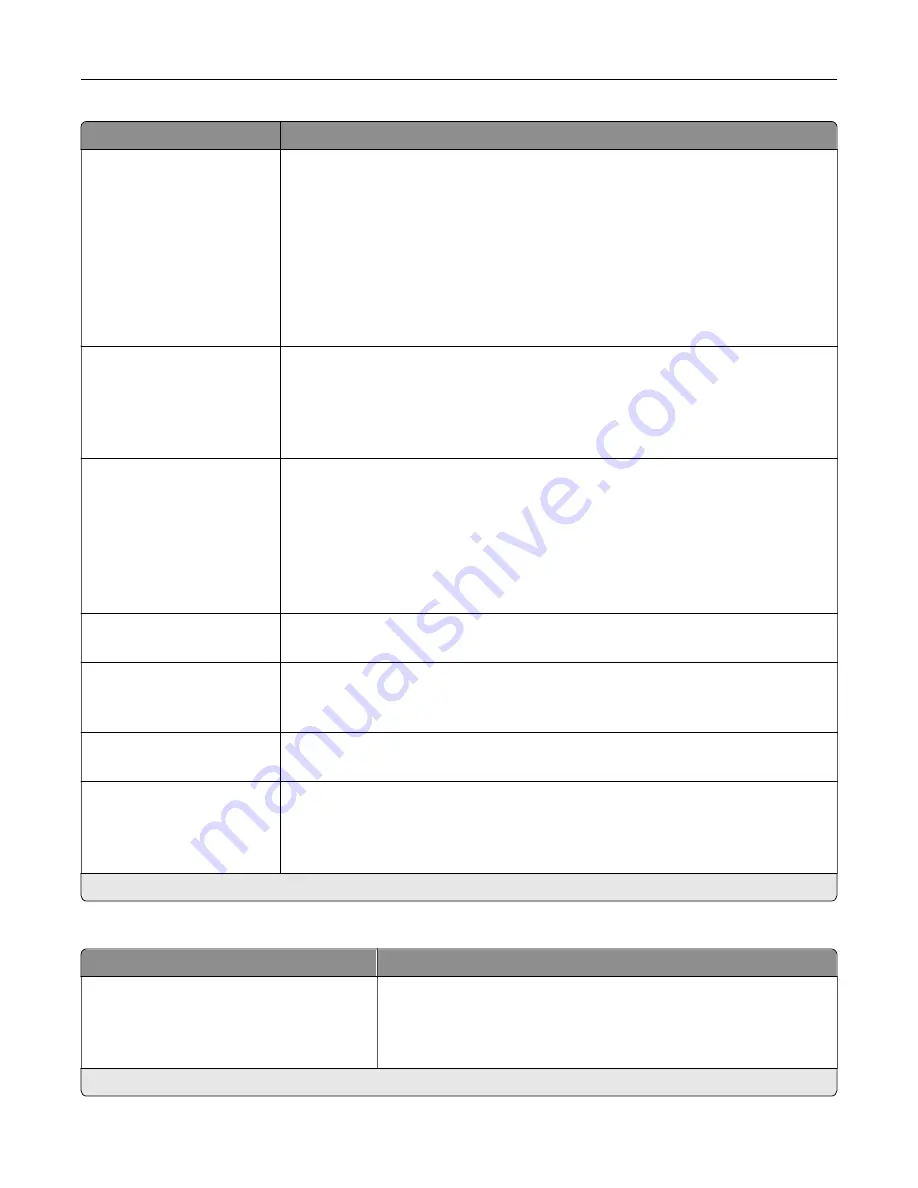
Content Source
Black and White Laser
Color Laser*
Inkjet
Photo/Film
Magazine
Newspaper
Press
Other
Improve the output result based on the content source of the original document.
Color
Black and White
Gray
Color*
Auto
Set the printer to capture file content in color or in mono.
Resolution
75 dpi
150 dpi*
200 dpi
300 dpi
400 dpi
600 dpi
Set the resolution of the scanned image.
Darkness
1–9 (5*)
Adjust the darkness of the scanned image.
Orientation
Portrait*
Landscape
Specify the orientation of the original document.
Original Size
Mixed Sizes*
Set the paper size of the original document.
Sides
Off*
Short Edge
Long Edge
Specify the orientation of the original document when scanning on both sides of the
document.
Note:
An asterisk (*) next to a value indicates the factory default setting.
Advanced Imaging
Menu item
Description
Color Balance
Cyan (0*)
Magenta (0*)
Yellow (0*)
Adjust the color intensity for cyan, magenta, and yellow.
Note:
An asterisk (*) next to a value indicates the factory default setting.
Understanding the printer menus
107
Содержание XC4140
Страница 60: ...5 Touch Scan Here If necessary change the scan settings 6 Scan the document Scanning 60 ...
Страница 154: ...4 Insert the new toner cartridge 5 Close door B Replacing the imaging unit 1 Open door B Maintaining the printer 154 ...
Страница 155: ...2 Remove the waste toner bottle 3 Remove the imaging kit Maintaining the printer 155 ...
Страница 157: ...8 Insert the black toner cartridge 9 Insert the imaging kit Maintaining the printer 157 ...
Страница 158: ...10 Insert the waste toner bottle 11 Close door B Replacing the imaging kit 1 Open door B Maintaining the printer 158 ...
Страница 159: ...2 Remove the waste toner bottle 3 Remove the imaging kit Maintaining the printer 159 ...
Страница 161: ...8 Insert the toner cartridges 9 Insert the new imaging kit Maintaining the printer 161 ...
Страница 173: ...4 Insert the new ADF separator roller until it clicks into place 5 Close door E Maintaining the printer 173 ...
Страница 187: ...2 Remove the jammed paper Note Make sure that all paper fragments are removed Clearing jams 187 ...
Страница 189: ...2 Open the duplex cover 3 Remove the jammed paper Note Make sure that all paper fragments are removed Clearing jams 189 ...
Страница 190: ...4 Close the duplex cover and door A Clearing jams 190 ...
Страница 236: ...4 Insert the memory card until it clicks into place Upgrading and migrating 236 ...
Страница 239: ...5 ISP extended cable 4 Install the ISP into its housing Upgrading and migrating 239 ...
Страница 240: ...5 Attach the housing to the controller board access cover Upgrading and migrating 240 ...
Страница 246: ...5 Open door B 6 Open door C Upgrading and migrating 246 ...


