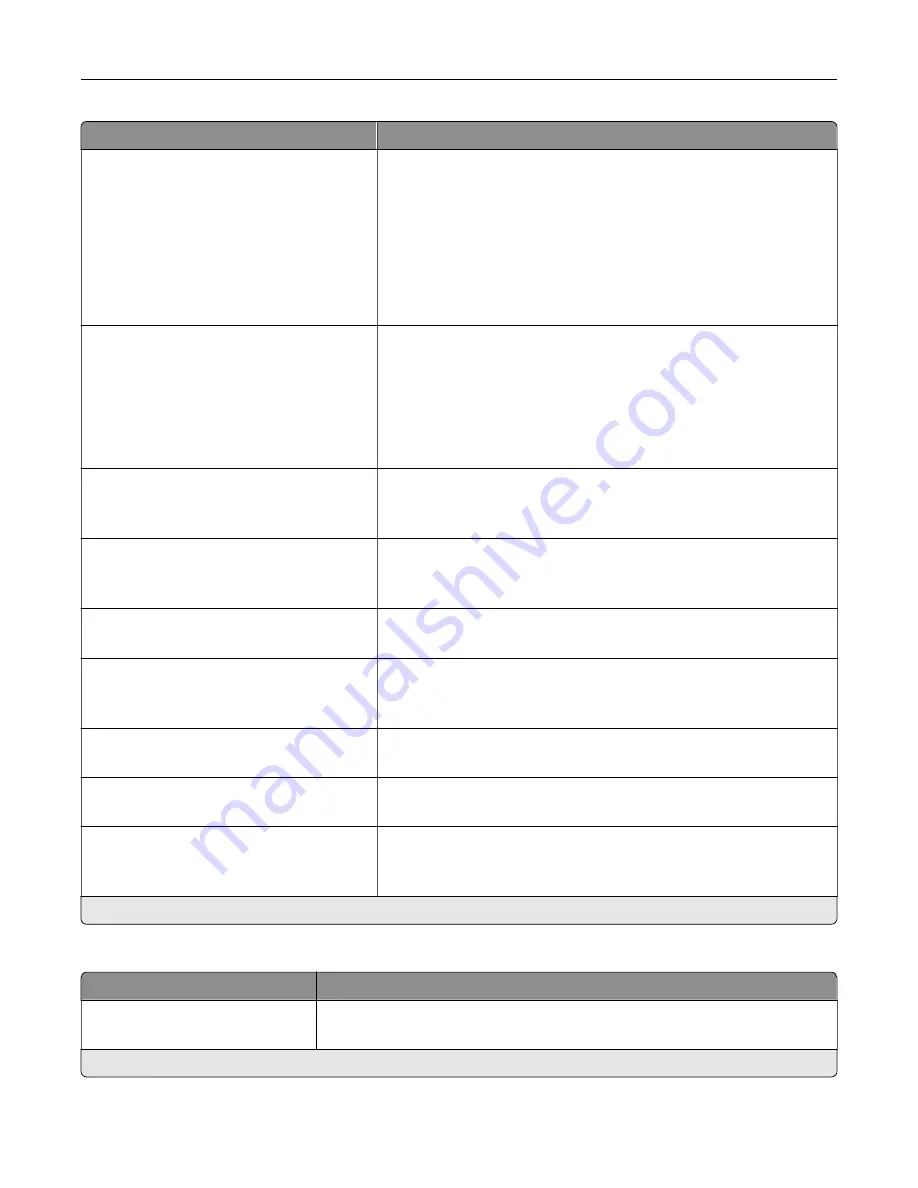
Menu item
Description
Contrast
Best for content*
0
1
2
3
4
5
Specify the contrast for the scanned image.
Background Removal
Background Detection (Content
‑
based*)
Level (0*)
Remove the background color or image noise from the original
document.
Notes:
•
Content-based removes the background color from the original
document .
•
Fixed removes image noise from a photo.
Mirror Image
Off*
On
Create a mirror image of the original document.
Negative Image
Off*
On
Create a negative image of the original document.
Shadow Detail
‑
4 to 4 (0*)
Adjust the shadow detail in the scanned image.
Scan Edge to Edge
Off*
On
Allow edge
‑
to
‑
edge scanning of the original document.
Sharpness
1–5 (3*)
Adjust the sharpness in the scanned image.
Temperature
‑
4 to 4 (0*)
Generate a bluer or redder output of the original document.
Blank Pages
Blank Page Removal (Do Not Remove*)
Blank Page Sensitivity (5*)
Set the sensitivity of scans in relation to blank pages in the original
document.
Note:
An asterisk (*) next to a value indicates the factory default setting.
Admin Controls
Menu item
Description
Text Default
5–95 (75*)
Set the quality of text on the scanned image.
Note:
An asterisk (*) next to a value indicates the factory default setting.
Understanding the printer menus
113
Содержание XC4140
Страница 60: ...5 Touch Scan Here If necessary change the scan settings 6 Scan the document Scanning 60 ...
Страница 154: ...4 Insert the new toner cartridge 5 Close door B Replacing the imaging unit 1 Open door B Maintaining the printer 154 ...
Страница 155: ...2 Remove the waste toner bottle 3 Remove the imaging kit Maintaining the printer 155 ...
Страница 157: ...8 Insert the black toner cartridge 9 Insert the imaging kit Maintaining the printer 157 ...
Страница 158: ...10 Insert the waste toner bottle 11 Close door B Replacing the imaging kit 1 Open door B Maintaining the printer 158 ...
Страница 159: ...2 Remove the waste toner bottle 3 Remove the imaging kit Maintaining the printer 159 ...
Страница 161: ...8 Insert the toner cartridges 9 Insert the new imaging kit Maintaining the printer 161 ...
Страница 173: ...4 Insert the new ADF separator roller until it clicks into place 5 Close door E Maintaining the printer 173 ...
Страница 187: ...2 Remove the jammed paper Note Make sure that all paper fragments are removed Clearing jams 187 ...
Страница 189: ...2 Open the duplex cover 3 Remove the jammed paper Note Make sure that all paper fragments are removed Clearing jams 189 ...
Страница 190: ...4 Close the duplex cover and door A Clearing jams 190 ...
Страница 236: ...4 Insert the memory card until it clicks into place Upgrading and migrating 236 ...
Страница 239: ...5 ISP extended cable 4 Install the ISP into its housing Upgrading and migrating 239 ...
Страница 240: ...5 Attach the housing to the controller board access cover Upgrading and migrating 240 ...
Страница 246: ...5 Open door B 6 Open door C Upgrading and migrating 246 ...


