© Copyright Lenovo 2017
Chapter 3: Installing NE1032T Hardware and Options
53
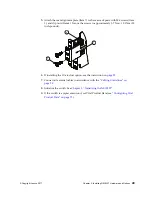
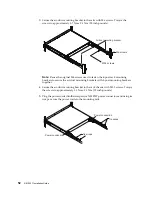
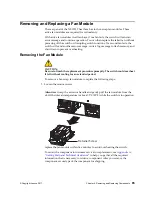
6.
Gently
slide
the
air
‐
duct
unit
side
flanges
into
the
card
guides
until
the
unit
is
seated
firmly.
Make
sure
that
the
foam
strip
is
oriented
on
top.
7.
Secure
the
air
‐
duct
unit
to
the
air
‐
duct
brackets
with
the
two
M4
thumbscrews.
M4
thumbscrews
Side flanges
Card guides
Foam
Содержание ThinkSystem NE1032T
Страница 1: ...Lenovo ThinkSystem NE1032T RackSwitch Installation Guide For Lenovo Cloud Network OS ...
Страница 6: ...6 Lenovo G8296 Installation Guide ...
Страница 14: ...14 NE1032T Installation Guide ...
Страница 18: ...18 NE1032T Installation Guide ...
Страница 19: ... Copyright Lenovo 2017 19 Chapter 2 Switch Components This chapter describes the NE1032T hardware components ...
Страница 32: ...32 NE1032T Installation Guide ...
Страница 78: ...78 NE1032T Installation Guide ...
Страница 94: ...94 NE1032T Installation Guide ...
Страница 100: ...100 NE1032T Installation Guide ...
Страница 120: ...120 NE1032T Installation Guide ...


