© Copyright Lenovo 2017
Chapter 5: Initializing the NE1032T
93
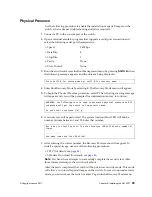
Physical Presence
Use
the
following
procedure
to
enable
the
installation
of
special
images
on
the
switch,
when
a
deeper
troubleshooting
analysis
is
required:
1.
Connect
a
PC
to
the
console
port
of
the
switch.
2.
Open
a
terminal
emulator
program
that
supports
a
serial
port
connection
and
select
the
following
serial
port
characteristics:
Speed:
9600
bps
Data
Bits:
8
Stop
Bits:
1
Parity:
None
Flow
Control:
None
3.
Boot
the
switch
and
access
the
Boot
Management
menu
by
pressing
Shift + B
when
the
following
message
appears
and
the
dots
are
being
displayed.
4.
Enter
Boot
Recovery
Mode
by
selecting
R
.
The
Recovery
Mode
menu
will
appear.
5.
To
begin
the
Physical
Presence
procedure,
select
P
.
The
following
warning
message
will
appear
and
you
will
be
prompted
for
confirmation
(enter
y
to
confirm):
6.
A
security
test
will
be
performed.
The
system
location
(blue)
LED
will
blink
a
number
of
times
between
1
and
12.
Enter
that
number:
7.
After
entering
the
correct
number,
the
Recovery
Mode
menu
will
reappear.
To
install
a
special
image,
use
one
of
the
following
procedures:
TFTP
(for
details,
see
)
XModem
Download
(for
details,
see
)
Note:
You
have
three
attempts
to
successfully
complete
the
security
test.
After
three
incorrect
attempts,
the
switch
will
reboot.
After
the
test
is
completed,
the
switch
will
be
put
in
low
security
mode.
This
mode
will
allow
you
to
install
special
images
on
the
switch.
To
revert
to
normal
security
mode,
you
must
reboot
the
switch
or
enter
P
again
in
the
Recovery
Mode
menu.
Press shift-B for startup menu or shift-R for recovery mode: ...
WARNING: the following test is used to determine physical presence and if
completed will put the switch in low security mode.
Do you wish to continue y/n?
y
Hit a key to start the test. The blue location LED will blink a number of
times.
...........
How many times did the LED blink?
Содержание ThinkSystem NE1032T
Страница 1: ...Lenovo ThinkSystem NE1032T RackSwitch Installation Guide For Lenovo Cloud Network OS ...
Страница 6: ...6 Lenovo G8296 Installation Guide ...
Страница 14: ...14 NE1032T Installation Guide ...
Страница 18: ...18 NE1032T Installation Guide ...
Страница 19: ... Copyright Lenovo 2017 19 Chapter 2 Switch Components This chapter describes the NE1032T hardware components ...
Страница 32: ...32 NE1032T Installation Guide ...
Страница 78: ...78 NE1032T Installation Guide ...
Страница 94: ...94 NE1032T Installation Guide ...
Страница 100: ...100 NE1032T Installation Guide ...
Страница 120: ...120 NE1032T Installation Guide ...


