74
NE1032T Installation Guide
Removing the Air-Duct Option
The
NE1032T
supports
an
optional
1U
air
duct
to
maximize
air
flow
conditions
in
a
Lenovo
Power
Systems
Group
rack.
To
remove
an
installed
1U
air
‐
duct
option
from
a
19”
rack,
complete
the
following
steps.
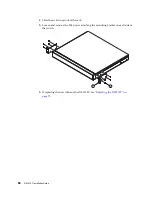
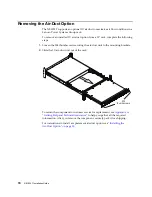
1.
Loosen
the
M4
thumbscrews
securing
the
air
‐
duct
unit
to
the
mounting
brackets.
2.
Slide
the
1U
air
‐
duct
unit
out
of
the
rack.
To
return
the
component
to
customer
service
for
replacement,
see
to
help
you
gather
all
the
required
information.
After
you
remove
the
component,
securely
pack
it
for
shipping.
For
instructions
to
install
a
replacement
air
‐
duct
option,
see
M4
thumbscrews
Содержание ThinkSystem NE1032T
Страница 1: ...Lenovo ThinkSystem NE1032T RackSwitch Installation Guide For Lenovo Cloud Network OS ...
Страница 6: ...6 Lenovo G8296 Installation Guide ...
Страница 14: ...14 NE1032T Installation Guide ...
Страница 18: ...18 NE1032T Installation Guide ...
Страница 19: ... Copyright Lenovo 2017 19 Chapter 2 Switch Components This chapter describes the NE1032T hardware components ...
Страница 32: ...32 NE1032T Installation Guide ...
Страница 78: ...78 NE1032T Installation Guide ...
Страница 94: ...94 NE1032T Installation Guide ...
Страница 100: ...100 NE1032T Installation Guide ...
Страница 120: ...120 NE1032T Installation Guide ...


