


LAGUNATOOLS.COM
19
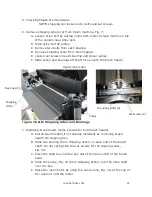
F. Place the brush head into the brush machine while holding the
drive belt out-of-the-way.
G. Center the brush head over the conveyor and install Mounting
Bolts, Fig. 7B, from the flange of the bearing into the mating
bracket
of the brush machine. Tighten the bearing mounting bolts.
H. Tighten the two set screws, Fig. 7B, in each bearing collar to
secure the brush head shaft to the bearings.
I. Align the pulley of the brush head with the drive pulley of the main
motor. Secure by tightening the set screw(s) in the driven pulley.
J. Lower the main motor for proper tension of the drive belt. Proper
tension is slight deflection of the drive belt when pressed from the
side.
K. Make sure all bolts and set screws are tight.
8.
Check alignment (parallelism)
of the brush heads to the conveyor.
Measure from the bottom of the brush bristles to the top of the conveyor belt
on the right and left side. If the brush head is not parallel;
A. Loosen the two bearing bolts (that secure the bearing to the
machine) on the lower side of the brush, Fig. 8.
B. Raise the bearing on the low side by using a hex wrench in the
center of the bearing stud and rotate both equally until the brush
head is parallel.
C.
Tighten the bolts attaching the bearing to the machine bracket.
Figure 8: Aligning Brush Head
Bearing Bolts
(lock, 2 each
side)
Bearing Stud
(adjust, 2 each
side))
Содержание SuperMax SuperBrush 24 x 2
Страница 1: ...OWNERS S MANUAL SuperBrush 24 x 2 SuperBrush 36 x 2 Lagunatools com...
Страница 25: ...LAGUNATOOLS COM 25 INTERNAL WIRING Figure 15 Internal Wiring...
Страница 34: ...LAGUNATOOLS COM 34 Exploded Views STAND ASSEMBLY 1of 2 Figure 22 Stand Assembly...
Страница 35: ...LAGUNATOOLS COM 35 STAND ASSEMBLY 2 of 2 elec hgt adj Figure 23 Stand Assembly electric height adj...
Страница 39: ...LAGUNATOOLS COM 39 HEAD ASSEMBLY Front 1 2 Figure 24 Head Assembly Front 1 2 without brush...
Страница 42: ...LAGUNATOOLS COM 42 CONVEYOR ASSEMBLY Figure 25 Conveyor Assembly...