2. Your LaCie Drive
page 13
LaCie Bigger Disk Extreme with Triple Interface
User’s Manual
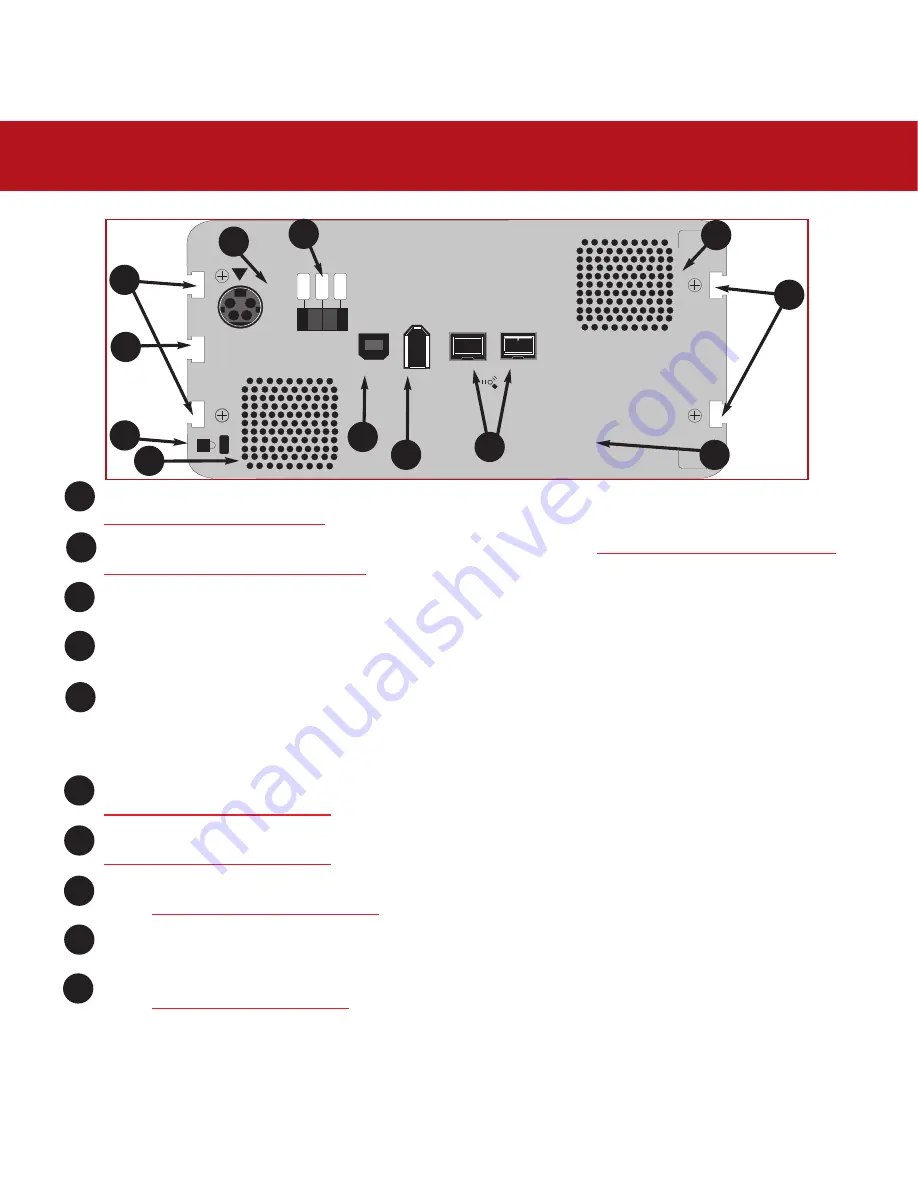
Power Supply Connector
- This is where you plug in the AC adapter supplied with the drive. See section
3.1. Connecting The Power Supply
for more information.
On/Auto/Off Switch -
This is where you turn the drive on or off. See section
3.1.1. Turning The LaCie Bigger Disk
Extreme with Triple Interface On And Off
for more information.
Ventilation Outlet
- These holes help to keep your drive cool during operation. Be sure not to block these openings
when using your drive.
Rackmount Grooves
- These grooves are used for mounting the drive in the Desk Rack kit (sold separately) or placing
your drive in standard 19” computer equipment racks using the LaCie Rackmount Kit (sold separately).
Serial Number Sticker
- This is where you will find your LaCie drive's serial number. Write down the serial number
and keep it in a safe place, because you will need to provide the number in the event you have to call LaCie Technical
Support for any reason in regards to the drive’s performance. The serial number would also come in handy if your
drive is lost or stolen.
Hi-Speed USB 2.0 Port
- This is where you plug in the Hi-Speed USB 2.0 cable furnished with the drive. See section
3.2. Connecting the Interface Cable
for more information.
FireWire 800 Ports
- This is where you plug in the FireWire 800 cable furnished with the drive. See section
3.2. Connecting the Interface Cable
for more information.
FireWire 400 Port
- This is where you plug in the FireWire 400 or iLink/DV cables furnished with the drive. See
section
3.2. Connecting the Interface Cable
for more information.
Lock Slot
- This slot is used to connect an anti-theft system, such as the LaCie Security Lock, for maximum protection.
Refer to your anti-theft system documentation for details on how to connect the lock.
Drive Stand Groove -
This groove is used for attaching the LaCie Drive Stand, which is included with your drive. See
section
3.6. Attaching The Drive Stand
for more information.
on
auto
of
f
FW800
FW800
FW400
USB 2.
0
1
2
3
4
5
6
7
8
3
4
1
10
2
3
4
5
6
7
8
9
10
2.2.2.2. Back View
9


