


29
english
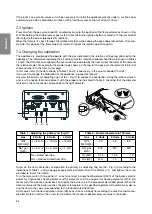
ExTERNAl PUMP
1) Use the braided 900 mm stainless-steel tube
32
to connect the water supply on-off valve to the water
softener inflow valve
1
(figure 3).
2) Using the rubber-braided stainless-steel tube
35
(600 mm long), connect the pump intake with the water
softener valve (figures 3-4).
3) Using the rubber-braided stainless-steel tube
36
(1600 mm long), connect the pump outflow with the
nipple
5
of the water system on the machine (figures 4-5).
32
35
36
35
35
36
Figure 3
Figure 4
Figure 5
5.5 Drainage
Connect the drainage tube to the grounds collecting tray and to the water drainage system.
5.6 Electrical connections
Instructions for a proper electrical connection of the espresso coffee machine:
• Before connecting the machine to the power supply, make sure that the data on the
rating tag correspond to the available power supply.
The tag is located on the left side of the machine (and can be accessed by removing the
lower tray).
• The power connection must be carried out according to applicable requirements.
• The power system prearranged by the customer must comply with the current appli-
cable laws and the power socket must be provided with an efficient grounding system.
La San Marco S.p.A. declines any liability if the applicable prescriptions of the law are
not complied with. An improper installation can cause injury or damage for which the
manufacturer cannot be held liable.
• If it is necessary to use adapters, multiple plugs and extensions, only products meeting
applicable safety standards must be used.
• To avoid any overheating of the power cable, unwind it completely.
• For the electrical connection, it is necessary to install an omnipolar main switch upstre-
am of the power supply; this switch should be rated according to the electrical cha-
racteristics (power and voltage) shown on the rating tag. The omnipolar switch must
disconnect the power supply with a contact gap of at least 3 mm.
Содержание 85 S
Страница 2: ...italiano uso e manutenzione serie 85 s e Istruzioni Originali...
Страница 22: ...21 english OPERATION AND MAINTENANCE SERIES 85 s e Translation of the original instructions...
Страница 26: ...25 english 2 Exploded diagrams 19 20 Mod 85 S 13 14 15 16 17 18 1 2 3 4 5 6 7 8 9 10 11 Mod 85 E...
Страница 41: ......
Страница 42: ...fran ais MANUEL D UTILISATION ET D ENTRETIEN S RIE 85 s e Traduction de la version originale du mode d emploi...
Страница 62: ...deutsch BEDIENUNGS UND WATERTUNGSANLEITUNG SERIE 85 s e bersetzung der Original Anweisungen...
Страница 82: ...espa ol MODO DE EMPLEO Y MANTENIMIENTO SERIE 85 s e Traducci n de las instrucciones originales...
Страница 86: ...85 espa ol 2 Figuras de los distintos modelos 19 20 Mod 85 S 13 14 15 16 17 18 1 2 3 4 5 6 7 8 9 10 11 Mod 85 E...
Страница 102: ...portugu s UTILIZA O E MANUTEN O S RIE 85 s e Tradu o das instru es originais...
Страница 122: ...e i a 85 S E...
Страница 124: ...123 e i a 1 PO OXH 1 1 1 2 800 mm La San Marco La San Marco SpA off La San Marco...
Страница 125: ...124 e i a boiler espresso LA SAN MARCO SPA 0 C San Marco S p A 1 3 5 45 C 80 800 kPa 0 8 8 0 bar 5 fH 70 db A...
Страница 126: ...125 e i a 2 19 20 Mod 85 S 13 14 15 16 17 18 1 2 3 4 5 6 7 8 9 10 11 Mod 85 E...
Страница 133: ...132 e i a 6 7 85 S 19 M 85 E 6 7 8 9 10 10 6 8 1 21 6 9 85 E 1 10 1 1 10 4 1 1 6 10 1 10 10 1 6 10 O 5...
Страница 137: ...136 e i a 8 1 1 2 3 4 5 6 7 8 8 2 8 3 8 4 1 0 2 3 4 5 6 9 1 0...


