background image

Maintenance

9-11

9

15

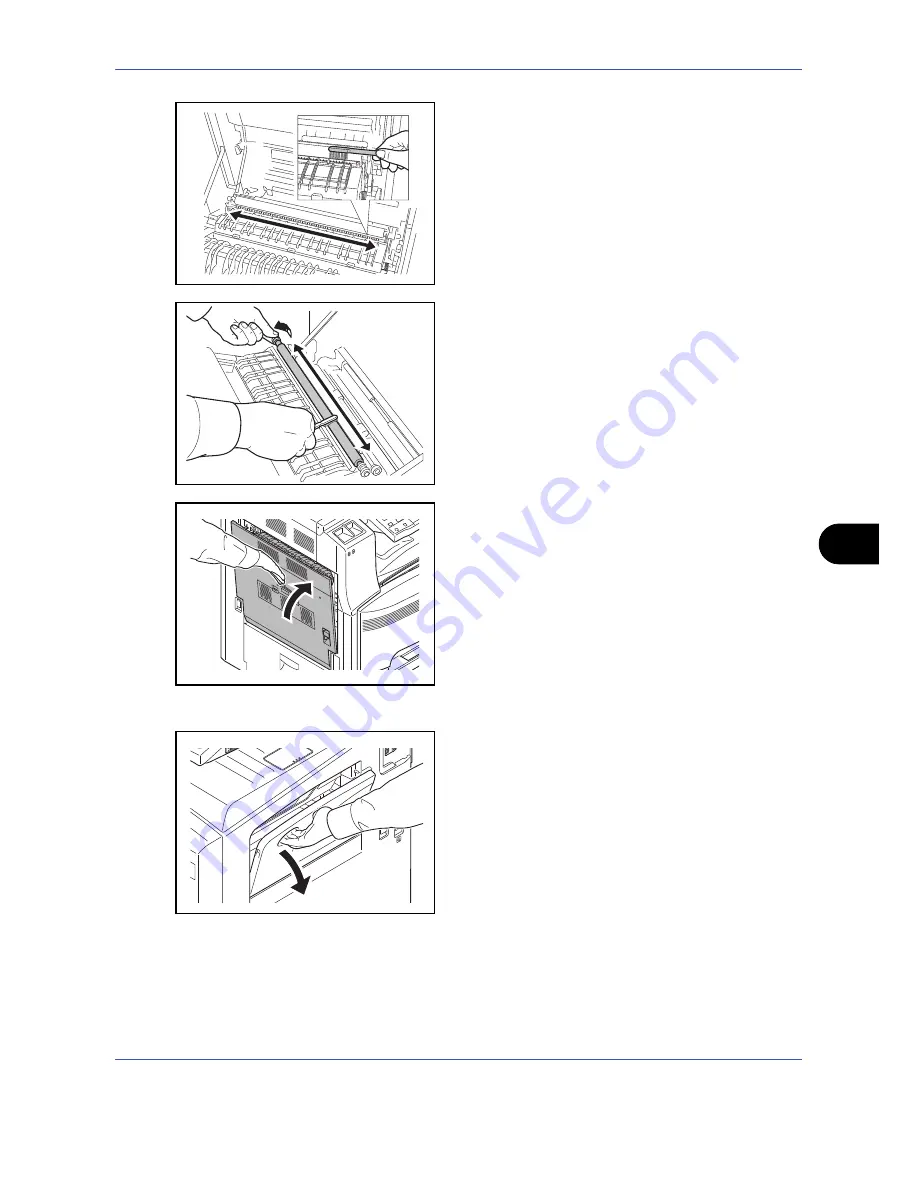
As shown in the figure, clean dirt from the separator 
by moving the brush from side to side along the 
separator.

16

As shown in the figure, clean dirt from the transfer 
roller by moving the brush from side to side along 
the roller while rotating the roller by turning the gear 
at the left end of the roller.

17

Put away the cleaning brush after the cleaning. 
Close the left cover 1 by pressing specified part.

18

Open the Multi Purpose tray.

Содержание TASKALFA 300I

Страница 1: ...OPERATION GUIDE 300i Please read this Operation Guide before using this machine Keep it close to the machine for easy reference ...

Страница 2: ...d keep it close to the machine for easy reference We recommend the use of our own brand supplies We will not be liable for any damage caused by the use of third party supplies in this machine A label shown in the illustration assures that the supplies are our own brand In this Operation Guide 300i is referred to as 30 ppm model Included Guides The following guides are supplied with the machine Ref...

Страница 3: ... indicated inside the symbol Please contact your service representative to order a replacement if the safety warnings in this Operation Guide are illegible or if the guide itself is missing fee required NOTE An original which resembles a bank note closely may not be copied properly in some rare cases because this machine is equipped with a counterfeiting prevention function WARNING Indicates that ...

Страница 4: ...Panel Angle 2 11 Switching the Language for Display Language 2 11 Setting Date and Time 2 12 Network Setup LAN Cable Connection 2 14 Installing Software 2 17 COMMAND CENTER Settings for E mail 2 18 Sending E mail 2 19 Loading Paper 2 21 Loading Originals 2 32 3 Basic Operation Login Logout 3 2 Enter key and Quick No Search key 3 3 Touch Panel Display 3 4 Original Preview 3 5 Copying 3 6 Printing P...

Страница 5: ...nding Functions Original Size Selection 5 2 Sending Size Selection 5 3 Zoom 5 5 Centering 5 6 Mixed Sized Originals 5 7 1 sided 2 sided Selection 5 10 Original Orientation 5 11 File Format 5 12 File Separation 5 13 PDF Encryption Functions 5 14 Image Quality 5 16 Adjusting Density 5 17 Scan Resolution 5 18 Sharpness 5 19 Background Density Adjustment 5 20 Color Grayscale Black and White Selection ...

Страница 6: ...tings 8 33 Printing Reports Sending Notice 8 38 Adjustment Maintenance 8 41 Date Timer 8 46 Editing Destination Address Book Adding One Touch Keys 8 51 Internet Browser Setup 8 58 Applications 8 60 System Initialization 8 63 Restarting the System 8 63 Network Setup 8 64 Secure Protocol 8 69 Interface Block Setting 8 72 Security Level Security Level setting 8 73 Document Guard Setting 8 73 Optional...

Страница 7: ...Contents v Character Entry Method Appendix 10 Paper Appendix 13 Specifications Appendix 21 Glossary Appendix 27 Index Index 1 ...

Страница 8: ...Administrator tasks It copies It prints Copying with specific settings Printing Documents Stored in Removable USB Memory Print via a network 1 For more information refer to the Printer Driver User Guide Connecting Cables Network Setup LAN Cable Connection Install the printer driver on your computer 1 What you want to do Setup Loading Paper 2 21 Copying Functions 4 1 Printing Documents Stored in Re...

Страница 9: ...the destination computer Place the originals on the platen Plug the USB memory 1 If the destination is not stored in the address book you can send by entering the address directly Setup Send as E mail Send to Folder SMB Saving Documents to USB Memory What you want to do Sending 3 21 1 Sending Functions 5 1 Operation Saving Documents to USB Memory Scan to USB 6 22 Editing Destination Address Book A...

Страница 10: ...of Telephone Line Inch version only Network Setup LAN Cable Connection Install the Network FAX Driver on your computer 1 1 For more information refer to the Network FAX Driver Operation Guide 2 If the destination is not stored in the address book you can send the FAX by entering the address directly Setup What you want to do Using the Address Book 3 17 on the FAX System S Operation Guide Loading P...

Страница 11: ...oner High temperature inside Do not touch parts in this area because there is a danger of getting burned High temperature inside Do not touch parts in this area because there is a danger of getting burned Do not incinerate toner and toner container Dangerous sparks may cause burn Label inside the machine Laser radiation warning Moving parts inside May cause personal injury Do not touch moving part...

Страница 12: ...ms to avoid the danger of fire To keep the machine cool and facilitate changing of parts and maintenance allow access space as shown below Leave adequate space especially around the rear cover to allow air to be properly ventilated out of the machine Other precautions The service environmental conditions are as follows Temperature 50 to 90 5 F 10 to 32 5 C Humidity 15 to 80 However adverse environ...

Страница 13: ...ecified Avoid multiple connections in the same outlet These types of situations present a danger of fire or electrical shock Plug the power cord securely into the mains power outlet and the power socket on the machine A buildup of dust around the prongs on the plug or contact between the prongs and metallic objects may cause a fire or electric shock Incomplete electrical contact could cause overhe...

Страница 14: ...danger of personal injury fire electrical shock or exposure to the laser If the laser beam escapes there is a danger of it causing blindness If the machine becomes excessively hot smoke appears from the machine there is an odd smell or any other abnormal situation occurs there is a danger of fire or electrical shock Turn the main power switch off immediately be absolutely certain to remove the pow...

Страница 15: ...ith your service representative in regard to the cost of cleaning the internal parts of the machine Other precautions Do not place heavy objects on the machine or cause other damage to the machine Do not open the front cover turn off the main power switch or pull out the power plug during copying When lifting or moving the machine contact your service representative When moving the machine please ...

Страница 16: ...ining tenderness contact a physician If toner does happen to get on your skin wash with soap and water Do not attempt to force open or destroy the toner container or the waste toner box If the optional Fax kit is installed and the main power switch is off transmitting receiving Fax is disabled Do not turn off the main power switch but press the Power key on the operation panel to enter Sleep Other...

Страница 17: ... housing and sealed within the external covers never permits the laser beam to escape 2 The CDRH Act A laser product related act was implemented on Aug 2 1976 by the Center for Devices and Radiological Health CDRH of the U S Food and Drug Administration FDA This act prohibits the sale of laser products in the U S without certification and applies to laser products manufactured after Aug 1 1976 The...

Страница 18: ...ich is invisible Shown at below is the label located on the cover of the optical unit 4 Maintenance For safety of the service personnel follow the maintenance instructions in the other section of this manual 5 Safety switch The power to the laser unit is cut off when the front cover is opened ...

Страница 19: ...pment does cause harmful interference to radio or television reception which can be determined by turning the equipment off and on the user is encouraged to try to correct the interference by one or more of the following measures Reorient or relocate the receiving antenna Increase the separation between the equipment and receiver Connect the equipment into an outlet on a circuit different from tha...

Страница 20: ...n performance of this warranty the Customer must immediately notify the Authorized Kyocera Dealer from whom the product was purchased If the Kyocera Dealer is not able to provide service write to Kyocera at the address below for the name and address of the Authorized Kyocera Dealer in your area or check Kyocera s website at http www kyoceramita com This warranty does not cover MFPs or accessories ...

Страница 21: ...ng Scanning the following items is prohibited and may be penalized by low It may not be limited to these items Do not knowingly copy scan the items that are not to be copied scanned Paper money Bank note Securities Stamp Passport Certificate Local laws and regulations may prohibit or restrict copying scanning of other items not mentioned above ...

Страница 22: ...xx ...

Страница 23: ...chine This chapter provides information on the following topics Legal Information xxii Regarding Trade Names xxiii Energy Saving Control Function xxvii Automatic 2 Sided Copy Function xxvii Paper Recycling xxvii Energy Star ENERGY STAR Program xxvii About this Operation Guide xxviii ...

Страница 24: ...xxii Legal Information Copying or other reproduction of all or part of this guide without the prior written consent of Kyocera Mita Corporation is prohibited ...

Страница 25: ...egistered trademark of Apple Computer Inc TypeBankG B TypeBankM M and Typebank OCR are trademarks of TypeBank All European language fonts installed in this machine are used under licensing agreement with Monotype Imaging Inc Helvetica Palatino and Times are registered trademarks of Linotype Hell AG ITC Avant Garde Gothic ITC Bookman ITC ZapfChancery and ITC ZapfDingbats are registered trademarks o...

Страница 26: ...t not be used to endorse or promote products derived from this software without prior written permission For written permission please contact openssl core openssl org 5 Products derived from this software may not be called OpenSSL nor may OpenSSL appear in their names without prior written permission of the OpenSSL Project 6 Redistributions of any form whatsoever must retain the following acknowl...

Страница 27: ...he following disclaimer in the documentation and or other materials provided with the distribution 3 All advertising materials mentioning features or use of this software must display the following acknowledgment This product includes cryptographic software written by Eric Young eay cryptsoft com The word cryptographic can be left out if the rouines from the library being used are not cryptographi...

Страница 28: ...y all copies of the Software and Typefaces and documentation as requested 6 You agree that you will not modify alter disassemble decrypt reverse engineer or decompile the Software 7 Monotype Imaging warrants that for ninety 90 days after delivery the Software will perform in accordance with Monotype Imaging published specifications and the diskette will be free from defects in material and workman...

Страница 29: ...lly enters Sleep when 15 minutes have passed since the device was last used The amount of time of no activity that must pass before Sleep is activated may be lengthened For more information see Sleep and Auto Sleep on page 2 10 Automatic 2 Sided Copy Function This device includes 2 sided copying as a standard function For example by copying two 1 sided originals onto a single sheet of paper as a 2...

Страница 30: ...t boxes Chapter 7 Status Job Cancel Explains how to check the job status and job history and how to cancel jobs being printed or waiting to print Also explains how to check the remaining paper and device status and how to cancel fax transmission Chapter 8 Default Setting System Menu Describes the System Menu options for general machine operation Chapter 9 Maintenance Describes cleaning and toner r...

Страница 31: ...el Ready to copy is displayed Used to emphasize a key word phrase or references to additional information For more information refer to Sleep and Auto Sleep on page 2 9 Note Indicates supplemental information or operations for reference NOTE Important Indicates items that are required or prohibited so as to avoid problems IMPORTANT Caution Indicates what must be observed to prevent injury or machi...

Страница 32: ...iginals and paper placement directions on the touch panel Placement direction Indicated size The size of the original paper that can be used depends on the function and source tray For further details refer to the page detailing that function or source tray Vertical direction A4 B5 A5 B6 A6 16K Letter Statement For the originals paper dimension A is longer than B Horizontal direction A4 R B5 R A5 ...

Страница 33: ...1 1 1 Part Names This chapter identifies the machine parts and operation panel keys Operation Panel 1 2 Machine 1 4 ...

Страница 34: ...ts printed and number of pages scanned Blinks while data is received Displays the Program screen Displays the Copy screen Displays the screen for sending You can also change this to show the address book screen Switches the touch panel display to enlarged display in the Copy screen or Send screen Displays the Document Box screen Displays the Application screen Displays help guidance ...

Страница 35: ...e into Sleep Mode Recovers from Sleep if in Sleep Mode Lit when the machine s main power is on Numeric keys Enter numbers and symbols Clears entered numbers and characters Recalls already registered destinations and programs for sending Finalizes numeric key entry and finalizes screen during setting of functions Operates linked with the on screen OK Starts copying and scanning operations and proce...

Страница 36: ...Attention Indicator Lights or blinks when an error occurs and a job is stopped 6 Receive Indicator Blinks while data is received 7 Left Cover 1 8 Left Cover 1 Lever 9 Left Cover 2 10 Left cover 2 Handle 11 Platen 12 Operation Panel 13 Cassette 1 14 Cassette 2 15 Duplex Unit 1 2 4 5 6 7 8 9 10 11 12 13 14 15 3 ...

Страница 37: ...Part Names 1 5 1 16 Toner Container Stopper 17 Toner Container 18 Waste Toner Box 19 Paper Feed Unit A2 20 Paper Feed Unit Cover A3 21 Green Knob 22 Cleaner Rod 23 Cleaning Brush 22 18 23 21 19 20 16 17 ...

Страница 38: ...ide 28 Top Tray 29 Main Power Switch 30 Paper Width Guide 31 Multi Purpose Tray 32 Output Stopper 33 Filter F1 34 Option Interface Slot OPT2 35 USB Memory Slot A2 36 USB Interface Connector B1 37 Network Interface Connector 38 Option Interface Slot OPT1 24 25 33 26 27 28 30 29 31 31 32 34 38 37 35 36 ...

Страница 39: ...n Method and Preparing Cables 2 3 Connecting Cables 2 5 Power On Off 2 7 Low Power Mode and Auto Low Power Mode 2 9 Sleep and Auto Sleep 2 10 Adjusting the Operation Panel Angle 2 11 Switching the Language for Display Language 2 11 Setting Date and Time 2 12 Network Setup LAN Cable Connection 2 14 Installing Software 2 17 COMMAND CENTER Settings for E mail 2 18 Sending E mail 2 19 Loading Paper 2 ...

Страница 40: ... included CD ROM Product Library Refer to them as necessary Documents KYOCERA COMMAND CENTER Operation Guide Printer Driver User Guide Network FAX Driver Operation Guide TWAIN WIA Driver Operation Guide KM NET for Direct Printing Operation Guide KMnet Viewer User Guide Scan to SMB PC Setup Guide PRESCRIBE Commands Technical Reference PRESCRIBE Commands Command Reference Data Security Kit E Operati...

Страница 41: ...ion Send FTP Sends the scanned image as a data file on the FTP Send E mail Sends the image data of scanned originals to the desired recipient as a file attached to an E mail message Send SMB Saves the scanned image as a data file on your PC MFP FAX Administrator s PC COMMAND CENTER Network settings Scanner default settings User and destination registration Network FAX Option TWAIN Scanning WIA Sca...

Страница 42: ... the interface you use Available Standard Interfaces Function Interface Necessary Cable Printer Scanner Network FAX Function available when using optional fax kit For details on Network FAX refer to the Fax Kit Operation Guide Network interface LAN 10Base T or 100Base TX Shielded Printer USB interface USB2 0 compatible cable Hi Speed USB compliant Max 5 0 m Shielded ...

Страница 43: ...r key on the operation panel Check that the Power indicator and the memory indicator are off After this turn off the main power switch 2 Connect the LAN cable to the network interface located on right side of the body 3 Connect the other end of the cable to the hub 4 Configure the network For details refer to Network Setup LAN Cable Connection on page 2 14 Check that the indicators are off ...

Страница 44: ...the memory indicator are off After this turn off the main power switch 2 Connect the USB cable to the appropriate interface located on the right side of the body 3 Connect the other end of the cable to the PC Connecting the Power Cable Connect one end of the supplied power cable to the machine and the other end to a power outlet IMPORTANT Only use the power cable that comes with the machine Check ...

Страница 45: ...rn the main power switch on NOTE If the optional Data Security Kit is installed a message might display indicating the security function is being activated and time may be taken to start up when the power is turned on IMPORTANT When turning off the main power switch do not turn on the main power switch again immediately Wait more than 5 seconds and then turn on the main power switch ...

Страница 46: ...damage In case of not using the machine for an extended period of time CAUTION If this machine will be left unused for an extended period e g overnight turn it off at the main power switch If the machine will not be used for an even longer period of time e g vacation remove the power plug from the outlet as a safety precaution If the optional Fax kit is installed note that turning the machine off ...

Страница 47: ...ives while the machine is in Low Power Mode when using the optional fax the machine automatically wakes up and starts printing To resume perform one of the following actions The machine will be ready to operate within 10 seconds Press any key on the operation panel Open the original cover or the optional document processor Place originals in the optional document processor Note that ambient enviro...

Страница 48: ...Sleep the print job is performed while the touch panel remains unlit When using the optional fax received fax data is printed out while the operation panel also remains unlit To resume press the Power key The machine will be ready within 15 seconds Note that ambient environmental conditions such as ventilation may cause the machine to respond more slowly Auto Sleep Auto Sleep automatically switche...

Страница 49: ...played on the touch panel Use the procedure below to select the language 1 Press the System Menu key 2 Press Common Settings and then Change of Language 3 Press the key for the language you want to use 4 Press OK The touch panel language will be changed Common Settings Language Set the language to use for the touch panel display English Français Deutsch Italiano ǸțșșȒȐȑ Nederlands Español Cancel O...

Страница 50: ...User on page 11 5 for the default login user name and password Be sure to set the time difference before setting the date and time If you change Date Time setting trial functions will be unavailable For details refer to Optional Functions on page 8 75 1 Press the System Menu key 2 Press Date Timer and then Change of Time Zone 3 Select the region NOTE Press or to view the next region 4 Press Off or...

Страница 51: ... before Use 2 13 2 6 Set the date and time Press or in each setting 7 Press OK Date Timer Date Time Set the date and time Off Day Month Year Second Minute Hour 2008 10 10 31 10 10 Status 08 08 2009 10 10 Cancel OK ...

Страница 52: ... screen appears Enter a login user name and password and press Login Refer to Adding a User on page 11 5 for the default login user name and password TCP IP IPv4 Setup by Entering IP Addresses Set up TCP IP to connect to the Windows network Set the IP addresses subnet masks and gateway addresses The default settings are TCP IP Protocol On DHCP On Bonjour Off Auto IP On NOTE Prior to the IP address...

Страница 53: ...63 DHCP Settings Select whether or not to use the DHCP server The default setting is On Use the procedure below 1 Press the System Menu key 2 Press System Next of Network and then Next of TCP IP Setting 3 Press Change of TCP IP 4 Press On and then press OK 5 Press Change of IPv4 6 Press DHCP 7 Press On or Off of DHCP and then press OK 8 After changing the setting restart the system or turn the mac...

Страница 54: ...rocedure below 1 Press the System Menu key 2 Press System Next of Network and then Next of TCP IP Setting 3 Press Change of TCP IP 4 Press On and then press OK 5 Press Change of IPv4 6 Press Auto IP 7 Press On or Off of Auto IP and then press OK 8 After changing the setting restart the system or turn the machine OFF and then ON again For detailed information on restarting the system refer to Resta...

Страница 55: ...ware on your PC from the included Product Library CD ROM Product Library if you want to use the printer function of this machine or perform TWAIN WIA transmission or FAX transmission from your PC NOTE Installation on Windows XP Windows 2000 Server 2003 and Windows Vista must be done by a user logged on with administrator privileges Plug and Play is disabled on this device when in Sleep Wake the de...

Страница 56: ...rocedure for accessing COMMAND CENTER is explained below 1 Launch your Web browser 2 In the Address or Location bar enter the machine s IP address E g http 192 168 48 21 The web page displays basic information about the machine and COMMAND CENTER as well as their current status 3 Select a category from the navigation bar on the left of the screen The values for each category must be set separately...

Страница 57: ...nto this machine as E mail attachments check the following The network environment used to connect this machine to the mail server A full time connection via a LAN is recommended SMTP Settings Use COMMAND CENTER to register the IP address or host name of the SMTP server If limits have been set on the size of E mail messages it may not be possible to send very large E mails The procedure for specif...

Страница 58: ...ngth of the login user name is 64 characters Login Password When Other is selected for Authenticate the password set here will be used for authentication The maximum length of the login password is 64 characters POP before SMTP Timeout Set the amount of time to wait before time out in seconds when you have selected POP before SMTP as the Authentication Protocol Test This will test if the SMTP conn...

Страница 59: ...aighten it before loading Paper that is curled or folded may cause a jam CAUTION If you copy onto used paper paper already used for copying do not use paper that is stapled or clipped together This may damage the machine or cause poor image quality NOTE If printouts are curled or not neatly stapled turn the stack in the cassette upside down Avoid exposing opened paper to high temperatures and high...

Страница 60: ...red paper always specify the media type setting Refer to Specifying Paper Size and Media Type for the Cassettes on page 2 28 The cassettes can hold paper with weights up to 120 g m2 Do not load paper that is heavier than 121 g m2 in the cassettes Use the multi purpose tray for paper that is heavier than 121 g m2 1 Pull the cassette out toward you until it stops NOTE Do not pull out more than one c...

Страница 61: ...ign the paper flush against the left side of the cassette IMPORTANT Before loading the paper be sure that it is not curled or folded Paper that is curled or folded may cause paper jams Ensure that the loaded paper does not exceed the level indicator see illustration below When loading the paper keep the side that was closest the package seal facing up The paper length and width guides must be adju...

Страница 62: ...K and 16K R Be sure to use the multi purpose tray when you print on any special paper IMPORTANT When using media types other than plain paper such as recycled or colored paper always specify the media type setting Refer to Specifying Paper Size and Media Type for the Multi Purpose Tray on page 2 30 If you are using a paper weight of 106 g m2 or more set the media type to Thick The capacity of the ...

Страница 63: ...ing up Curled paper must be uncurled before use Straighten the top edge if it is curled When loading paper into the multi purpose tray check that there is no paper left over in the tray from a previous job before loading the paper If there is just a small amount of paper left over in the multi purpose tray and you want to add more first remove the left over paper from the tray and include it with ...

Страница 64: ...sert the envelope all the way along the width guides keeping the printing side face up and the edge with the flap facing towards you For portrait form envelopes close the flap Insert the envelope all the way along the width guides keeping the printing side face up and the edge with the flap facing the insertion slot Acceptable Envelope Size Youkei 2 162 114 mm Youkei 4 235 105 mm Monarch 3 7 8 7 1...

Страница 65: ...ng face NOTE When you load envelopes in the multi purpose tray select the envelope type by referring to Specifying Paper Size and Media Type for the Multi Purpose Tray on page 2 30 When you load envelopes or cardstock in the multi purpose tray Load envelope with the print side facing up Landscape form envelopes Portrait form envelopes Cardstock Hagaki Return postcard Oufuku Hagaki NOTE Use unfolde...

Страница 66: ...ond Color High Quality Rough and Custom 1 to 8 Selection Item Selectable Size Type Paper Size Auto Paper size is automatically detected and selected Select whether the paper is in Metric size or in Inch size Standard Sizes 1 Select from the standard sizes Selectable paper sizes are as follows Inch size Ledger Letter R Letter Legal Statement R 8 5 13 5 and Oficio II Metric size A3 B4 A4 A4 R B5 B5 ...

Страница 67: ...ect the paper size press Standard Sizes 1 or Standard Sizes 2 and select the paper size 5 Press OK The previous screen reappears 6 Press Change of Media Type and select the media type Then press OK Common Settings Paper Size Set cassette paper size Standard Sizes 1 Auto Status 08 08 2009 10 10 Ledger Letter Standard Sizes 2 Letter Legal Statement 8 5x13 5 OficioII Cancel OK Common Settings Media T...

Страница 68: ...ize A3 A4 R A4 A5 R A6 R B4 R B5 R B5 B6 R Folio 8K 16K R and 16K Metric size Ledger Letter R Letter Legal Statement R Executive 8 5 13 5 Oficio II 8K 16K R and 16K Others Select from special standard sizes and custom sizes Selectable paper sizes are as follows ISO B5 Envelope 10 Commercial 10 Envelope 9 Commercial 9 Envelope 6 Commercial 6 3 4 Envelope Monarch Envelope DL Envelope C5 Envelope C4 ...

Страница 69: ...f Media Type and select the media type Then press OK Common Settings Multi Purpose Tray Setting Set the multi purpose tray paper size Standard Sizes 1 Auto Standard Sizes 2 Others Size Entry Ledger Letter Letter Legal Statement 8 5x13 5 Executive Status 08 08 2009 10 10 Cancel OK OficioII Common Settings Paper Size Set the multi purpose tray paper size Standard Sizes 1 X 5 83 17 00 17 Auto Status ...

Страница 70: ... open the document processor Before opening the document processor be sure that there are no originals left on the original table or on the original eject table Originals left on the original table or on the original eject table may fall off when the document processor is opened Keep the document processor open if the original is 40 mm 1 5 8 or thicker 2 Place the original Put the scanning side fa...

Страница 71: ...ginal cover IMPORTANT Do not push the original cover forcefully when you close it Excessive pressure may crack the platen glass NOTE Shadows may be produced around the edges and in the middle of open faced originals CAUTION Do not leave the document processor open as there is a danger of personal injury ...

Страница 72: ...ies such as OHP film Carbon paper Originals with very slippery surfaces Originals with adhesive tape or glue Wet originals Originals with correction fluid which is not dried Irregularly shaped non rectangular originals Originals with cut out sections Crumpled paper Originals with folds Straighten the folds before loading Failure to do so may cause the originals to jam Originals bound with clips or...

Страница 73: ...iginals If there is a gap readjust the original width guides The gap may cause the originals to jam Ensure that loaded originals do not exceed the level indicator Exceeding the maximum level may cause the originals to jam see the figure Originals with punched holes or perforated lines should be placed in such a way that the holes or perforations will be scanned last not first Original placement in...

Страница 74: ...Preparation before Use 2 36 ...

Страница 75: ... Original Preview 3 5 Copying 3 6 Printing Printing from Applications 3 19 Sending 3 21 Specifying Destination 3 28 Using Document Box 3 31 Basic Operation for Document Box 3 33 Canceling Jobs 3 40 Quick Setup Screen 3 41 Program Copying and Sending 3 44 Registering Shortcuts Copy Send and Document Box Settings 3 44 Using the Internet Browser 3 47 ...

Страница 76: ...ess OK NOTE Refer to the Character Entry Method on Appendix 10 for details on entering characters 3 Press Login Password Press Keys to enter the login data using the numeric keys 4 Enter the password and press OK 5 Check the login user name and password are correct and press Login NOTE If Network Authentication is selected as the user authentication method either Local or Network can be selected a...

Страница 77: ...e use of the Quick No Search key is explained below using an example in which a speed dial number is specified and used to select a destination For more information on speed dialing refer to Specifying Destination on page 3 28 1 Press the Quick No Search key or No in the basic send screen 2 In the number entry screen use the numeric keys to enter the speed dial number 3 If you entered speed dial n...

Страница 78: ... Setup Layout Edit Advanced Setup Status 08 08 2009 10 10 Shortcut 1 Shortcut 4 Shortcut 3 Shortcut 2 Shortcut 6 Shortcut 5 Letter Original Zoom Paper 100 Letter Staple Off 2 in 1 Combine 2 sided 2 sided Duplex Normal 0 Density Paper Selection Auto Zoom 100 Press Start key to start printing Press Cancel to change settings Original position Size orientation of original and paper Paper source Output...

Страница 79: ... new settings NOTE If you scan a multi page original only the first page is previewed 5 If there is no problem with the preview image press the Start key Copying begins Copy Image Preview Ready to copy Copies Image Quality Org Paper Finishing Quick Setup Layout Edit Advanced Setup Status 08 08 2009 10 10 Shortcut 1 Shortcut 4 Shortcut 3 Shortcut 2 Shortcut 6 Shortcut 5 Original Zoom Paper 100 Stap...

Страница 80: ...automatically To change the paper size press Org Paper Finishing Paper Selection and select the desired paper source NOTE Select paper size manually if necessary instead of using automatic paper selection 4 Use the numeric keys to enter the copy quantity Specify the desired number up to 999 5 Press the Start key to start copying 6 Remove the finished copies from the top tray Place original Copy Im...

Страница 81: ...djust density manually pressing 3 Lighter to 3 Darker You can change the density level 3 Lighter to 3 Darker in half steps To change density adjustment from Manual to Auto press Auto 5 Press OK 6 Press the Start key Copying begins Density Adjustment Option Description Manual Adjust density using 7 or 13 levels Auto Optimum density is selected according to the density of the original Status 08 08 2...

Страница 82: ...ty 5 Press OK 6 Press the Start key Copying begins Image Quality Option Description Text Photo For originals with both text and photographs Text For originals primarily consisting of text Photo For photos taken with a camera Printed Document For documents printed from this machine Status Ready to copy Copies Cancel OK Original Image Text Select original image type for best results Printed Document...

Страница 83: ...ons The following magnifications are available Letter R Ledger 129 Statement R 64 A3 141 A5 70 A4 25 400 Model Zoom Level Original Copy Inch Models 100 Auto 400 Max 200 STMT Ledger 154 STMT Legal 129 Letter Ledger 121 Legal Ledger 78 Legal Letter 77 Ledger Legal 64 Ledger Letter 50 Ledger STMT 25 Min Metric Models 100 Auto 400 Max 200 A5 A3 141 A4 A3 A5 A4 127 Folio A3 106 11 15 A3 90 Folio A4 75 ...

Страница 84: ...displayed magnifications of X horizontal and Y vertical You can also enter the magnification directly using the numeric keys by pressing Keys Press Original Orientation to select orientation of the originals either Top Edge Top or Top Edge Left Then press OK 5 Press OK 6 Press the Start key Copying begins Y X Status 08 08 2009 10 10 Cancel OK Zoom Place original Add Shortcut 25 400 Standard Zoom X...

Страница 85: ...80 Copies can be bound on the top edge facing the same orientation when turning the pages Two sided to One sided Copies each side of a two sided original onto two individual sheets The optional document processor is required The following binding options are available Binding Left Right Images on the second sides are not rotated Binding Top Images on the second sides are rotated 180 Two sided to T...

Страница 86: ...ded mode Original Ledger Letter R A3 B4 A4 R B5 R A5 R and 8K Paper Letter A4 and B5 The procedure for using two sided duplex copying is explained below 1 Press the Copy key 2 Place the originals on the platen 3 Press Layout Edit and then Duplex 4 Select the desired Duplex option 5 If you choose 1 sided 2 sided or 2 sided 2 sided select the binding edge of the finished copies of Finishing If you c...

Страница 87: ...w Collate Scan multiple originals and deliver complete sets of copies as required according to page number Offset Without Document Finisher If the optional document finisher is not installed when you use offsetting printed copies are produced after rotating each set or page by 90º NOTE You need to load the same sized paper with different orientation in the paper source other than the selected pape...

Страница 88: ...late copying press On of Collate To use offset copying press Each Set of Offset Press OK If Off is selected for Collate press Off or Each Page of Offset 5 Press OK 6 Press the Start key Copying begins 3 2 1 3 2 1 3 2 1 3 2 1 Original Copy each set Off Each Set Off On Collate Offset Offset Ready to copy Copies Status 08 08 2009 10 10 Cancel OK Add Shortcut Collate Preview Original Zoom Paper 100 Pl...

Страница 89: ...creen appears on the touch panel during printing 1 Press Reserve Next The default screen for copying appears 2 Place the originals onto the machine for reserving copy and configure the copy settings 3 Press the Start key The machine starts scanning the originals When the current print job ends the reserved copy job is printed Place original Copy Image Preview Ready to copy Copies Color Image Quali...

Страница 90: ...d The current print job is temporarily interrupted 2 Place the originals onto the machine for interrupt copy and configure the copy settings 3 Press the Start key to start interrupt copying 4 When interrupt copying ends press the Interrupt key The machine resumes the paused print jobs Place original Copy Image Preview Ready for interrupt copy Copies Image Quality Org Paper Finishing Quick Setup La...

Страница 91: ...tations are available Original Orientation Top Edge Back Edge Original Orientation Top Edge Back Edge Original Orientation Left Top Edge Left top corner Original Orientation Left Top Edge Left top corner Document Finisher Cassette Paper Load Direction Document Finisher Cassette Paper Load Direction Built in Finisher Cassette Paper Load Direction Built in Finisher Cassette Paper Load Direction ...

Страница 92: ... Original Orientation to choose orientation of the originals either Top Edge Top or Top Edge Left Then press OK 6 Press OK 7 Press the Start key Copying begins Staple Top Right Staple Top Left 2 staples Top 2 staples Right Ready to copy Copies 1 Status 08 08 2009 10 10 Cancel OK Add Shortcut Preview Original Zoom Paper 100 Place original Top Edge Top Original Orientation Off Off Bind and Fold 2 st...

Страница 93: ...ate a document using an application 2 Click File and select Print in the application The Print dialog box appears 3 Click the button next to the Name field and select this machine from the list 4 Enter the desired print quantity in the Number of copies box Enter any number up to 999 When there is more than one document select Collate to print out one by one in the sequence of the page numbers 5 Cl...

Страница 94: ...choose Auto Select paper is supplied automatically from the paper source loaded with paper of optimum size and type To print on special paper such as envelope or thick paper place it on the multi purpose tray and select MP Tray 8 Select paper orientation either Portrait or Landscape to match the orientation of the document Selecting Rotate 180 will print the document rotated 180 9 Click OK button ...

Страница 95: ... When the PC Folder SMB FTP is selected it is necessary to share the destination folder For setting up the PC Folder contact your administrator Creating Registering a Document Box when a Document Box is selected as the destination Detailed transmission settings to select a Document Box as the destination or to print and send the image at the same time Follow the steps below for basic sending The f...

Страница 96: ...n this event press Cancel to display the screen for sending 2 Press E mail Addr Entry and then E mail Address NOTE Destination can be specified using the Address Book or the One Touch Keys Refer to Specifying Destination on page 3 28 3 Enter destination E mail address and press OK 4 Press Next Dest and repeat steps 3 to specify the destination Up to 100 E mail addresses can be specified NOTE When ...

Страница 97: ... to share a folder Be sure that SMB Protocol or FTP in the COMMAND CENTER is On For details refer to the KYOCERA COMMAND CENTER Operation Guide 1 Press the Send key Displays the screen for sending NOTE Depending on the settings the address book screen may appear In this event press Cancel to display the screen for sending 2 Press Folder Path Entry and then SMB or FTP NOTE Destination can be specif...

Страница 98: ...tination computer Status 08 08 2009 10 10 Use the keyboard to enter Backspace Upper case Lower case No Symbol Space Cancel OK Lower case _ Q W E R T Y U I O P A S D F G H J K L Z X C V B N M Input characters Limit characters 0 128 Item Data to be entered Max characters Host Name Host name or IP address of the PC to receive the data Up to 64 characters Path Path to the receiving folder such as foll...

Страница 99: ...ist Item Data to be entered Max characters Host Name Host name or IP address of FTP server Up to 64 characters Path Path to the receiving folder For example User ScanData Otherwise the data will be saved in the home directory Up to 128 characters Login User Name FTP server login user name Up to 64 characters Login Password FTP server login password Up to 64 characters To specify a port number diff...

Страница 100: ...ppears Enter the same host name and path again and press OK When selecting On for Destination Check before Send page 8 29 the confirmation screen appears after pressing the Start key For details refer to Confirmation Screen of Destinations on page 3 27 Status 08 08 2009 10 10 Original Sending Data Format Quick Setup Destination Color Image Quality Advanced Setup Destination Detail ABCD abcd efg co...

Страница 101: ...ination press Cancel and then return to the destination screen 2 Press Check NOTE Be sure to confirm every destination by displaying them on the touch panel You cannot press Check unless you have confirmed every destination 3 Press the Start key to start sending Status 08 08 2009 10 10 Original Sending Data Format Quick Setup Destination Color Image Quality Advanced Setup Destination Detail ABCD a...

Страница 102: ... check box and remove the checkmark For details on the external address book refer to KYOCERA COMMAND CENTER Operation Guide 3 Press OK to register the selected destination in the destination list NOTE To delete a destination in the list select the destination and press Delete Status 08 08 2009 10 10 Original Sending Data Format Quick Setup Destination Color Image Quality Advanced Setup Destinatio...

Страница 103: ...Search No No Type Name Detail Folder Detail Address Book Sort Addr Book 0001 0002 0005 0004 0003 ABCD abcd efg com TUVW tuvw xyz com Group1 Group2 Group3 Name Register Edit Address Book 1 2 i FAX FAX ABC DEF JKL MNO PQRS TUV WXYZ GHI 0 9 1 2 3 4 Keys used Search type Subjects searched 1 Search by name Search by registered name 2 Search by address number Search by registered address number 3 Advanc...

Страница 104: ...oadcast items E mail Up to 100 Folders SMP FTP Total of 10 SMB and FTP FAX Up to 500 i FAX Up to 100 Also depending on the settings you can send and print at the same time Procedures are the same as used in specifying the destinations of respective types Continue to enter E mail address or folder path so that they appear in the destination list Press the Start key to launch transmission to all des...

Страница 105: ... Job Boxes cannot be created or deleted by a user NOTE You can set up the machine so that temporary documents in job boxes are automatically deleted For details refer to Automatic Delete Setting for Temporary Documents on page 6 17 Private Print Stored Job Box page 6 12 In Private Printing you can specify that a job is not printed until you release the job at the operation panel When sending the j...

Страница 106: ...15 Repeat Copy feature stores the copied original document data in the Job Box and allows you to print additional copies later By default up to 32 documents can be stored When power is turned off the original data will be deleted NOTE Repeat Copy function is not available when the optional Data Security Kit is installed Form for Form Overlay Box page 6 17 Image Overlay feature copies the original ...

Страница 107: ...e information on registering boxes refer to Creating a New Custom Box on page 6 2 You cannot access boxes if you forget your password In this event access the machine using administrator privileges and overwrite your box password 3 Select the box containing the document you want to work with and press Open The document list screen appears You can use this screen for tasks such as printing and send...

Страница 108: ...1 Store File Detail Open Custom Box Job Box Removable Memory FAX Box Status 08 08 2009 10 10 0001 10 Box 0002 20 Box 0003 30 User User User 1 2 3 Box 0001 0002 0003 Search Name Search No Listing the boxes by number in ascending descending order Listing the boxes by name in alphabetical order Registers new boxes and checks modifies or deletes box information Opens the selected box Displays the deta...

Страница 109: ...iew Close 0002 0003 Search Name Selecting more than one document at a time Listing the documents by time of update in ascending descending order Listing the documents by size in ascending descending order Listing the documents by name in alphabetical order Previews the selected document Highlighting a document to display its details with Detail Selecting documents by checking checkboxes Box Detail...

Страница 110: ...ress OK 4 If you have changed the details press Register and then press Yes in the confirmation screen If you did not change the details press No 5 Press Close The display returns to the default Document Box screen Document Box Removable Memory Register Edit Box No Name Owner Used Area 0001 SALES Anonymous 1 1 Add Detail Edit Delete Close Status 08 08 2009 10 10 Search Name Search No Status 08 08 ...

Страница 111: ...ument or check the document details The operations available in the preview screen are shown below 3 When you have finished previewing documents or checking document details press Close Close Preview No 1 6 2007040410574501 Status 08 08 2009 10 10 Size Resol Color When you have zoomed in you can use these keys to move the displayed area In multiple page documents you can change pages by entering t...

Страница 112: ...ain access and manipulate his her own boxes and the shared boxes Access level Accessibility Administrator User Operation Creating a box Yes No Changing box owner Yes No Deleting a box Others Yes No Owner Yes Yes Box information Changing box number Others Yes No Owner Yes No Renaming a box Others Yes No Owner Yes Yes Changing the password to a box Others No No Owner Yes Yes Overwriting the password...

Страница 113: ...K NOTE For information on specifying other settings refer to Creating a New Custom Box on page 6 2 Working With User Privileges When User Login Administration is Enabled When user login administration is enabled the owner of a box with user privileges set can change the following box information the box name the box password the permission the auto file deletion and the overwrite setting NOTE It i...

Страница 114: ...Cancel appears NOTE Pressing the Stop key will not temporarily stop a job that you have already started sending 2 To cancel printing select Cancel and then press Yes in the confirmation screen NOTE If Reserve Next Priority refer to page 8 26 is set to Off The Copying screen appears in the touch panel during printing 1 Press the Stop key or Cancel The current print job is cancelled Cancel Reserve N...

Страница 115: ...ilable for Registration in the Quick Setup Screen Default registrations and the functions available for registration are as follows Function Default Registration Functions Available for Registration Copying 1 Paper Selection 2 Zoom 3 Density 4 Duplex 5 Combine 6 Staple Paper Selection Zoom Density Duplex Combine Staple Original Orientation Collate Offset Original Image Original Size Continuous Sca...

Страница 116: ...ing Size Sending From Box 1 File Format 2 Delete after Transmitted 3 FAX TX Resolution 4 Sending Size File Format Delete after Transmitted FAX TX Resolution Sending Size Printing From Box 1 Paper Selection 2 Delete after Printed 3 Collate Offset 4 Duplex 5 Staple 6 Combine Paper Selection Delete after Printed Collate Offset Duplex Staple Combine Function Default Registration Functions Available fo...

Страница 117: ...location 4 Press OK A confirmation screen appears Press Yes The Original Image Quality function will be newly registered Key 1 Cancel OK Off Key 2 Key 3 Key 4 Key 5 Key 6 Copy Original Image Register Original Image function on the Quick Setup screen Status 08 08 2009 10 10 ...

Страница 118: ... 2 Press Register and press a number 01 to 50 for the program number If entering Program screen from the Copy screen or Send screen go to step 4 NOTE If you select a program number already registered the currently registered functions can be replaced with a new set of functions 3 Check that Copy is selected and press Next 4 Enter the new program name and press Register to register the program Reca...

Страница 119: ...lete a program 1 Press the Program key 2 Press Edit and press the key s corresponding to the program number 01 to 50 to change or delete 3 To edit a program use the procedure for registering a program and press Change Then change the program number and program name and press Register Choose Yes in the confirmation screen to change the program To delete the program press Delete this Program Choose ...

Страница 120: ...number already registered the currently registered shortcut can be replaced with a new one 3 Enter the shortcut name and press Register to add the shortcut Editing and Deleting Shortcuts Follow the steps as below to change shortcut number name or delete shortcut 1 In the setup screen of each function press Add Shortcut in the bottom of the screen 2 Press Edit and press the keys corresponding to th...

Страница 121: ...lication list screen appears 2 Press Internet Browser The Internet browser starts up 3 Use the browser screen to browse web pages For information on how to use the browser screen refer to Using the Browser Screen on page 3 48 4 To exit the browser press X Close and then press Yes in the exit confirmation screen The application list screen reappears NOTE You can specify preferences such as the way ...

Страница 122: ...when you are viewing a protected page Loader Progress bar Shows the status of page loading When the browser is loading a web page the loader changes to an animated display Menu Displays the browser setup menu You can use this menu to specify the browser s display magnification set the text encoding scheme and check the server certificate Search Search Internet Retrieval in page Displays a search m...

Страница 123: ...n 4 12 Combine Mode 4 13 Margin Centering Mode 4 15 Border Erase 4 17 Booklet from Sheets 4 19 Cover Mode 4 21 Form Overlay 4 22 Page Numbering 4 23 Memo Mode 4 25 Image Repeat Double Copy 4 27 EcoPrint 4 29 Sharpness Adjust 4 30 Continuous Scan 4 31 Auto Image Rotation 4 32 Negative Image 4 32 Mirror Image 4 33 Job Finish Notice 4 34 File Name 4 35 Priority Override 4 35 Repeat Copy 4 36 ...

Страница 124: ...ed in the Standard Sizes 1 Inch models A3 B4 A4 A4 R B5 B5 R A5 A5 R B6 B6 R A6 R Folio 8K 16K and 16K R Metric models Ledger Legal Letter Letter R Statement Statement R 8 5 13 5 Oficio II 11 15 8K 16K and 16K R Others Select from envelope postcard or the custom sized originals For instructions on how to specify the custom original sizes Custom 1 to 4 refer to Custom Original Size Setup on page 8 ...

Страница 125: ...ey to start copying Ledger Letter Legal Letter Statement Statement 11x15 8 5x13 5 OficioII Auto Standard Sizes 1 Standard Sizes 2 Others Size Entry Original Size Ready to copy Copies Status 08 08 2009 10 10 Cancel OK Add Shortcut Preview Original Zoom Paper 100 Place original Original Size X Y 2 00 17 00 Keys Keys 17 11 2 00 11 69 Ready to copy Copies Status 08 08 2009 10 10 Cancel OK Add Shortcut...

Страница 126: ... the platen 3 Press Org Paper Finishing and then Paper Selection 4 Press the key of the paper source corresponding to the required paper size The cassette in which the paper is loaded is selected If Auto is selected the paper matching the size of the original is selected automatically 5 Press OK 6 Press the Start key to start copying Status 08 80 2009 10 10 Cancel OK Paper Selection Auto MP Tray S...

Страница 127: ...SO B5 Envelope 10 Commercial 10 Envelope 9 Commercial 9 Envelope 6 Commercial 6 3 4 Envelope Monarch Envelope DL Envelope C5 Envelope C4 Hagaki Oufuku Hagaki Youkei 4 Youkei 2 and Custom 1 to 4 For instructions on how to specify the custom paper sizes Custom 1 to 4 refer to Adding a Custom Size and Media Type for Paper to Print on page 8 4 Size Entry Enter the size not included in the standard siz...

Страница 128: ...elect paper type and press OK 7 Press OK 8 Press OK 9 Press the Start key to start scanning the originals 10 When the machine is ready the confirmation screen for the specified paper appears Load the required paper in the multi purpose tray and press Continue to start copying Paper Selection MP Tray Setting Ledger Legal 8 5x13 5 Letter Statement OficioII Letter Executive Ready to copy Copies Statu...

Страница 129: ...his operation up to 30 originals of different sizes can be placed in the document processor at the same time Supported Combinations of Originals Originals of the Same Width The supported combinations of originals are as follows Ledger and Letter A3 and A4 Ledger and Letter R Folio and A4 R B4 and B5 Ledger Ledger Letter Letter Legal Legal Letter R Letter R ...

Страница 130: ...en mixing the original sizes as using the following combination Folio A4 R and B5 R make sure to set the System Menu key Common Settings Original Paper Settings Original Auto Detect to On for Folio For more information refer to Automatic Detection of Originals Available for metric models only on page 8 9 A3 B4 A4 and B5 B4 A4 R and B5 Folio A4 R and B5 R ...

Страница 131: ...k of the machine 3 Press Org Paper Finishing and then Mixed Size Originals 4 Select Mixed Size Copies or Same Size Copies as finish size 5 Select the combination of originals from Same Width and Different Width When Same Size Copies is selected select Long Edge Left or Short Edge Left as the first original orientation 6 Press OK 7 Press the Start key to start copying Option Description Mixed Size ...

Страница 132: ...selected as the Orientation Confirmation on page 8 14 setting in the System Menu the selection screen for original orientation appears when you select any of the above functions When placing originals on the platen When placing originals on the optional document processor NOTE To change the default setting for the original orientation refer to Original Orientation on page 8 15 Original Top Edge To...

Страница 133: ...er Finishing and then Original Orientation 4 Select Top Edge Top or Top Edge Left as the way the original is oriented 5 Press OK 6 Press the Start key to start copying Original Orientation Top Edge Left Select the orientation of the original document s top edge Top Edge Top Ready to copy Copies Status 08 08 2009 10 10 Cancel OK Add Shortcut Preview Original Zoom Paper 100 Place original ...

Страница 134: ...ut 4 Select the output destination for finished copies When you select Finisher Tray select the orientation of output copy Face Up print facing up or Face Down print facing down 5 Press OK 6 Press the Start key to start copying Destination Description Top tray Top tray of the machine where copies are stored Finisher Tray Copy output orientation can be selected either as face up print facing up or ...

Страница 135: ...used with Duplex mode to copy four originals onto one sheet The following 2 in 1 options and output orientations are available NOTE When placing the original on the platen be sure to copy the originals in page order 4 in 1 Mode For copying four originals onto a single sheet This mode can be used with Duplex mode to copy eight originals onto one sheet The following 4 in 1 options and output orienta...

Страница 136: ... OK 6 Press Original Orientation to choose orientation of the originals either Top Edge Top or Top Edge Left Then press OK 7 Press OK 8 Press the Start key Copying begins If the original is placed on the platen replace the original and press the Start key After scanning all originals press Finish Scan to start copying None Dotted Solid Borders Cropmark Status 08 08 2009 10 10 Ready to copy Copies ...

Страница 137: ...eparately NOTE You can set the default margin width Refer to Margin Default on page 8 20 for details Use the procedure below to make copies with margins 1 Press the Copy key 2 Place the originals on the platen 3 Press Layout Edit and then Margin Centering 4 Press Margin to select the copy with margin Use or to enter the margins for Left Right and Top Bottom Press Keys to use the numeric keys for e...

Страница 138: ...or Top Edge Left Then press OK 6 Press OK 7 Press the Start key to start copying Status 08 08 2009 10 10 Ready to copy Copies Cancel OK Margin Centering Back Page Place original Add Shortcut Left Right Auto Manual 0 75 0 75 Top Bottom 0 75 0 75 Keys Keys 0 25 0 25 Original Zoom Paper Preview 100 Status 08 08 2009 10 10 Ready to copy Copies Cancel OK Margin Centering Add Shortcut Off Margin Origina...

Страница 139: ...e original such as a thick book You can specify the widths individually to erase the borders around the edges and in the center of the book Individual Border Erase Specify border erase widths individually for all edges In each option the available ranges are as below NOTE To specify the default width value of Border Erase refer to Border Erase Default on page 8 19 for details Original Copy Origina...

Страница 140: ... numeric keys for entry Press Original Orientation to select the original orientation from either Top Edge Top or Top Edge Left Then press OK For 2 sided originals press Back Page and then press Same as Front Page or Do Not Erase 5 Press OK 6 Press the Start key to start copying Item Detail Same as Front Page Border Erase performed using the same setting as the front page Do Not Erase No Border Er...

Страница 141: ...g on the left side The folded copies can be read from left to right For binding on the right side The folded copies can be read from right to left For top binding The folded copies can be read from top to bottom The procedure for using Booklet copying is explained below 1 Press the Copy key Type of Original Original Size Paper Size One sided original Two sided original All Except for custom sized ...

Страница 142: ...r select Cover and press OK 7 Press Original Orientation to choose orientation of the originals either Top Edge Top or Top Edge Left Then press OK 8 Press OK 9 Platen and press the Start key Copying begins NOTE When using the platen be sure to place the originals in page order If the originals are placed on the platen consecutively replace each original after pressing the Start key After scanning ...

Страница 143: ... Cover or Front and Back Covers 5 Press OK 6 Press the Start key Copying begins If the originals are placed on the platen consecutively replace each original after pressing the Start key After scanning all originals press Finish Scan to start copying Type of Cover Description Front Cover First page of the originals is copied on a different paper Front and Back Covers First page and last page of th...

Страница 144: ... Select Stored Form Press Select Form to display the document boxes that store documents which can be used as a form Select the desired form from the list and press OK NOTE To return to a higher level folder press Up 4 Press OK 5 Place the originals Place the original for the form on top of the other originals When using the optional document processor the first page of the originals should be pla...

Страница 145: ...elect the starting page You can also enter the number with the numeric keys after pressing Keys 7 To start the numbering with a number other than 1 press or of Start Number and enter the starting number You can also enter the number with the numeric keys after pressing Keys 8 If you do not want page numbering through to the last page press Last Page Select Manual and use or to enter the final page...

Страница 146: ... and select Manual Press or to enter the total number of pages and press OK You can also enter the number with the numeric keys after pressing Keys 10 Press Original Orientation to choose orientation of the originals either Top Edge Top or Top Edge Left Press OK 11 Press OK 12 Press the Start key to start copying ...

Страница 147: ...able for the copy paper sizes of Ledger Legal Oficio II 8 5 13 5 Letter Letter R Statement R A3 B4 Folio A4 A4 R B5 B5 R A5 R 8K 16K and 16K R Layout A Reduces images of each original page for printing onto half of a page leaving the other half blank for notes Layout B Reduces images of two original pages for copying onto half of a single page leaving the other half blank for notes Original Copy O...

Страница 148: ... Layout 5 Press Border Line to select the page boundary line Press OK 6 Press Original Orientation to select orientation of the originals either Top Edge Top or Top Edge Left Press OK 7 Press OK 8 Press the Start key to start copying None Dotted Solid Borders Cropmark Status 08 08 2009 10 10 Ready to copy Copies Cancel OK Memo Page Add Shortcut Off Layout B Original Orientation Layout A Border Lin...

Страница 149: ...f to make 2 copies that are identical to the original Follow the steps as below to use Image Repeat Double Copy 1 Press Copy key 2 Place the originals on the platen 3 Press Layout Edit and then press Image Repeat 4 Press Zoom Priority To make double copies press Double Copy and proceed to step 8 5 Press or to set the zoom size Press Keys to enter with numeric keys 6 To set the area of the original...

Страница 150: ...an enter the border width directly using the numeric keys after pressing Keys Y1 Length from top left of platen to top edge of repeat area X1 Length from Height from top left of platen to left edge of repeat area Y2 Height of repeat area X2 Width of repeat area 8 Press OK 9 Press the Start key Copying begins ...

Страница 151: ...plained below 1 Press the Copy key 2 Place the originals on the platen 3 Press Image Quality and then EcoPrint 4 Press On 5 Press OK 6 Press the Start key to start copying Status Ready to copy Copies Cancel OK EcoPrint On Conserve toner when printing Use EcoPrint for test copies and other situations where high quality copies are not necessary Off Add Shortcut 08 08 2009 10 10 Original Zoom Paper 1...

Страница 152: ...ire effect can be obtained by setting the sharpness toward Unsharpen Patterns that are created by irregular distribution of halftone dots Follow the steps below to adjust sharpness 1 Press Copy key 2 Place the originals on the platen 3 Press Image Quality and then Press Sharpness 4 Press 3 to 3 Unsharpen Sharpen to adjust the sharpness 5 Press OK 6 Press the Start key Copying begins Sharpness Read...

Страница 153: ...hanged Press Sheet Insertion to insert a blank paper Press Next Copy On Back in duplex copying to print the next page on back page 6 Place the next original and press the Start key Repeat these steps to scan the remaining originals After scanning all originals press Finish Scan to start copying Original size selection Zoom Original orientation Border erase Image quality selection Density Type of o...

Страница 154: ...ained below 1 Press the Copy key 2 Place the originals on the platen 3 Press Advanced Setup and then Auto Image Rotation 4 Press On to select Auto Image Rotation 5 Press OK 6 Press the Start key to start copying Negative Image Inverts black and white portions of the image for printing NOTE This function is only available for black and white copy mode Use the procedure below to make negative image ...

Страница 155: ...unction is only available for black and white copy mode Use the procedure below to make mirror image copies 1 Press the Copy key 2 Place the originals on the platen 3 Press Advanced Setup and then Mirror Image 4 Press On to select Mirror Image 5 Press OK 6 Press the Start key to start copying ...

Страница 156: ...n the next screen Select the destination to be notified then press OK You can view information on the notification destination by pressing Detail To directly enter the E mail address press Address Entry Press E mail Address enter the address and press OK 5 Press OK 6 Press the Start key to start copying Upon completion of the job an E mail notice is sent to the selected destination To h_pttr owl n...

Страница 157: ...pying Priority Override Suspends a current job and gives the selected job priority for copying The suspended job resumes after Priority Override copying is finished NOTE The current job that is selected as Priority Override cannot be suspended The procedure for using Priority Override is explained below 1 Press the Copy key 2 Place the originals on the platen 3 Press Advanced Setup and then Priori...

Страница 158: ...obs Retained on page 4 37 You can select Repeat Copy as default setting Refer to Repeat Copying on page 8 23 Giving a file name to a copy job will facilitate identification of the data when copying refer to File Name on page 4 35 Selecting Repeat Copy Use the procedure below to select repeat copying 1 Press the Copy key 2 Place the originals on the platen 3 Press Advanced Setup and then Repeat Cop...

Страница 159: ...Menu key 2 Press Document Box Removable Memory and then Next of Job Box 3 Press Change of Repeat Copy Job Retention 4 Use the or key to enter the maximum retention number You can also enter the number from the numeric keys A number between 0 and 50 can be entered as the number of retained jobs NOTE If you enter a value of 0 zero you cannot use the Repeat Copy function 5 Press OK Document Box Remov...

Страница 160: ...Copying Functions 4 38 ...

Страница 161: ... 5 12 File Separation 5 13 PDF Encryption Functions 5 14 Image Quality 5 16 Adjusting Density 5 17 Scan Resolution 5 18 Sharpness 5 19 Background Density Adjustment 5 20 Color Grayscale Black and White Selection 5 21 Continuous Scan 5 22 Border Erase 5 23 Enter Document Name File Name 5 25 Enter E mail Subject and Body 5 26 WSD Scan 5 27 Job Finish Notice 5 29 Send and Print 5 30 Send and Store 5 ...

Страница 162: ...A3 B4 A4 A4 R B5 B5 R A5 A5 R B6 B6 R A6 R Folio Standard Sizes 2 Select from standard sizes except Standard Sizes 1 Inch models A3 B4 A4 A4 R B5 B5 R A5 A5 R B6 B6 R A6 R Folio 8K 16 K 16K R Metric models Ledger Legal Letter Letter R Statement Statement R 8 5 13 5 Oficio II R 11 15 8K 16K 16K R Others Select from Hagaki and Custom Original Size Regarding the setting method of Custom Original Size...

Страница 163: ...dd Shortcut Preview Original Zoom Send 100 Place original Ready to send Destination Place original X Y Keys Keys 2 00 17 00 2 00 11 69 17 11 Ready to send Destination Place original Status 08 08 2009 10 10 Cancel OK Add Shortcut Preview Original Zoom Send 100 Place original Original Size Standard Sizes 2 Standard Sizes 1 Others Size Entry Item Detail Size Standard Sizes 1 Select from Same as Origi...

Страница 164: ...inal Sending Data Format and then Sending Size 4 Press Standard Sizes 1 Standard Sizes 2 or Others to select the sending size 5 Press OK 6 Specify the destination and press the Start key to start sending Original Size and the size you wish to send as are the same different Original Size Specify as necessary Specify as necessary Sending Size Select Same as Original Select the required size Zoom Sel...

Страница 165: ...cedure below to enlarge or reduce the original to match the transmission size 1 Press the Send key 2 Place the originals on the platen 3 Select the transmission size 4 Press Advanced Setup and then Zoom 5 Press 100 or Auto 6 Press OK 7 Specify the destination and press the Start key to start sending Item Detail 100 No Zoom to be scanned at actual size Auto Zoomed automatically according to the spe...

Страница 166: ...r By using the centering the image is placed with a margin equally created at each of the page Top Bottom and Left Right Use the procedure below to center then image when sending a scanned image 1 Press the Send key 2 Place the originals on the platen 3 Press Advanced Setup and then Centering 4 Press On Centering is performed 5 Press OK 6 Specify the destination and press the Start key to start se...

Страница 167: ...eration up to 30 originals of different sizes can be placed in the document processor at the same time Originals of the Same Width When the original widths are the same the combinations of originals that can be placed are as follows Ledger and Letter A3 and A4 Legal and Letter R Folio and A4 R B4 and B5 Ledger Ledger Letter Letter Legal Legal Letter R Letter R ...

Страница 168: ...s NOTE When mixing the original sizes as using the following combination Folio A4 R and B5 R make sure to set the System Menu key Common Settings Original Paper Settings Original Auto Detect to On for Folio For more information refer to Automatic Detection of Originals Available for metric models only on page 8 9 A3 B4 A4 B5 B4 A4 R B5 Folio A4 R B5 R ...

Страница 169: ...3 Press Original Sending Data Format and then Mixed Sized Originals 4 Select the combination of originals from Same Width and Different Width 5 Press OK 6 Specify the destination and press the Start key to start sending Scan all sheets in the document processor even if differently sized then send Up to 30 sheets can be placed in the document processor for mixed size originals Off Same Width Mixed ...

Страница 170: ...ection and press Original Orientation to select the direction in which the original is set on the platen When selecting Book select the binding direction 6 Press OK 7 Specify the destination and press the Start key to start sending Original Type Binding 1 sided Sheet Original 1 sided 2 sided Sheet Original 2 sided Only when the optional document processor is used BindingLeft Right Binding Top Open...

Страница 171: ...page 8 14 setting in the System Menu the selection screen for original orientation appears when you select any of the above functions When placing the original on the platen When placing the original on the optional document processor Use the procedure below to select the orientation when placing the originals on the platen for sending 1 Press the Send key 2 Place the originals on the platen 3 Pre...

Страница 172: ...lect the orientation of the original document s top edge Top Edge Left Original Orientation Place original Top Edge Top Ready to send Destination Cancel OK Add Shortcut Preview Original Zoom Send 100 Status 08 08 2009 10 10 Place original File Format Adjustable range of image quality Color mode PDF 1 Low Quality High Comp to 5 High Quality Low Comp Auto Color Color Grayscale Auto Color Color Black...

Страница 173: ...hen sending scanned originals 1 Press the Send key 2 Place the originals on the platen 3 Press Original Sending Data Format and then File Separation 4 Press Each Page to set File Separation 5 Press OK 6 Specify the destination and press the Start key The scanned original is sent after being divided into files of one page each NOTE Three digit serial number such as abc_001 pdf abc_002 pdf is attach...

Страница 174: ... Method on page Appendix 10 for details on entering characters 7 Press Confirmation and enter the password again for confirmation Then press OK 8 When you enter the password to edit the PDF file select On of Password to Edit Print Document 9 In the same way as the entry of Password to Open Document enter the password to change the PDF file 10 Press Detail Item Value Detail Compatibility Acrobat 4 ...

Страница 175: ...t Images Others Disable Enable Status 08 08 2009 10 10 Cancel OK Item Detail Not Allowed Make the printing of PDF file impossible Allowed Low Resolution only Only displayed when Acrobat 5 0 and later is selected in Compatibility Can print the PDF file only in low resolution Allowed Can print the PDF file in original resolution Item Detail Not Allowed Cannot change the PDF file Commenting Can only ...

Страница 176: ... Select the original image 5 Press OK 6 Specify the destination and press the Start key to start sending Item Detail Disable Prohibit the copying of text and objects on the PDF file Enable Can copy text and objects on the PDF file Item Detail Text Photo Text and photos together Photo For photos taken with a camera Text Only text no photos for OCR For documents to be read by OCR This function is on...

Страница 177: ...ng manual density adjustment press 3 to 3 Lighter Darker to adjust density When selecting auto density adjustment press Auto 5 Press OK 6 Specify the destination and press the Start key to start sending Item Detail Manual Adjust density using 7 or 13 levels Auto Optimum density is selected according to the density of the original Darker Density Auto Normal Lighter Cancel OK Add Shortcut Status 08 ...

Страница 178: ...r adjusting the scanning resolution when sending a scanned image is explained below 1 Press the Send key 2 Place the originals on the platen 3 Press Color Image Quality and then Scan Resolution 4 Select the resolution 5 Press OK 6 Specify the destination and press the Start key to start sending Select fineness of scanning resolution The larger the number the better the image resolution 400x400dpi ...

Страница 179: ...to 3 Unsharpen Sharpen to adjust the sharpness 5 Press OK 6 Specify the destination and press the Start key to start sending Item Detail Sharpen Emphasize the image outline Make letters and lines appear sharper Unsharpen Blur the image outline Can weaken a Moire effect grids appearing as wavelike patterns when scanning printed photos Sharpen Sharpness Unsharpen Cancel OK Add Shortcut Status 08 08 ...

Страница 180: ...nsity when sending scanned images 1 Press the Send key 2 Place the originals on the platen 3 Press Color Image Quality and then Background Density Adj 4 Press On and press 1 to 5 Lighter Darker to adjust the background density 5 Press OK 6 Specify the destination and press the Start key to start sending On Off Background Background Density Adj Lighter Darker Preview Original Zoom Send 100 Place or...

Страница 181: ...inals on the platen 3 Press Color Image Quality and then Color Selection 4 Select the color mode to be used for scanning 5 Press OK 6 Specify the destination and press the Start key to start sending Black White Grayscale Color Selection Full Color Select scanning color Select Auto Color to automatically send color originals in full color and black white originals in black white Cancel OK Add Short...

Страница 182: ...nning when sending scanned images is explained below 1 Press the Send key 2 Press Advanced Setup and then Continuous Scan 3 Press On Continuous Scan is selected 4 Press OK 5 Specify the destination 6 Place the original and press the Start key When the scanning is completed change the settings as necessary 7 Place the next original and press the Start key Scan the remaining originals by the same pr...

Страница 183: ...ok Erases black borders around the edges and in the middle of the original such as a thick book You can specify the widths individually to erase the borders around the edges and in the center of the book Individual Border Erase Specify border erase widths individually for all edges In each option the available ranges are as below Original Copy Original Copy Original Copy Input units Border Erase R...

Страница 184: ...om either Top Edge Top or Top Edge Left and press OK For 2 sided originals press Back Page and then press Same as Front Page or Do Not Erase 5 Press OK 6 Specify the destination and press the Start key to start sending Item Detail Same as Front Page Border Erase performed using the same setting as the front page Do Not Erase No Border Erase performed on the back page Border Erase Sheet Border Eras...

Страница 185: ...e Name Entry 4 Press File Name 5 Enter the document name and press OK NOTE Up to 32 characters can be entered for the document name 6 Press Job No to enter the job No and Date and Time to enter the date and time 7 Press OK 8 Specify the destination and press the Start key to start sending Add a file name Additional information such as Job No and Date and Time can also be set File Name Entry File N...

Страница 186: ... E mail Subject Body 3 Press Subject 4 Enter the subject and press OK NOTE Up to 60 characters can be entered for the subject 5 Press Body 6 Enter the body and press OK NOTE Up to 500 characters can be entered for the body 7 Press OK 8 Specify the destination and press the Start key to start sending Subject Body E mail Subject Body Cancel OK Add Shortcut Status 08 08 2009 10 10 Preview Original Zo...

Страница 187: ...hine s icon and then click Install NOTE If the User Account Control window appears click Continue If the Found New Hardware window appears click Cancel 3 During the installation double click the icon shown on the task bar to display the Driver Software Installation screen When Your devices are ready to use is displayed on the Driver Software Installation screen the installation is completed Proced...

Страница 188: ...om Your Computer 1 Press the Send Key The send screen appears NOTE Depending on the settings the address book screen may appear In this event press Cancel to display the screen for sending 2 Place the originals in the document processor or on the platen 3 Press WSD Scan 4 Press From Computer and press Execute 5 Use the software installed on the computer to send the images Status 08 08 2009 10 10 B...

Страница 189: ... to send the finish notice and press OK NOTE For the procedure to select the destination from the Address Book refer Specifying Destination on page 3 28 6 To directly enter the address press Address Entry and then E mail Address 7 Enter the E mail address and press OK 8 Press OK 9 Specify the destination and press the Start key to start sending When the sending is completed the finish notice is se...

Страница 190: ...rocedure for using Send and Store is explained below 1 Press the Send key 2 Place the originals on the platen 3 Press Advanced Setup and then Send and Store 4 Press On 5 Select the Custom Box in which the copy is to be stored If a password entry screen for the Custom Box appears enter the password You can view information on the selected Custom Box by pressing Detail 6 Press OK 7 Specify the desti...

Страница 191: ... CENTER Be sure that SSL of Secure Protocol Settings is On and one or more effective encryption are selected in Clientside Settings For details refer to the KYOCERA COMMAND CENTER Operation Guide Color Type This sets the color type when you send color documents The table below shows the available settings Selecting RGB displays the color profile values set on the machine 1 Press System Menu key 2 ...

Страница 192: ...A compliant software Use the color profile after carefully reading the manual included with your TWAIN WIA complaint software Selecting a color profile compatible with this device 1 Select the color profile found in the CD included with this scanner CD Product Library under the Color Profile folder NOTE Use the indicated color profiles when you chose RGB in color type ...

Страница 193: ...x This chapter explains the typical procedure for utilizing Document Box Using a Custom Box 6 2 Using a Job Box 6 12 Printing Documents Stored in Removable USB Memory 6 20 Saving Documents to USB Memory Scan to USB 6 22 ...

Страница 194: ... Box 1 1 0001 SALES Anonymous Store File Detail Open Custom Box Job Box Removable Memory Status 08 08 2009 10 10 FAX Box Search Name Search No Item Detail Box No Enter the box number by pressing or number keys The box number can be from 0001 to 1000 A Custom Box should have a unique number If you enter 0000 the smallest number available will be automatically assigned Box Name Enter a box name cons...

Страница 195: ...ed To enable a capacity restriction enter a value for the storage capacity of the Custom Box in megabytes by pressing or number keys You can enter a limit between 1 and 30 000 Changes according to the number of created custom boxes Auto File Deletion Automatically deletes stored documents after a set period of time Press On to enable automatic deletion and then use and or the numeric keys to enter...

Страница 196: ...o store a file needs to be created in advance If a custom box is protected by a password enter the correct password 4 Select the type of originals scanning density etc as necessary 5 Press the Start key The original is scanned and the data is stored in the specified Custom Box NOTE Enter up to 64 characters as the file name Status Document Box Removable Memory Auto File Deletion Time Set the time ...

Страница 197: ...int by checking the checkbox The document is marked with a checkmark NOTE To deselect press the checkbox again and remove the checkmark 4 Press Print 5 Set the paper selection duplex printing etc as desired 6 Press the Start key Printing of the selected document begins 1 1 0001 0404200710574501 10 10 2008 09 40 21 Box File Name Date and Time Size MB Status 08 08 2009 10 10 0404200710574511 0404200...

Страница 198: ...tiple documents To deselect press the checkbox again and remove the checkmark 4 Press Send The screen for sending appears NOTE Depending on the settings the address book screen may appear 5 Set the destination NOTE For more information on selecting destinations refer to Specifying Destination on page 3 28 6 Press the Start key Sending of the selected document begins 1 1 0001 0404200710574501 10 10...

Страница 199: ... Form and then Select Form NOTE You can change the form density setting through 10 levels from 10 to 100 Press the or buttons in Density 6 In Form Overlay Select Form select the image file to be overlaid onto the document from the displayed document boxes You can only select one image file 7 Press OK 8 Press OK again to return to the Functions screen 9 Press the Start key Printing begins 1 1 0001 ...

Страница 200: ...n the list that you want to move or copy by pressing the checkbox The document is marked with a checkmark NOTE To deselect press the checkbox again and remove the checkmark 4 Press Move Copy 5 To move the document press Move to Custom Box To copy the document press Copy to Custom Box or Copy to Removable Mem 6 Press Next 1 1 0001 0404200710574501 10 10 2008 09 40 21 Box File Name Date and Time Siz...

Страница 201: ...t the box containing the documents you want to join and press Open NOTE If a custom box is protected by a password enter the correct password 3 Select the documents in the list that you wish to join by pressing the checkbox The document is marked with a checkmark You can join up to 10 documents NOTE To deselect press the checkbox again and remove the checkmark 4 Press Join Move Move to Custom Box ...

Страница 202: ...OK NOTE Enter up to 32 characters as the file name 8 Press Join and then press Yes in the confirmation screen The documents are joined NOTE After joining the original documents are left unchanged Delete the documents if they are no longer needed Next File Name Up Date and Time Size 1 1 Join Down 08 08 2009 10 10 Status Cancel Confirm the order of documents to combine 2008101010574501 10 10 2008 09...

Страница 203: ...ete by checking the checkbox The document is marked with a checkmark NOTE Delete is disabled until a document is selected To deselect press the checkbox again and remove the checkmark 4 Press Delete The delete confirmation screen appears 5 Press Yes The document is deleted 1 1 0001 0404200710574501 10 10 2008 09 40 21 Box File Name Date and Time Size MB Status 08 08 2009 10 10 0404200710574511 040...

Страница 204: ...the document to print and press Open 5 Select the document and press Print NOTE If a password is set for the Custom Box in advance enter the correct password 6 If the document is protected by a password enter the password using the numeric keys 7 Specify the number of copies to print as desired 8 Press Start Print to start printing Upon completion of printing the Private Print job is automatically...

Страница 205: ...river as a Quick Copy or Proof and Hold Print job Refer to the Printer Driver User Guide on how to print a job as Quick Copy or Proof and Hold Print job using the printer driver Setting the Number of Stored Jobs To maintain free space on the hard disk you can set the maximum number of stored jobs Use the procedure below to set the number of stored jobs 1 Press the System Menu key 2 Press Document ...

Страница 206: ...ss Open 5 Select the document to print and press Print 6 Specify the number of prints as desired 7 Press Start Print to start printing Document Box Removable Memory Quick Copy Job Retention Set the maximum number of quick copy proof print jobs to retain Use or the numeric keys to enter a number Set this number to 0 to not retain any jobs 0 50 32 Cancel OK Status 08 08 2009 10 10 job s Close 1 2 Op...

Страница 207: ...Jobs To maintain free space on the hard disk you can set the maximum number of stored jobs Use the procedure below to specify the maximum number of stored jobs 1 Press the System Menu key 2 Press Document Box Removable Memory Next of Job Box Change of Repeat Copy Job Retention Close 1 2 Open User Name Files Quick Copy Proof and Hold Status 08 08 2009 10 10 Job Box 5 2 1 1 1 User User User User Use...

Страница 208: ... press Open 4 Select the document to print and press Print 5 If the document is protected by a password enter the password using the numeric keys 6 Press Start Print to start printing The Repeat Copy box job will be deleted when the main power switch is turned off Document Box Removable Memory Repeat Copy Job Retention Set the maximum number of repeat copy jobs to retain Use or the numeric keys to...

Страница 209: ...ress OK NOTE This function is valid for documents saved after the function is set Regardless of this function setting temporary documents are deleted when the main power switch is turned off Form for Form Overlay Box Storing a Form You can store forms to be used for the form overlay in the Form for Form Overlay box You can store a 1 page form Use the procedure below to store a form 1 Press the Doc...

Страница 210: ...a Form Stored You can delete the form stored in the Form for Form Overlay box Use the procedure below to delete a form 1 Press the Document Box key 2 Press Job Box 3 Select Form for Form Overlay and press Open Job Box Name Files Quick Copy Proof and Hold Removable Memory Job Box Custom Box Open Repeat Copy Form for Form Overlay Private Print Stored Job 21 08 08 2009 10 10 Status FAX Box 21 21 21 F...

Страница 211: ...mation screen appears 5 Press Yes The form is deleted Form for Form Overlay Name Date and Time Size 1010200800530910 1 1 Detail Print Close Delete Store File 1010200809530900 10 10 2008 09 00 10 10 2008 09 10 MB 30 MB 21 08 08 2009 10 10 Status 1010200800530920 10 10 2008 09 20 MB 30 ...

Страница 212: ...B memory printing is error free if a USB hub is used Printing Print documents stored in the removable USB memory 1 Plug the USB memory into the USB memory slot A1 IMPORTANT Use USB memory formatted by this machine If a USB memory formatted by any other device is used The removable memory is not formatted may appear To format a USB memory press Format and follow the instructions on the screen 2 Whe...

Страница 213: ...le Memory Detail Delete Memory Information 001 999 Name Date and Time Size Remove Memory Print Document MB 1 Document MB 3 Document MB 4 Document MB 1 Document MB 2 10 10 2008 09 30 10 10 2008 09 40 10 10 2008 09 50 10 10 2008 10 00 10 10 2008 10 05 Removable Memory Store File Open Custom Box Job Box Removable Memory FAX Box Up 1 2 3 4 5 Status 08 08 2009 10 10 Removable Memory Detail Delete Memor...

Страница 214: ... memory Removable Memory is recognized Displaying files may appear Press Yes to display the removable memory screen NOTE If the message does not appear press the Document Box key and then Removable Memory 3 Select the folder where the file will be stored and press Open The machine will display the top 3 folder levels including the root folder 4 Press Store File 5 Set the type of original file form...

Страница 215: ... the remaining amount of toner and paper and the status of devices and how to cancel the fax communication Checking Job Status 7 2 Checking Job History 7 9 Sending the Job Log History 7 11 Pause and Resumption of Jobs 7 13 Canceling of Jobs 7 13 Priority Override for Waiting Jobs 7 14 Reordering Print Jobs 7 14 Checking the Remaining Amount of Toner and Paper 7 15 Device Communication 7 16 ...

Страница 216: ...ansmission job press Sending Jobs and then Scheduled Job For an explanation of the screen refer to Details of the Status Screens on page 7 3 Screen Job statuses to be displayed Printing Jobs Copy Printer FAX reception i FAX reception E mail reception Printing from Document Box Job Report List Printing data from removable memory Sending Jobs FAX transmission i FAX transmission PC SMB FTP transmissi...

Страница 217: ...te Type Job Name User Name Result 1 1 Detail Paper Supplies Device Communication Storing Jobs Sending Jobs Printing Jobs 10 10 09 50 10 10 09 55 doc10102008091000 Waiting 000003 AAAAA 10 10 10 00 1 2 3 4 5 6 7 8 9 10 12 11 No Item Key Detail 1 Job No Acceptance No of job 2 Accepted Time Accepted Time of job 3 Type Icons that indicate the job type Copy job Printer job FAX reception i FAX reception ...

Страница 218: ... 10 Priority Override Select the job to be overridden and press this key Refer to Priority Override for Waiting Jobs on page 7 14 11 Move Up In the list select the job that you want to move up the job queue and press this key Refer to Reordering Print Jobs on page 7 14 12 Detail Select the job for displaying detailed information from the list and press this key Refer to Checking the Detailed Infor...

Страница 219: ... Sending Job i FAX Sending Job PC SMB FTP Sending Job E mail Sending Job Application Sending Job Multiple 4 Destination Destination Either destination name FAX number E mail address or server name 5 User Name User Name for the executed job 6 Status Status of job InProcess The status before starting sending such as during scanning originals Sending Sending Waiting Sending Waiting Canceling Cancelin...

Страница 220: ...ndicate the job type Storing Job Scan Storing Job Printer Storing Job FAX Storing Job i FAX Join Box Document Copy Box Document 4 Job Name Job name or file name is displayed 5 User Name User Name for the executed job 6 Status Status of job InProcess The status before starting to save such as during scanning originals Storing Storing Data Canceling Canceling the job Pause Pausing the job 7 of Job T...

Страница 221: ...ck the destination by pressing Detail in Status Destination Log abc def com 438 14 47 1 1 08 08 2009 10 10 Status Printing Jobs Sending Jobs Storing Jobs Device Communication Paper Supplies Detail InProcess Status User Name Job Name Type Accepted Time Job No Cancel Job Type All Status Status Scheduled Job Detail Job No Close Job No Status Destination Job Type Destination User Name Job Name Accepte...

Страница 222: ...the list Press or select a destination and press Detail Information on the selected job is displayed for checking 4 To exit from the detailed information press Close Detail Job No Close Job Type Destination Type Status 1 2 User01 doc20070404131415 000081 Detail All Sending Waiting 08 08 2009 10 10 Status ...

Страница 223: ... Log Screen Job histories to be displayed Printing Jobs Copy Printer FAX reception i FAX reception E mail reception Printing from Document Box Job Report List Printing data from removable memory Sending Jobs FAX i FAX PC SMB FTP E mail Application Multiple destination Storing Jobs Scan FAX i FAX Printer Join Box Document Copy Box Document Status Log All Job No End Date Type doc20070225141427 User ...

Страница 224: ... Detailed information of the selected job is displayed NOTE To check the information of the next previous page press or 4 To exit from the detailed information press Close Status Log All Job No End Date Type doc20070225141427 User Name Result Completed 000080 01 25 14 14 Status Job Name 001 001 Device Communication Paper Supplies 08 08 2009 10 10 doc20070225142253 Completed 000081 01 25 14 22 doc2...

Страница 225: ... mail address and then press OK 4 To set an address from the address book press E mail Address Book Press Address Book Select the destination from the address book and press OK NOTE For information on specifying destinations refer to Specifying Destination on page 3 28 The selected e mail addresses is displayed NOTE You can view information on the selected destinations by pressing Detail 5 Press O...

Страница 226: ... confirmation screen appears press Yes The job log history is sent Setting E mail Subject Set the subject automatically entered when sending job log histories by e mail Use the procedure below to set the subject 1 Press the System Menu key 2 Press Report Next of Sending Job Log History and then Change of Subject 3 Enter an e mail subject not more than 60 characters NOTE Refer to the Character Entr...

Страница 227: ...een paused press Resume All Print Jobs Canceling of Jobs For more information on canceling jobs refer to the Canceling Jobs on page 3 40 08 08 2009 10 10 doc10102008095050 InProcess 000001 doc10102008095510 Waiting 000002 AAAAA AAAAA Pause All Print Jobs Cancel Priority Override Move Up Status Status Status Log Job Type All Job No End Date Type Job Name User Name Result 1 1 Detail Paper Supplies D...

Страница 228: ...gned a higher priority and press Move Up The priority of the selected job is increased by 1 To further raise the job s priority press Move Up again Each time you press Move Up the priority increases by 1 08 08 2009 10 10 doc10102008095050 InProcess 000001 doc10102008095510 Waiting 000002 AAAAA AAAAA Pause All Print Jobs Cancel Priority Override Move Up Status Status Status Log Job Type All Job No ...

Страница 229: ...of waste toner box You can check the status of waste toner box Paper You can check the size orientation type and remaining amount of paper in each paper source The remaining amount of paper is shown by 11 levels from 100 to 0 however the paper in the multi purpose tray is shown by 2 levels as 100 and 0 Others You can check the status of staples NOTE If the optional built in finisher or document fi...

Страница 230: ...cribed below Scanner The status of an original scanning in the document processor optional or the error information paper jam opened cover etc is displayed Printer Error information such as paper jam out of toner or out of paper and status such as waiting or printing are displayed Hard Disk The information such as formatting overwriting for erasure and error occurrence is displayed Overwriting Sca...

Страница 231: ...g to display the fax transmission history For details refer to the Operation Guide of FAX kit Removing the USB Memory There is a way to remove the USB memory safely Use the procedure below to remove the USB memory 1 Press the Status Job Cancel key 2 Press Device Communication Remove in Removable Memory 3 When Device can be removed safely is displayed remove the USB memory Overwriting Scanner Ready...

Страница 232: ...or FAX Port 2 3 Press Yes in the confirmation screen The line is disconnected and the fax communication is canceled Overwriting Scanner Ready Printer Not connected Removable Memory Hard Disk 䝯䝰䝸䜹䞊䝗 Format Remove Line Off Manual RX FAX Port 1 Log FAX Check New FAX i FAX FAX Port 2 Line Off 08 08 2009 10 10 Status Printing Jobs Sending Jobs Storing Jobs Device Communication Paper Supplies Status Dia...

Страница 233: ...inting Reports Sending Notice 8 38 Adjustment Maintenance 8 41 Date Timer 8 46 Editing Destination Address Book Adding One Touch Keys 8 51 Internet Browser Setup 8 58 Applications 8 60 System Initialization 8 63 Restarting the System 8 63 Network Setup 8 64 Secure Protocol 8 69 Interface Block Setting 8 72 Security Level Security Level setting 8 73 Document Guard Setting 8 73 Optional Functions 8 ...

Страница 234: ...nguage displayed on the touch panel Use the procedure below to select the language 1 Press the System Menu key 2 Press Common Settings and then Change of Language 3 Press the key for the language you want to use 4 Press OK The touch panel language will be changed Default Screen Select the screen appearing right after start up default screen The options are as follows The table below lists the avai...

Страница 235: ...on The Application selecting screen the screen shown when the Application key is pressed appears Accessibility Copy The Accessibility Copy screen the screen shown when the Accessibility Display key is pressed in the Copy screen appears Accessibility Send The Accessibility Send screen the screen shown when the Accessibility Display key is pressed in the Send screen appears Application name Maximum ...

Страница 236: ...ettings Next of Original Paper Settings and then Next of Custom Original Size 3 Press Change of any one of Custom 1 to Custom 4 on which you wish to register the size 4 Press On and then press or numeric keys to enter X horizontal and Y vertical dimensions 5 Press OK 6 Move to the copy send or document box screen and press the Reset key Adding a Custom Size and Media Type for Paper to Print Set up...

Страница 237: ...ia type for Cassette 1 2 and optional paper feeders Cassette 3 and 4 The available paper sizes and media types are shown in the table below Item Description Paper Size Auto Automatically detect paper size Select Metric or Inch for paper size Standard Sizes 1 Available options are as follows Inch models Ledger Legal Letter Letter R Statement R 8 5 13 5 Oficio II Metric models A3 B4 A4 A4 R B5 B5 R ...

Страница 238: ... R Statement R 8 5 13 5 Oficio II Executive Metric models A3 B4 A4 A4 R B5 B5 R A5 R B6 R A6 R Folio Standard Sizes 2 Select a standard size except that selected in Standard Sizes 1 Inch models A3 B4 A4 A4 R B5 B5 R A5 R B6 R A6 R Folio 8K 16K 16K R Metric models Ledger Legal Letter Letter R Statement R 8 5 13 5 Oficio II Executive 8K 16K 16K R Others Select special standard sizes or custom sizes ...

Страница 239: ...d press OK Paper Weight Select weight for each media type The options for media type and weight of paper are as follows Paper types and weights Y Available N Not available Paper Weight Light Normal 1 Normal 2 Normal 3 Heavy 1 Heavy 2 Heavy 3 Extra Heavy Weight g m2 Media type 64 g m2 or less 60 g m2 to 75 g m2 76 g m2 to 90 g m2 91 g m2 to 105 g m2 106 g m2 to 135 g m2 136 g m2 to 170 g m2 171 g m...

Страница 240: ... or Permit and press OK The previous screen reappears 8 Press Close 9 To change the name for Custom 1 8 press Next of Custom 1 8 and then Change of Name Enter the name and press OK NOTE Refer to the Character Entry Method on page Appendix 10 for details on entering characters High Quality Y Y Y default Y N N N N Custom 1 8 Y Y Y default Y Y Y Y Y When Heavy 3 or Extra Heavy is selected the media t...

Страница 241: ...e System Menu key 2 Press Common Settings Next of Original Paper Settings and then Change of Original Auto Detect 3 Select A6 or Hagaki of A6 Hagaki Select Off to disable automatic detection or On to enable automatic detection of Folio and 11x15 respectively 4 Press OK Media for Auto Selection Select a default media type for auto paper selection when Auto is selected of Paper Selection If Plain is...

Страница 242: ... the paper source to load cover paper 4 Press OK Special Paper Action When printing on Prepunched Preprint and Letterhead punch holes might not be aligned or the print direction might be upside down depending on how originals are set and the combination of copying functions In such a case select Adjust Print Direction to adjust the print direction When paper orientation is not important select Spe...

Страница 243: ...ress the System Menu key 2 Press Common Settings Next of Original Paper Settings and then Change of Special Paper Action 3 Select Adjust Print Direction or Speed Priority 4 Press OK Switching Unit of Measurement Select inch or metric for the unit for paper dimensions Use the procedure below to change the input units 1 Press the System Menu key 2 Press Common Settings and then Change of Measurement...

Страница 244: ...when the optional built in finisher or document finisher is installed Stapling Limit Error Select what to do when stapling capacity is exceeded during printing NOTE The messages are displayed when the optional built in finisher or document finisher is installed Item Description 1 sided Printed in 1 sided Display Error Error message to cancel printing is displayed Processing Description Ignore The ...

Страница 245: ...s follows NOTE The optional job separator built in finisher or document finisher are required FAX RX data output can be specified when the optional fax kit is installed Use the procedure below to select the output tray 1 Press the System Menu key 2 Press Common Settings and then Next of Paper Output 3 Press Change of Copy Custom Box Printer or FAX Port 1 or FAX Port 2 NOTE FAX Port 1 appears when ...

Страница 246: ...en when using the following functions For more information refer to page 4 10 for Original Orientation Orientation Confirmation Setting Use the procedure below to select the default Orientation Confirmation setting 1 Press the System Menu key 2 Press Common Settings and Change of Orientation Confirmation 3 Select the default for Off or On 4 Press OK Function Defaults Defaults are the values automa...

Страница 247: ...low Refer to page 4 10 for Original Orientation Use the procedure below to select the default settings for continuous scanning 1 Press the System Menu key 2 Press Common Settings Next of Function Defaults and then Change of Continuous Scan 3 Select Off or On for the default Use the procedure below to select the default quality setting for originals 4 Press OK Original Image Set the default origina...

Страница 248: ...ments The available default settings are shown below Use the procedure below to select the default color mode 1 Press the System Menu key Text Only text no photos for OCR Image quality suitable for OCR software Printed Document For documents printed from this machine This function is only available for black and white mode Color mode Description Auto Color Color Gray Automatically recognize whethe...

Страница 249: ...OK File Separation Select the default file separation setting The available default settings are shown below NOTE Refer to page 5 13 for file separation Use the procedure below to select the default file separation 1 Press the System Menu key 2 Press Common Settings Next of Function Defaults and then Change of File Separation 3 Select the default for Off or Each Page Press OK Item Description PDF ...

Страница 250: ...ttings Next of Function Defaults and then Change of Zoom 3 Select the default zoom setting 4 Press OK File Name Entry Set an automatically entered name default for jobs Additional information such as Date and Time and Job No can also be set NOTE Refer to page 4 35 and page 5 25 for name entry Use the procedure below to set the default file name 1 Press the System Menu key 2 Press Common Settings N...

Страница 251: ...and then Change of E mail Subject Body 3 Press Subject to enter an E mail subject not more than 60 characters NOTE Refer to the Character Entry Method on page Appendix 10 for details on entering characters 4 Press OK 5 Press Body to enter an E mail Body not more than 500 characters 6 Press OK 7 Check that the entries are correct and press OK Border Erase Default Set the default width to be erased ...

Страница 252: ... Same as Front Page or Do Not Erase 4 Press OK Margin Default Set the default margin The table below shows the measurement ranges that can be set Use the procedure below to set the default margin width 1 Press the System Menu key 2 Press Common Settings Next of Function Defaults and then Change of Margin Default 3 Use the or to enter the margin widths for Left Right and Top Bottom You can use the ...

Страница 253: ...ge of Auto Image Rotation 3 Select the default for Off or On 4 Press OK EcoPrint Select the EcoPrint default The table below shows the available settings NOTE Refer to page 4 13 for EcoPrint Use the procedure below to set the default EcoPrint setting 1 Press the System Menu key 2 Press Common Settings Next of Function Defaults twice and then Change of EcoPrint 3 Select Off or On for the default 4 ...

Страница 254: ...ble settings Use the procedure below to select the default quality setting for highly compressed PDF files 1 Press the System Menu key 2 Press Common Settings and Next of Function Defaults Press twice and Change of High Comp PDF Image 3 Select the default for Compression Ratio Priority Standard or Quality Priority 4 Press OK Color TIFF Compression Settings Select the compression method for TIFF im...

Страница 255: ...he default for Off or On 4 Press OK Collate Offset Set the defaults for Collate Offset The table below shows the available settings NOTE Refer to page 3 13 for Collate Offset Use the procedure below to set the default Collate Offset settings 1 Press the System Menu key 2 Press Common Settings Next of Function Defaults Press twice and Change of Collate Offset 3 Select the defaults for Collate and O...

Страница 256: ... Resolution or Fit to Print Resolution 4 Press OK XPS Fit to Page Reduces or enlarges the image size to fit to the selected paper size when printing XPS file Use the procedure below to set the default XPS Fit to Page settings 1 Press the System Menu key 2 Press Common Settings Next of Function Defaults Press twice and Change of XPS Fit to Page 3 Select Off or On for the default 4 Press OK Item Des...

Страница 257: ...on 1 Press the System Menu key 2 Press Copy and Change of Paper Selection 3 Press Auto or Default Paper Source 4 Press OK 5 Move to the copy screen and press the Reset key Auto Paper Selection If Auto is selected for Paper Selection set the paper size selection method when the zoom changes The table below shows the available settings Item Description Auto Automatically select the cassette containi...

Страница 258: ... available settings Use the procedure below to specify the automatic zoom priority 1 Press the System Menu key 2 Press Copy and Change of Auto Priority 3 Select the default for Off or On 4 Press OK 5 Move to the copy screen and press the Reset key Reserve Next Priority Select the operation of the reserve copy and interrupt copy functions and for canceling jobs Use the procedure below to select the...

Страница 259: ...ical functions but can be changed as necessary Six items from the following options are available Paper Selection Zoom Staple Density Duplex Combine Collate Offset Original Image Original Size Original Orientation Continuous Scan NOTE Refer to Quick Setup Screen on page 3 41 for the Quick Setup steps Use the procedure below to register the Quick Setup functions 1 Press the System Menu key 2 Press ...

Страница 260: ...e Quick Setup screen are allocated to typical functions but can be changed as necessary Six items in the following options are available Original Size 2 sided Book Original Sending Size Original Orientation File Format Density Original Image Scan Resolution FAX TX Resolution Color Selection Zoom Continuous Scan Use the procedure below to register the Quick Setup functions 1 Press the System Menu k...

Страница 261: ...e of Dest Check before Send 3 Select Off or On 4 Press OK Color Type Set the color type when you send color documents The table below shows the available settings Selecting RGB displays the color profile values set on the machine Use the procedure below to set the color type 1 Press the System Menu key 2 Press Send and then Change of Color Type 3 Select RGB or sRGB 4 Press OK Item Description Off ...

Страница 262: ...he Default Send Screen Use this procedure to set the default screen displayed when you press the Send key The table below shows the available settings Use the procedure below to set the default send screen 1 Press the System Menu key 2 Press Send and then Change of Default Screen 3 Press Destination or Address Book 4 Press OK Item Description Off Do not display the entry check screen On Display th...

Страница 263: ... three operations can be done For details refer to each page shown below Quick Copy Proof and Hold Print Box page 6 13 Repeat Copy Box page 6 15 Deleting a Form Stored page 6 18 Quick Setup Registration Select the Storing in Box Sending from Box Printing from Box functions to be registered for Quick Setup Six keys of the Quick Setup screen are allocated to typical functions but can be changed as n...

Страница 264: ...ox Removable Memory and Next of Quick Setup Registration 3 Press Next of Store File Print or Send 4 Press Change of the function to be registered in Quick Setup 5 Select a key 1 6 allocated on the Quick Setup screen Press Off to delete a key from the Quick Setup 6 Press OK If you overwrite the setting a confirmation screen appears Press Yes ...

Страница 265: ...ine by commands oriented to other types of printers Selection of emulation The printer can emulate PCL 6 KPDL and KPDL Auto Use the procedure below to select the emulation 1 Press the System Menu Key 2 Press Printer Change of Emulation 3 Select the desired emulation NOTE If you selected KPDL Auto set Alternative Emulation too Refer to page 8 33 When you have selected KPDL or KPDL Auto set KPDL Err...

Страница 266: ...t conserves toner when printing This is recommended for test copies where faded printing is not a problem Use the procedure below to specify the EcoPrint setting 1 Press the System Menu key 2 Press Printer and Change of EcoPrint 3 Press Off or On 4 Press OK Override A4 Letter Select whether to treat A4 size and Letter which are similar in size as the same size when printing The table below shows t...

Страница 267: ... default number of copies from 1 to 999 Use the procedure below to specify the default number of copies 1 Press the System Menu key 2 Press Printer and Change of Copies 3 Press or the numeric keys to set the default number of copies 4 Press OK Orientation Set the default orientation Portrait or Landscape Use the procedure below to set the default orientation for printing Item Description Finish 1 ...

Страница 268: ...orm feed timeout 1 Press the System Menu key 2 Press Printer and Change of Form Feed Timeout 3 Press or to set the Form Feed Timeout You can set the timeout delay in seconds You cannot use the numeric keys to enter this value 4 Press OK LF Action Set the line feed action when the machine receives the line feed code character code 0AH The table below shows the available settings Use the procedure b...

Страница 269: ...from the computer select how to feed paper when the paper source and type are specified The table below shows the available settings Use the procedure below to select the paper feed mode 1 Press the System Menu key 2 Press Printer and Change of Paper Feed Mode 3 Press Auto or Fixed 4 Press OK Item Description CR Only Only character return performed LF and CR Character return and line feed performe...

Страница 270: ...nfigured NOTE If user login administration is enabled you can only print by logging in with administrator privileges Printing Reports Printable reports are as follows Status Page Check the information including current settings available memory space and optional equipment installed Font List Check the font samples installed in the machine Status Page TASKalfa xxxxx Firmware Version ...

Страница 271: ...tomatically print a report of transmission result when a transmission is complete The table below shows the available settings 1 Press the System Menu key 2 Press Report Next of Result Report Setting Next of Send Result Report and then Change of E mail Folder 3 Press Off On or Error Only 4 Press OK Item Description Off No result report printed On Result report automatically printed Transmitted ima...

Страница 272: ...ed before Sending Print a send result report when the job is canceled before being sent 1 Press the System Menu key 2 Press Report Next of Result Report Setting Next of Send Result Report and then Change of Canceled before Sending 3 Press Off On 4 Press OK ...

Страница 273: ...t copy density Adjustment can be made in 7 levels both in auto and manual density modes Use the procedure below to adjust the copy density 1 Press the System Menu key 2 Press Adjustment Maintenance and then Next of Copy Density Adjustment 3 Press Change of Auto or of Manual 4 Press 3 3 Lighter Darker to adjust density 5 Press OK Send Box Density Adjust Adjust scan density when sending or storing t...

Страница 274: ...rmal and does not indicate a fault To use Drum Refresh 2 load Ledger or A3 size paper into the Multi Purpose tray Use the procedure below to refresh the drum 1 Press the System Menu key 2 Press Adjustment Maintenance 3 Press and then Next of Drum Refresh 1 or Drum Refresh 2 4 Press Execute to perform Drum Refresh 5 After Drum Refresh is completed press OK to return to the Adjustment Maintenance sc...

Страница 275: ...hich may appear on the copies when the optional document processor used The table below shows the available settings NOTE Using Correcting Fine Black Line can impair reproduction of fine characters It is recommended to keep the default Off Item Description Off Do not perform Drum Refresh Standard Perform Auto Drum Refresh as Standard maximum 120 seconds Long Perform Auto Drum Refresh as Long maxim...

Страница 276: ...rightness 4 Press OK Silent Mode Make the machine run more quietly Select this mode when the running noise is uncomfortable Use the procedure below to set Silent mode 1 Press the System Menu key 2 Press Adjustment Maintenance and then Change of Silent Mode 3 Press Off or On 4 Press OK Auto Color Correction This setting allows you to adjust the detection level used by the machine to determine wheth...

Страница 277: ...OTE To perform gray adjustment verify that either 11 8 1 2 or A4 paper is loaded into a cassette Use the procedure below for adjustment 1 Press the System Menu key 2 Press Adjustment Maintenance and then Next of Gray Adjustment 3 Press Execute A color pattern is printed 4 As shown in the illustration place the printed side down on the platen with the three black boxes aligned to the top 5 Press Ex...

Страница 278: ...efore the Date Time setup Use the procedure below to set the date and time 1 Press the System Menu key 2 Press Date Timer and then Change of Date Time 3 Press or to enter the date and time respectively 4 Press OK NOTE If you try to change the date time when a trial application page 8 75 is running the If you change Date Time setting trial functions will be unavailable Are you sure message is displ...

Страница 279: ...ss OK NOTE If you select a region that does not utilize summer time the summer time setting screen will not appear Auto Panel Reset If no jobs are run for a certain period of time automatically reset settings and return to the default setting NOTE Refer to page 8 14 for the default settings Auto Panel Reset ON OFF Select to use Auto Panel Reset or not Use the procedure below to specify the auto pa...

Страница 280: ...ower Mode Specify a value from 1 240 minutes 1 minute increments For more information on Low Power Mode refer to the Low Power Mode and Auto Low Power Mode on page 2 9 Use the procedure below to set the Low Power Mode 1 Press the System Menu key 2 Press Date Timer and then Low Power Timer 3 Press or the numeric keys to enter the time until Low Power Mode is turned on 4 Press OK Auto Sleep If no jo...

Страница 281: ...er the time until Auto Sleep is turned on 4 Press OK Auto Error Clear If an error occurs during printing the print job stops to wait for the next step to be taken by the user In the Auto Error Clear mode automatically clear the error after a set amount of time elapses The following errors are automatically cleared Print overrun Memory is full Auto Error Clear ON OFF Select whether to use Auto Erro...

Страница 282: ...nd then Change of Error Clear Timer 3 Press or to enter the time until printing restarts You cannot use the numeric keys to enter this value 4 Press OK Interrupt Clear Timer Set the period after which the machine reverts to Normal mode when it has been set to Interrupt Copy mode and then left unused Any period between 5 and 495 seconds in five second increments can be set The procedure for setting...

Страница 283: ...m Menu key 2 Press Edit Destination Register Edit of Address Book Add Contact and then Next 3 To specify the address number press Change in Address Number 4 Press or numeric keys to enter a particular Address Number 1 2500 To have the number assigned automatically enter 0000 NOTE Address Number is an ID for a destination You can select any available number out of 2 500 numbers for contacts and 500...

Страница 284: ... use the Host name port number format e g FTPhostname 140 To enter the IPv6 address enclose the address in brackets e g 3ae3 9a0 cd05 b1d2 28a 1fc0 a1 10ae 140 NOTE Refer to the Character Entry Method on page Appendix 10 for details on entering characters Press Connection Test to check the connection to the FTP server you chose If the connection fails check the entries you made Item Description Ma...

Страница 285: ... the Address Book the contacts to be included in the group must be added first Up to 100 destinations for the e mail 500 destinations for the FAX and the total of 10 destinations for the FTP and SMB can be registered per a group Use the procedure below to register a group 1 Press the System Menu key 2 Press Edit Destination Register Edit of Address Book Add Group and then Next 3 To specify the add...

Страница 286: ...r details on entering characters 8 Press Member 9 Press Add 10 Select destinations contacts to add to the group NOTE Destinations can be sorted or searched by destination name or address number Refer to Specifying Destination on page 3 28 for Address List 11 Press OK If you have more destinations to add repeat Steps 9 to 11 12 Check if the selected destination was added to the group and press Regi...

Страница 287: ...n Deletion is performed Adding a Destination on One Touch Key Add a new destination contact or group A maximum of 1000 destinations can be registered NOTE Refer to Specifying Destination on page 3 28 for use of One Touch Key Use the procedure below to register a new destination under a One Touch key 1 Press the System Menu key 2 Press Edit Destination and Register Edit of One Touch Key 3 Select a ...

Страница 288: ...e procedure differs depending on the details to be edited Changing the Registered Information 1 Press Register Edit 2 Select a new destination Contact or group Pressing Detail shows the detailed information of the selected destination NOTE Destinations can be sorted or searched by destination name or address number Refer to Specifying Destination on page 3 28 for Address List 3 Press OK 4 Press Ye...

Страница 289: ...layed The table below shows the available settings Use the procedure below to specify the Narrow Down settings 1 Press the System Menu key 2 Press Edit Destination Next of Address Book Defaults and then Change of Narrow Down 3 Select the type of destination filter 4 Press OK Item Detail No Displays the destination list in order of the registered number Name Displays the destination list in order o...

Страница 290: ...3 Press Change of Internet Browser 4 Press On or Off 5 Press OK Browser Preferences This specifies Internet browser preferences such as your home page setting and how pages are displayed NOTE This is not displayed if you selected Off in Internet Browser Setting page 8 58 Use the procedure below to set your Internet browser preferences 1 Press the System Menu key 2 Press and then Internet NOTE If u...

Страница 291: ...tration is disabled the user authentication screen appears Enter your login user name and password and then press Login For this you need to login with administrator privileges Refer to Adding a User on page 11 5 for the default login user name and password 3 Press Change of Proxy and then press On To set a proxy server HTTP 1 Press Keyboard of Proxy Server HTTP enter the proxy address and press O...

Страница 292: ... your login user name and password and then press Login For this you need to login with administrator privileges Refer to Adding a User on page 11 5 for the default login user name and password 4 Press Add 5 Select the application to be installed and press Install You can view detailed information on the selected application by pressing Detail 6 When the confirmation screen appears press Yes Insta...

Страница 293: ...ion press Deactivate 4 Enter the license key and press Official Some applications do not require you to enter a license key If the license key entry screen does not appear go to Step 5 To use the application as a trial press Trial without entering the license key 5 When the confirmation screen appears press Yes IMPORTANT If you change the date time while using an application you will no longer be ...

Страница 294: ...cation NOTE If login administration is disabled the user authentication screen appears Enter your login user name and password and then press Login For this you need to login with administrator privileges Refer to Adding a User on page 11 5 for the default login user name and password 3 Select the application to be deleted and press Delete You can view detailed information on the selected applicat...

Страница 295: ...ogin with administrator privileges Refer to Adding a User on page 11 5 for the default login user name and password 4 When the confirmation screen appears press Yes Initialization starts IMPORTANT The Formatting Do not turn off the main power switch message appears during initialization Wait until initialization ends 5 Once the initialization ends the message Task is completed Turn the main power ...

Страница 296: ...P IPv4 Setup Set up TCP IP to connect to the Windows network Refer to TCP IP IPv4 Setup by Entering IP Addresses on page 2 14 about the procedures TCP IP IPv6 Setup Set up TCP IP IPv6 to connect to the network The default settings are TCP IP Protocol On TCP IP IPv6 Off Use the procedure below 1 Press the System Menu key 2 Press System Next of Network and then Next of TCP IP Setting 3 Press Change ...

Страница 297: ...For detailed information on restarting the system refer to Restarting the System on page 8 63 RA Stateless Settings Select whether or not to use RA Stateless The RA Stateless settings are available when selecting On for TCP IP IPv6 The default setting is On Use the procedure below 1 Press the System Menu key 2 Press System Next of Network and then Next of TCP IP Setting 3 Press Next of IPv6 4 Pres...

Страница 298: ... On Y SMTP E mail TX Select whether or not to send e mail using SMTP Off N POP3 E mail RX Select whether or not to receive e mail using POP3 Off N FTP Client Transmission Select whether or not to send documents using FTP When selecting On set the FTP Port Number Use the FTP default port 21 On Port 21 Y FTP Server Reception Select whether or not to receive documents using FTP On Y SMB Client Transm...

Страница 299: ...om Auto Ethernet II 802 3 802 2 or SNAP The default settings are On Frame Type Auto Use the procedure below 1 Press the System Menu key 2 Press System Next of Network and then Change of NetWare 3 Press On 4 Press the key for the frame type you want to use HTTPS Select whether or not to communicate using HTTPS SSL must be set to On in SSL Setup on page 8 69 On Y IPP Select whether or not to communi...

Страница 300: ...2 Press System Next of Network and then Change of WSD Scan 3 Press On or Off 4 Press OK 5 After changing the setting restart the system or turn the machine OFF and then ON again For detailed information on restarting the system refer to Restarting the System on page 8 63 WSD Print Setup Select whether or not to use WSD Print The default setting is On Use the procedure below 1 Press the System Menu...

Страница 301: ... OK 5 After changing the setting restart the system or turn the machine OFF and then ON again For detailed information on restarting the system refer to Restarting the System on page 8 63 IPP Security Setup Select the IPP security level This setup is available when SSL is On The default setting is IPP over SSL Only NOTE IPP must be set to On in Protocol Detail on page 8 66 Use the procedure below ...

Страница 302: ...be set to On in Protocol Detail on page 8 66 The table below shows the available settings Use the procedure below 1 Press the System Menu key 2 Press System Next of Network Next of Secure Protocol and then Change of LDAP Security 3 Press Off LDAP over SSL or LDAPv3 TLS 4 Press OK 5 After changing the setting restart the system or turn the machine OFF and then ON again For detailed information on r...

Страница 303: ...ss OK 5 After changing the setting restart the system or turn the machine OFF and then ON again For detailed information on restarting the system refer to Restarting the System on page 8 63 LAN Interface Setup Specify the settings for the LAN interface to be used The default setting is Auto Use the procedure below 1 Press the System Menu key 2 Press System Next of Network and then Change of LAN In...

Страница 304: ... appears Enter your login user name and password and then press Login For this you need to login with administrator privileges Refer to Adding a User on page 11 5 for the default login user name and password 3 Press Block 4 Press OK USB Device USB interface setting This locks and protects the USB interface connector B1 USB Device The default setting is Unblock Use the procedure below to specify th...

Страница 305: ...suggest you to confirm how the machine performs this function on your environment Machine Operation after Detecting the Document Guard Pattern Item Description Common operation Displays the message that indicates the machine detected the document guard pattern and stops scanning the remaining documents Copy functions Prints the documents in blank from the position that the machine detected the doc...

Страница 306: ...tection If the malfunction occurs contact your service representative Use the procedure below to specify the Document Guard setting 1 Press the System Menu key 2 Press System and then Next of Optional Function NOTE If user login administration is disabled the user authentication screen appears Enter your login user name and password and then press Login For this you need to login with administrato...

Страница 307: ...iffer depending on the application Starting Application Use Use the procedure below to start using an application 1 Press the System Menu key 2 Press System and then Next of Optional Function NOTE If user login administration is disabled the user authentication screen appears Enter your login user name and password and then press Login For this you need to login with administrator privileges Refer...

Страница 308: ...ay Touch panel characters and key displays can be enlarged Use the numeric keys to select items and proceed to the next screen NOTE Accessibility can be used only with Copying and Sending registered on the Quick Setup screen To set functions other than those displayed in the accessibility screens you must return to the original display Press the Accessibility Display key again Press the Accessibil...

Страница 309: ...9 1 9 Maintenance This chapter describes cleaning and toner replacement Cleaning 9 2 Toner Container and Waste Toner Box Replacement 9 7 ...

Страница 310: ...nplug the power cord before cleaning the machine Original Cover Glass Platen Wipe the backside of the original cover the inside of the document processor and the glass platen with a soft cloth dampened with alcohol or mild detergent IMPORTANT Do not use thinner or other organic solvents Original Cover Glass Platen ...

Страница 311: ...ot use water soap or solvents for cleaning 1 Remove the cloth from the cleaning cloth compartment 2 Open the document processor and wipe the slit glass a 3 Wipe the white guide b on the document processor 4 Close the document processor top cover and return the cleaning cloth to the cleaning cloth compartment 5 Press End Hold 1 Open the document processor 2 Clean the surface of the slit glass locat...

Страница 312: ...y at least monthly to ensure optimum output quality 1 Open the front cover 2 Remove cleaning brush blue colored 3 Pull up and open left cover 1 4 As shown in the figure clean dirt from the separator by moving the brush from side to side along the separator ...

Страница 313: ...9 5 Put away the cleaning brush press the specified position of the front cover and left cover 1 to close Transfer Roller 1 Open the front cover 2 Remove the cleaning brush blue colored 3 Pull up and open left cover 1 ...

Страница 314: ...m the transfer roller by moving the brush from side to side along the roller while rotating the roller by turning the gear at the left end of the roller 5 Put away the cleaning brush press the specified position of the front cover and left cover 1 to close ...

Страница 315: ...ell Every time you replace the toner container be sure to clean the parts as instructed below Dirty parts may deteriorate output quality CAUTION Do not attempt to incinerate the toner container or the waste toner box Dangerous sparks may cause burns CAUTION Do not attempt to force open or destroy the toner container or the waste toner box 1 Open the front cover 2 Remove the waste toner box 3 Peel ...

Страница 316: ... Do not attempt to incinerate the toner container or the waste toner box Dangerous sparks may cause burns CAUTION Do not attempt to force open or destroy the toner container or the waste toner box 6 Grip the cleaner rod and slowly pull it out as far as it will go Then push it back in Repeat this procedure 2 or 3 times CAUTION Do not pull strongly on the rod or pull it out completely ...

Страница 317: ...attach it to the machine 10 While gently holding the grid cleaner in place with your left hand pull the main charger out fully and then push it back to a position where the roller A does not quite reach the white pad on the grid cleaner Repeat this procedure 2 or 3 times CAUTION When pushing the main charger back in take care not to push it all the way in This could result in damage to copies A ...

Страница 318: ...the grid cleaner Then push the main charger back in fully applying pressure in the direction shown by the arrow so that the main charger is in its designated position 12 Install a new waste toner box 13 Remove the cleaning brush blue colored 14 Pull up and open left cover 1 ...

Страница 319: ...rator 16 As shown in the figure clean dirt from the transfer roller by moving the brush from side to side along the roller while rotating the roller by turning the gear at the left end of the roller 17 Put away the cleaning brush after the cleaning Close the left cover 1 by pressing specified part 18 Open the Multi Purpose tray ...

Страница 320: ...ed cleaning brush 21 Put the filters back in place and close the Multi Purpose Tray 22 Push the toner container stopper to the right and pull out the old toner container WARNING High voltage parts inside Handle with care because there is a danger of electric shock IMPORTANT Do not pull the toner container all the way out without holding the handle otherwise it will drop ...

Страница 321: ...bag 25 Unwrap a new toner container and hold the new toner container upright and tap the top of the container 5 or more times Then turn the container the other way up and again tap the top of the container 5 or more times 26 Then shake the toner container up and down 5 or more times Turn the toner container over and shake it another 5 or more times ...

Страница 322: ...y push it into the machine 29 Using both hands push in the toner container until it is locked 30 Close the front cover NOTE Return the exhausted toner container and waste toner box to your dealer or service representative The collected toner container and waste toner box will be recycled or disposed in accordance with the relevant regulations ...

Страница 323: ...10 1 10 Troubleshooting This chapter explains how to solve problems with the machine Solving Malfunctions 10 2 Responding to Error Messages 10 6 Clearing Paper Jams 10 15 ...

Страница 324: ...y to copy within 15 seconds 2 10 Blank sheets are ejected Are the originals loaded correctly When placing originals on the platen place them face down and align them with the original size indicator plates 2 32 When placing originals in the optional document processor place them face up 2 34 Printouts are too light Is the machine in Auto Density mode Set the correct density level for auto density ...

Страница 325: ...drum dirty Carry out Drum Refresh 8 42 Is the Printed Document Guard Kit enabled Disable the Printed Document Guard Kit Appendix 9 Printouts are fuzzy Is the machine being used in very humid conditions Carry out Drum Refresh 8 42 Images are skewed Are the originals placed correctly When placing originals on the platen align them with the original size indicator plates 2 34 When placing originals i...

Страница 326: ...o restart printing Documents are printed improperly Are the application software settings at the PC set properly Check that the printer driver and application software settings are set properly While the operation panel was being used the keys locked up and do not respond when pressed Is the operation panel locked Check the panel lock setting in COMMAND CENTER and change the setting if necessary K...

Страница 327: ...he USB host settings 8 72 Perform Gray Adjustment in the System Menu is displayed Over long periods of use the effects of the ambient temperature and humidity can cause color output hues to vary slightly Whenever the printed hues differ from the original document or image carry out Gray Adjustment 8 45 Symptom Checkpoints Corrective Actions Reference Page ...

Страница 328: ...les Has any of the document finisher run out of staples If the staples are depleted the machine will stop and the location of staple depletion will be indicated on the touch panel Leave the machine on and follow the instruction to replace the staple case Press Continue to print without stapling Press Cancel to cancel the job Add toner Replace the toner container 9 7 Box is not found This job is ca...

Страница 329: ... be stapled Select the available paper size type Press Continue to print without using Staple Check the cover Is there any cover which is open Close the cover indicated on the touch panel Check the document processor Is the document processor open Close the document processor Is the top cover of the document processor open Close the top cover of the document processor 10 25 Check the finisher Is t...

Страница 330: ...ount ID Incorrect box password Enter the correct password Incorrect Login User Name or Password Enter correct login user name or password Job Accounting restriction exceeded Is the acceptable printing count restricted by Job Accounting exceeded The printing count exceeded the acceptable count restricted by Job Accounting Cannot print any more This job is canceled Press End Job separator is full of...

Страница 331: ...ry error This job is canceled Press End Removable memory is full This job is canceled Press End Replace all originals and press Continue Remove originals from the document processor put them back in their original order and place them again Press Continue to resume printing Press Cancel to cancel the job 2 34 Replace the waste toner box The waste toner box is full Replace the waste toner box 9 7 R...

Страница 332: ...ror System error has occurred Confirm that the Attention indicator is lighting and then turn the main power switch off and on The phone receiver is off the hook Put down the receiver The removable memory is not formatted Is the removable memory formatted by this machine Use the removable memory formatted by this machine Top tray of the machine is full of paper Remove paper from the top tray and pr...

Страница 333: ... name and login password If the sender is a domain user specify the domain name Host name Path 3 23 Failed to send the e mail Failed to send i FAX Check the followings on the COMMAND CENTER SMTP login user name and login password POP3 login user name and login password Failed to send via FTP Check the FTP settings Login user name and login password If the sender is a domain user specify the domain...

Страница 334: ... Internet Faxing i FAX Option 1106 Failed to send the e mail Failed to send i FAX Check the sender address of SMTP on the COMMAND CENTER 2 19 1131 Failed to send via FTP Select On of the secure protocol settings on the COMMAND CENTER 2 19 1132 Failed to send via FTP Check the followings of the FTP server Is FTPS available Is the encryption available 2 19 2101 Failed to send via SMB Failed to send ...

Страница 335: ...d to send via FTP 2204 Failed to send the e mail Failed to send i FAX Check the e mail size limit of the SMTP settings on the COMMAND CENTER 2 19 3101 Failed to send the e mail Failed to send i FAX Check the authentication methods of both the sender and the recipient Failed to send via FTP Check the network The network cable is connected The hub is not operating properly The server is not operatin...

Страница 336: ... connect to authentication server Check the domain name 11 2 Check the host name 11 2 Check the connection status with the server Symptom Checkpoints Corrective Actions Reference Page Cannot send fax Is the modular cord connected correctly Connect the modular cord correctly Is Permitted FAX No or Permitted ID No registered correctly Check Permitted FAX No and Permitted ID No FAX System S Operation...

Страница 337: ...ver and remove the jammed paper 3 Close the cover Job No Job Name User Name doc101020081010 000021 Mike Paper Jam Location Indicator Paper Jam Location Reference Page A Cassette 1 10 16 B Cassette 2 10 17 C Cassette 3 or 4 Option 10 18 D Multi Purpose Tray 10 19 E Inside the left cover 1 2 or 3 10 20 F Duplex Unit 10 21 G Paper Feed Unit 10 23 H Document processor Option 10 25 I Document finisher ...

Страница 338: ...per from inside the machine Scraps of paper left in the machine could cause subsequent jamming Discard paper that has jammed in the optional document finisher A page affected by a paper jam will be printed again CAUTION The fixing unit is extremely hot Take sufficient care when working in this area as there is a danger of getting burned Cassette 1 Follow the steps below to clear paper jams in cass...

Страница 339: ...r tears remove every loose scrap from inside the machine 5 Push cassette 1 back in place securely 6 Press the specified position to close left cover 1 Cassette 2 Follow the steps below to clear paper jams in cassette 2 1 Open left cover 2 2 Remove any paper ...

Страница 340: ...inside the machine 5 Push cassette 2 back in place securely 6 Close left cover 2 Optional Cassettes 3 and 4 Follow the steps below to clear paper jams in cassettes 3 or 4 when using the optional paper feeder 1 Open left cover 3 2 Remove any paper If the paper tears remove every loose scrap from inside the machine ...

Страница 341: ... paper 5 Push the cassette back in place securely 6 Close left cover 3 Multi Purpose Tray Follow the steps below to clear paper jams in the multi purpose tray 1 Remove the paper from the multi purpose tray 2 If paper is jammed inside pull the paper toward you to remove ...

Страница 342: ...ing the optional paper feeder 1 Pull up left cover 1 lever and open the left cover 1 2 Remove the paper If the paper tears remove every loose scrap from inside the machine 3 Remove any paper in the output section If the paper tears remove every loose scrap from inside the machine 4 Press the specified position to close left cover 1 ...

Страница 343: ... paper jams in the duplex unit 1 Pull up left cover 1 lever and open the left cover 2 Remove the paper If the paper tears remove every loose scrap from inside the machine 3 Lift up the duplex unit and remove the paper 4 Press the specified position to close left cover 1 ...

Страница 344: ...the left cover 2 Remove any paper If the paper tears remove every loose scrap from inside the machine 3 Lift duplex unit and remove any paper If the paper tears remove every loose scrap from inside the machine 4 Pull out cassette 1 and remove the paper If the paper tears remove every loose scrap from inside the machine 5 Push cassette 1 back in place securely ...

Страница 345: ...close left cover 1 Paper Feed Unit Follow the steps below to clear paper jams in the paper feed unit 1 Pull up left cover 1 lever and open the left cover 1 2 Remove any paper If the paper tears remove every loose scrap from inside the machine 3 Open front cover ...

Страница 346: ... 5 Remove any paper If you cannot remove the paper proceed with the next step 6 Pull out paper feed unit A2 7 Open paper feed unit cover A3 and remove any paper 8 If the paper is torn pull paper feed unit A2 all the way out and lift it slightly to remove any paper ...

Страница 347: ... Push paper feed unit A2 back in place and close the front cover 11 Press the specified position to close left cover 1 Optional Document Processor Follow the steps below to clear paper jams in the optional document processor 1 Remove any paper from the original tray 2 Open the document processor top cover ...

Страница 348: ...y loose scrap from inside the machine 6 Remove the original by turning the dial C as shown in the figure 7 Put reverse unit back in its original place and close the document processor top cover 8 Reload the originals on the document processor tray Optional Document Finisher If a misfeed occurs in the optional document finisher refer to the respective Operation Guides to clear the jam C ...

Страница 349: ...teps below to clear paper jams in the optional built in finisher 1 Remove any paper in the output section If the paper tears remove every loose scrap from inside the machine 2 Remove the output tray 3 Lift up the handle on left cover 1 and open left cover 1 ...

Страница 350: ...ting 10 28 4 Remove any paper If the paper tears remove every loose scrap from inside the machine 5 Press the indicated position to close left cover 1 6 Re attach the output tray 7 Lower the finisher process tray ...

Страница 351: ...Troubleshooting 10 29 10 8 Remove the paper If the paper tears remove every loose scrap from inside the machine 9 Raise the finisher process tray ...

Страница 352: ...rator 1 Remove any paper in the output section If the paper tears remove every loose scrap from inside the machine 2 Pull up left cover 1 lever and open left cover 1 3 Remove the paper If the paper tears remove every loose scrap from inside the machine 4 Press the indicated position to close left cover 1 ...

Страница 353: ...11 1 11 Management This chapter explains the following operations User Login Administration 11 2 Job Accounting 11 14 Data Security Kit Operations 11 27 ...

Страница 354: ...ogin administration Select one of the following authentication methods Use the procedure below to enable user login administration 1 Press the System Menu key 2 Press User Login Job Accounting 3 If user login administration is disabled the user authentication screen appears Enter your login user name and password and then press Login For this you need to login with administrator privileges Refer t...

Страница 355: ...e will be recognized 6 Press OK Login Logout Once you enable user login administration a login user name and password entry screen appears each time you use this machine Login Use the procedure below to login 1 If the screen below appears during the operations press Login User Name Press Keys to enter the login data using the numeric keys 2 Enter the login user name and press OK NOTE Refer to the ...

Страница 356: ...tion method either Local or Network can be selected as the authentication destination 5 Check the login user name and password are correct and press Login Logout To log out the machine press the Logout key to return to the login user name login password entry screen Auto Logout Logout is automatically executed in the following cases When the Power key is pressed to enter the sleep mode When auto s...

Страница 357: ...2 Press the System Menu key 3 Press User Login Job Accounting 4 If user login administration is disabled the user authentication screen appears Enter your login user name and password and then press Login For this you need to login with administrator Item Description User Name Mandatory at user registration Enter the name displayed on the user list up to 32 characters Login User Name Enter the log...

Страница 358: ...t the user access privilege and press OK 16 Press Change of Account Name 17 Select the account and press OK NOTE Select Name and ID from the Sort pull down menu to sort the account list Press Search Name or Search ID to search by account name or account ID 18 Press Register to add a new user on the local user list User User Name Account Name Access Level Register E mail Address Login Password Logi...

Страница 359: ...ding a User on page 11 5 for the default login user name and password 4 Press Next of User Login Setting and Register Edit of Local User List 5 Select the user whose properties you wish to change NOTE Select Name and Login Name from the Sort pull down menu to sort the user list Press Search Name or Search Login to search by name or login user name The procedure differs depending on the details to ...

Страница 360: ...r account name cannot be changed the users can check the present status Use the procedure below to change user properties 1 Press the System Menu key 2 Press User Property 3 Refer to steps 6 to 17 of Adding a User to change user properties Press Detail of Login User Name or Account Name to check the present status 4 Press Register to finalize changed user properties User User Name Account Name Acc...

Страница 361: ... to process jobs sent from unknown users 1 Press the System Menu key 2 Press User Login Job Accounting 3 If user login administration is disabled the user authentication screen appears Enter your login user name and password and then press Login For this you need to login with administrator privileges Refer to Adding a User on page 11 5 for the default login user name and password 4 Press Change o...

Страница 362: ...Press Next of User Login Setting Next of Group Authorization Set and then Change of Group Authorization 5 Press On 6 Press OK Group List Register the groups that is restricted the machine usage Up to 20 groups can be individually registered Other users and groups belong to Others The table below explains the group information to be registered Item Description Group ID Enter the ID displayed on the...

Страница 363: ... press OK 11 Press Change of Print Restriction 12 Select Reject Usage or Off and press OK Storing Restr in Memory Select whether or not to reject usage of storing in the removable memory For Group ID specify PrimaryGroupID assigned by ActiveDirectory of Windows If you are using Windows Server 2008 check Attribute Editor tab of user properties If you are using Windows Server 2000 2003 check ADSIEdi...

Страница 364: ... Smith and the value of department is Sales in Active Directory of Windows the user name appears as Mike Smith Sales 4 If using Active Directory of Windows mail of Attribute may be used as E mail Address 1 Press the System Menu key 2 Press User Login Job Accounting 3 If user login administration is disabled the user authentication screen appears Enter your login user name and password and then pre...

Страница 365: ...ess E mail Address 13 Enter the LDAP Attribute to obtain the e mail address and press OK 14 Press Search Timeout to set the amount of time to wait before time out 15 Press or the numeric keys to enter the time 16 Press LDAP Security to select the type of encryption according to the type of security employed by the LDAP server 17 Select Off LDAP over SSL or LDAPv3 TLS and press OK User Login Job Ac...

Страница 366: ...unter for each account or for all accounts combined First Job Accounting Setup Follow these steps for the first job accounting setup Enable job accounting page 11 14 Add an account page 11 16 Log out page 11 15 Other users login for operations page 11 15 Enabling Disabling Job Accounting Enable job accounting Use the procedure below to specify the job accounting setting 1 Press the System Menu key...

Страница 367: ...ch the registered ID a warning beep will sound and login will fail Enter the correct account ID By pressing Counter Check you can refer to the number of pages printed and the number of pages scanned When the screen to enter the login user name and password appears If user login administration is enabled the screen to enter the login user name and password appears Enter a login user name and passwo...

Страница 368: ...thod on Appendix 10 for details on entering characters 7 Follow steps 5 and 6 above to enter the Account ID NOTE Any account ID that has already registered cannot be used Enter any other account ID 8 Activate or deactivate restriction Refer to Restricting the Use of the Machine on page 11 18 9 Press Register to add a new account on the Account List Item Description Account Name Enter the account n...

Страница 369: ...rs depending on the details to be edited Changing account information 1 Press Detail 2 Refer to steps 5 to 7 of Adding an Account and steps 2 to 5 of Restricting Using the Machine to change account information 3 Press Register 4 Press Yes in the registration confirmation screen The account information is changed Deleting an account 1 Press Delete 2 Press Yes To delete the account User Login Job Ac...

Страница 370: ... default login user name and password 4 Press Next of Job Accounting Setting Next of Default Setting and then Change of Copier Printer Count 5 Press Total or Split 6 Press OK Restricting the Use of the Machine This section explains how to restrict the use of the machine by account or the number of sheets available The items that can be restricted differ depending on whether Split or Total is selec...

Страница 371: ...ter The restricted account is added Item Detail Print Restriction Total Limits the total number of sheets used for copying and printing Scan Restriction Others Limits the number of sheets scanned excludes copying FAX TX Restriction Limits the number of sheets sent by fax This is displayed when the optional fax kit is installed FAX Port Restriction Restricts the ports used for faxing This is displa...

Страница 372: ... password and then press Login For this you need to login with administrator privileges Refer to Adding a User on page 11 5 for the default login user name and password 4 Press Next of Job Accounting Setting Next of Default Setting and then Change of Apply Limit 5 Select Immediately Subsequently or Alert Only 6 Press OK Item Description Immediately The next job will be prohibited in sending or in ...

Страница 373: ...es Refer to Adding a User on page 11 5 for the default login user name and password Item Detail Copy Restriction Total Sets the default restriction on the number of sheets used for copying Print Restriction Total Sets the default restriction on the total number of sheets used for printing Scan Restriction Others Sets the default restriction on the number of sheets used for scanning excludes copyin...

Страница 374: ...ify and then press or or use the numeric keys to enter the default restriction on the number of sheets 6 Press OK 7 To set another default restriction repeat steps 5 to 6 Status 08 08 2009 10 10 User Login Job Accounting Copy Restriction Total Set the default limit value for restricting use of the functions for each account by counter 1 9999999 Cancel OK 9999999 ...

Страница 375: ...nted Pages Displays the number of pages copied and printed and the total number of pages used You can also use Count by Paper Size and Count by Duplex Combine to check the number of pages used For copying you can check the pages used for black and white copying For printing you can check the pages used for black and white printing You can use Count by Paper Size to check the number of pages used i...

Страница 376: ... user name and password and then press Login For this you need to login with administrator privileges Refer to Adding a User on page 11 5 for the default login user name and password 4 Press Next of Job Accounting Setting and Check of Each Job Accounting 5 Select the account to check the count NOTE Select Name or ID from the Sort pull down menu to sort the account names Press Search Name or Search...

Страница 377: ...ess the System Menu key 2 Press User Login Job Accounting 3 If user login administration is disabled the user authentication screen appears Enter your login user name and password and then press Login For this you need to login with administrator privileges Refer to Adding a User on page 11 5 for the default login user name and password 4 Press Next of Job Accounting Setting Next of Default Settin...

Страница 378: ...ccounting report 1 Check that Letter or A4 paper is loaded in the cassette 2 Press the System Menu key 3 Press User Login Job Accounting 4 If user login administration is disabled the user authentication screen appears Enter your login user name and password and then press Login For this you need to login with administrator privileges Refer to Adding a User on page 11 5 for the default login user ...

Страница 379: ...paper size by pressing Printed Pages by Paper Size Data Security Kit Operations Installing the optional Data Security Kit adds Data Security on the System Menu Refer to the Data Security Kit E Operation Guide on the bundled CD ROM for descriptions of the Data Security options and the procedures for using them Counter 08 08 2009 10 10 Status Close Print Status Page Printed Pages Black White Total P...

Страница 380: ...Management 11 28 ...

Страница 381: ...Appendix 1 Appendix Optional Equipment Appendix 2 Character Entry Method Appendix 10 Paper Appendix 13 Specifications Appendix 21 Glossary Appendix 27 ...

Страница 382: ...ix Appendix 2 Optional Equipment Overview of Optional Equipment The following optional equipment is available for the machine Document Processor Built in Finisher Document Finisher Job Separator Paper Feeder ...

Страница 383: ...Appendix Appendix 3 Key Counter FAX Kit Expansion Memory ...

Страница 384: ...feeder for use in clearing paper jams Document Finisher The document finisher holds a large quantity of finished copies The finisher offers a convenient means of sorting Sorted finished copies may also be stapled For further details refer to the document finisher Operation Guide Built in Finisher The built in finisher holds a large quantity of finished prints The finisher offers a convenient means...

Страница 385: ...n ejected paper guides 1 and 2 as necessary to match the paper size When stapling Legal Statement A3 or B4 paper open the finisher tray extension to ensure that the paper does not fall out of the tray Adding Staples 1 Pull to open the stapler front cover 2 Pull out the staple holder ...

Страница 386: ...case in your right hand insert the staple case into the staple holder in the direction of the arrow 5 Insert the staple case fully as far as it will go Pull to remove the paper tape wound on the staple case 6 Insert the staple holder into the slot of the staple unit again When fully inserted the staple holder locks with a clicking sound ...

Страница 387: ...staple holder lift the face plate 3 Clear the staple jammed in the cartridge end staple loaded side 4 Lower the face plate of the staple holder 5 Insert the face plate back in place When fully inserted the face plate locks with a clicking sound 6 After lifting the staple unit slightly lower it and insert it again into its place 7 Close the stapler front cover A ...

Страница 388: ...nly turn the paper in the cassette over and try again NOTE To ensure that paper is delivered to the Job Separator select the output destination or change the default setting For details refer to the Paper Output on page 8 13 When removing paper from the Job Separator pull it out at an angle Key Counter Use the key counter to monitor machine usage The key counter offers a convenient solution for ce...

Страница 389: ...e installed or removed by the service representative Data Security Kit The Data Security Kit overwrites all unnecessary data in the storage area of the hard disk so that it cannot be retrieved The Data Security Kit encrypts data before storing it in the hard disk It guarantees higher security because no data cannot be decoded by ordinary output or operations Printed Document Guard Kit This prevent...

Страница 390: ...n Status 08 08 2009 10 10 Use the keyboard to enter Backspace Upper case No Symbol Space Cancel OK Input characters Limit characters 0 128 Lower case 1 2 3 4 5 6 7 8 9 0 q w e r t y u i o p a s d f g h j k l z x c v b n m 1 2 4 5 6 7 8 9 10 11 3 No Display Key Description 1 Display Displays entered characters 2 Limit Display Displays maximum number of characters 3 Cursor Key Press to move the curs...

Страница 391: ... Backspace Upper case Lower case No Symbol Space Cancel OK Lower case _ Q W E R T Y U I O P A S D F G H J K L Z X C V B N M Input characters Limit characters 0 128 Status 08 08 2009 10 10 Use the keyboard to enter Backspace Upper case Lower case No Symbol Space Cancel OK Lower case 1 2 3 4 5 6 7 8 9 0 _ Input characters Limit characters 0 128 12 No Display Key Description 12 To enter a number or s...

Страница 392: ...the keyboard to enter Backspace Upper case Lower case No Symbol Space Cancel OK Lower case L _ Q W E R T Y U I O P A S D F G H J K L Z X C V B N M Input characters Limit characters 1 128 Status 08 08 2009 10 10 Use the keyboard to enter Backspace Upper case No Symbol Space Cancel OK Lower case 1 2 3 4 5 6 7 8 9 0 q w e r t y u i o p a s d f g h j k l z x c v b n m _ List Input characters Limit cha...

Страница 393: ...tatement A3 B4 A4 A4 R B5 B5 R A5 R Oficio II 8 5 13 5 Folio 8K 16K 16K R 500 80 g m2 Supported types Supported paper sizes No of sheets Plain paper 45 to 200 g m2 Recycled paper 45 to 200 g m2 Colored paper 45 to 200 g m2 Ledger Legal Letter Letter R Executive R Statement A3 B4 A4 A4 R B5 B5 R A5 R B6 R A6 R Oficio II 8 5 13 5 8K Folio 16K 16K R Other sizes Portrait 3 7 8 to 11 5 8 or 98 to 297 m...

Страница 394: ...s section describes guidelines for choosing paper Condition Avoid using paper with bent corners or that is curled dirty or torn Do not use paper that has a rough surface or paper fiber lint or that is especially delicate Use of paper in any of these conditions will not only deliver poor copies but may also cause jams and shorten the useful life of the machine Choose paper with a smooth and even su...

Страница 395: ...ectly or cause paper jams which may cause excessive wear of the machine Mixed paper weight i e thickness may cause several sheets to be supplied at once accidentally and may also cause blurring or other printing problems if the toner fails to adhere correctly Multi Purpose Tray Cassette or Multi Purpose Tray A6 R 105 148 mm A3 297 420 mm B6 R 128 182 mm B4 257 364 mm Hagaki 100 148mm A4 297 210 mm...

Страница 396: ...p the paper a sufficient distance away from wooden or concrete floors Before using paper that has been stored keep it at the proper moisture level for at least 48 hours Do not store paper where it is exposed to heat sunlight or dampness Other Paper Specifications Porosity The density of the paper fibers Stiffness Paper must be stiff enough or it may buckle in the machine causing jams Curl Most pap...

Страница 397: ...el paper Choosing Special Paper Although special paper that meets the following requirements can be used with the machine print quality will vary considerably due to differences in the construction and quality of special paper Thus special paper is more likely than regular paper to cause printing problems Before purchasing special paper in volume try testing a sample to ensure the print quality is...

Страница 398: ...e try testing a sample to ensure the print quality Storing envelopes for a long period may cause them to become wrinkled Thus keep the package sealed until you are ready to use them Keep the following points in mind Do not use envelopes with exposed adhesive In addition do not use the type of envelope in which the adhesive is exposed after the top layer is peeled off Serious damage may be caused i...

Страница 399: ... must be liable for the print quality and possible trouble Labels consist of three layers as shown in the illustration The adhesive layer contains materials that are easily affected by the force applied in the machine The carrier sheet bears the top sheet until the label is used This composition of labels may cause more problems The label surface must be covered completely with the top sheet Gaps ...

Страница 400: ...e colored ink must be able to withstand the heat of printing It must be resistant to silicone oil as well Do not use paper with a treated surface such as glossy paper used for calendars Recycled Paper Recycled paper must conform to the specifications listed on the page 2 of the Appendix however its whiteness may be considered separately NOTE Before purchasing recycled paper in volume try testing a...

Страница 401: ...Tray Plain Transparency OHP film Rough Vellum Labels Recycled Preprinted Bond Cardstock Hagaki Color Colour Prepunched Thick Letterhead Thick Envelope High Quality Custom 1 to 8 Paper Size Cassette 1 2 Maximum 11 17 A3 Duplex 11 17 A3 Minimum 5 1 2 8 1 2 A5R Duplex 5 1 2 8 1 2 A5 R Multi Purpose Tray Maximum 11 17 A3 Minimum 5 1 2 8 1 2 A6 R Zoom Level Manual mode 25 to 400 1 increments Auto mode ...

Страница 402: ...SB Network interface 1 10 BASE T 100 BASE TX Option KUIO W slot 2 Resolution 600 600 dpi Operating Environment Temperature 10 to 32 5 C 50 to 90 5 F Humidity 15 to 80 Altitude 2 500 m 8 202 ft maximum Brightness 1 500 lux maximum Dimension W D H 22 7 16 24 13 16 30 3 16 Main unit only 570 630 767 mm Weight without toner container and waste toner box 165 lb 75 kg Space Required W D 28 9 16 24 13 16...

Страница 403: ...Network interface 1 10 BASE T 100 BASE TX Page Description Language PRESCRIBE Item Description Operating System Windows 2000 Service Pack 2 or later Windows XP Windows Vista System requirements CPU 600MHz or higher RAM 128MB or more Resolution 600 dpi 400 dpi 300 dpi 200 dpi 200 100 dpi 200 400 dpi Resolution in FAX mode included File Format TIFF MMR JPEG compression JPEG XPS PDF MMR JPEG compress...

Страница 404: ...l sizes auto selection 30 sheets 50 to 80 g m2 maximum Dimensions W D H 22 19 3 16 5 3 16 559 487 131 mm Weight Approx 15 4 lbs Approx 7 kg Item Description Paper Supply Method Friction Feed No Sheets 500 80 g m2 2 cassettes Paper Size Ledger Legal Oficio II 8 5 13 5 Letter Letter R Statement R A3 B4 A4 A4 R B5 B5 R A5 R Folio 8K 16K 16K R Supported Paper Paper weight 60 120 g m2 Media types stand...

Страница 405: ...A3 B4 8K 25 sheets Letter Letter R A4 A4 R 16K 50 sheets Paper weight 90 g m2 or less Dimensions W D H 25 20 63 64 40 5 16 634 9 533 1013 5 mm Weight Approx 58 42 lbs Approx 26 5 kg Item Description Number of Trays 1 tray Maximum Sheets 100 sheets 80 g m2 Paper Size Ledger Legal Oficio II 8 5 13 5 Letter Letter R Executive R Statement R 8K 16K 16K R A3 B4 A4 A4 R B5 B5 R A5 R Folio Paper Type Pape...

Страница 406: ...flexionen am Bildschirmarbeitsplatz zu vermeiden darf dieses Produkt nicht im unmittelbaren Gesichtsfeld platziert werden Item Description Number of Trays 1 tray Paper Size Non stapling Ledger Legal Oficio II 8 5 13 5 A3 B4 Folio 8K 250 sheets Letter Letter R A4 A4 R B5 16K 500 sheets 60 to 105 g m2 Maximum Sheets for Stapling Ledger Legal Oficio II 8 5 13 5 A3 B4 Folio 8K 20 sheets Letter Letter ...

Страница 407: ... same size as original at printing Auto Sleep A mode designed for electrical power saving activated when the machine is left unused or data transfer for a specific period In Sleep mode power consumption is kept to a minimum Bonjour Bonjour also known as zero configuration networking is a service that automatically detects computers devices and services on an IP network Bonjour because an industry ...

Страница 408: ...r Copies made in this mode are thus lighter than normal Emulation The function to interpret and execute other printers page description languages The machine emulates operation of PCL6 KPDL and KPDL automatic FTP File Transfer Protocol A protocol to transfer files on the TCP IP network whether the Internet or an intranet Along with HTTP and SMTP POP FTP is now frequently used on the Internet Grays...

Страница 409: ...ting services NetWare Novell s network management software that is able to run on a variety of operating systems POP3 Post Office Protocol 3 A standard protocol to receive E mail from the server in which the mail is stored on the Internet or an intranet PostScript A page description language developed by Adobe Systems It enables flexible font functions and highly functional graphics allowing highe...

Страница 410: ... address 133 210 2 0 with a 24 bit prefix network section This new network address section originally part of the host address made possible by the subnet mask is referred to as the subnet address When you enter the subnet mask be sure to set the DHCP setting to Off TCP IP Transmission Control Protocol Internet Protocol TCP IP is a suite of protocols designed to define the way computers and other ...

Страница 411: ...orted after Windows Me XP from digital cameras and other peripheral devices This function replaces what TWAIN used to do the feature is provided as a part of Windows functions and improves ease of operation so that you import images directly to My Computer without using any application ...

Страница 412: ...Appendix Appendix 32 ...

Страница 413: ...27 B Background density adjust Send 5 20 Bonjour Appendix 27 Booklet from Sheets 4 19 Left side 4 19 Right side 4 19 Top binding 4 19 Border Erase Copy 4 17 Send 5 23 Bundled Items 2 2 Buzzer 8 3 C Cassette Loading Paper 2 22 Paper Size and Media Type 8 5 Cassette 1 1 4 Cassette 2 1 4 Caution Labels ix CD ROM 2 2 Centering 5 6 Changing Language 2 11 8 2 Character Entry Method Appendix 10 Cleaning ...

Страница 414: ...s 6 11 Editing Documents 6 8 Form Overlay 6 7 Join Documents 6 9 Move Documents 6 8 Printing Documents 6 5 Sending Documents 6 6 Storing Documents 6 4 User Privileges 3 38 D Date Timer 8 46 Auto Error Clear 8 49 Auto Panel Reset 8 47 Auto Sleep 8 48 Date Format 8 46 Date Time 8 46 Low Power Timer 8 48 Setup 8 46 Time Zone 8 47 Default 8 14 Auto Image Rotation 8 21 Border Erase 8 19 Border Erase to...

Страница 415: ... 2 35 Loading Originals 2 34 Not Supported Originals 2 34 Part Names 2 34 Supported Originals 2 34 Double Copy 4 27 dpi Appendix 28 Duplex 3 11 8 35 Duplex Unit 1 4 E EcoPrint Mode Appendix 28 Copy 4 13 Print 8 34 E mail Send as E mail 3 22 Emulation Appendix 28 Selection 8 33 Energy Star Program xxvii Enlarged Display 8 76 Enter E mail Subject and Body 5 26 Enter key 3 3 Entry Body 5 26 Document ...

Страница 416: ...e of the Machine 11 18 Job Box Form Overlay Box 6 17 Private Print Stored Job Box 6 12 Quick Copy Proof and Hold Print Box 6 13 Repeat Copy Box 6 15 Job Finish Notice 5 29 Copy 4 34 Send 5 29 K Key Counter Appendix 8 KPDL Appendix 29 L Label Appendix 19 LAN Cable Connecting 2 5 LAN Interface Setup 8 71 LDAP Protocol Detail 8 66 Left Cover 1 1 4 Left Cover 1 Lever 1 4 Left Cover 2 1 4 Left cover 2 ...

Страница 417: ...ng in the Document Processor 2 34 Placing on the Platen 2 32 Size xxx Original Cover 1 4 Cleaning 9 2 Original Orientation Copy 4 10 Document Processor 4 10 Orientation Confirmation 8 14 Send 5 11 Original Placement Indicator Indications and Status 2 35 Original Size Indicator Plates 1 4 2 32 Original Size Selection Send 5 2 Original SSLeay License xxv Originals Automatic Detection 8 9 Copy 4 2 Cu...

Страница 418: ...tup 8 33 Printer Driver Appendix 29 Printer Settings 8 33 Copies 8 35 CR Action 8 37 Duplex 8 35 EcoPrint 8 34 Emulation 8 33 Form Feed Timeout 8 36 LF Action 8 36 Orientation 8 35 Override A4 Letter 8 34 Paper Feed Mode 8 37 Printing 3 19 Printing from Applications 3 19 Printing Reports Sending Notice 8 38 Font List 8 38 Network Status Page 8 39 Service Status Page 8 39 Status Page 8 38 Transmiss...

Страница 419: ... SMTP E mail TX Protocol Detail 8 66 SNMP Protocol Detail 8 66 SNMPv3 Protocol Detail 8 66 Solving Malfunctions 10 2 Specifications Built in Finisher Appendix 26 Document Finisher Appendix 25 Document Processor Appendix 24 Job Separator Appendix 25 Machine Appendix 21 Paper Feeder Appendix 24 Printer Appendix 23 Scanner Appendix 23 Specifying Destination 3 27 3 28 Status Job Cancel 7 1 Status Page...

Страница 420: ... Logout 11 4 Unknown login user name Job 11 9 W Waste Toner Box 1 5 Replacement 9 7 Status 7 15 WIA Appendix 31 WSD Print Setup 8 68 WSD Scan 5 27 Setup 8 68 X XPS File formats 5 12 8 17 Printing documents stored in Removable USB Memory 6 20 Saving documents to Removable USB Memory 6 22 Z Zoom Copying Auto Zoom 3 9 Manual Zoom 3 9 Preset Zoom 3 9 XY Zoom 3 10 Zoom Mode Copy 5 5 Send 5 5 ...

Страница 421: ...A1 We recommend the use of our own brand supplies We will not be liable for any damage caused by the use of third party supplies in this machine ...

Страница 422: ...MEMO ...

Страница 423: ...MEMO ...

Страница 424: ......

Страница 425: ......

Страница 426: ...First edition 2009 9 Printed in China 302K556040 ...

Отзывы: