background image

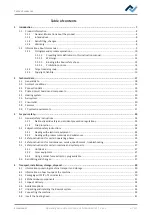
1 |  Introduction

1 Introduction

1.1

Product information..........................................................................................................................................  8
1.1.1

General information about the product ............................................................................................. 8

1.1.2

Intended use....................................................................................................................................... 8

1.1.3

Retrofitting, changes .......................................................................................................................... 8

1.1.4

Warranty............................................................................................................................................. 8

1.2

Information about this manual .........................................................................................................................  9
1.2.1

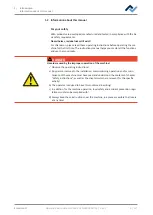
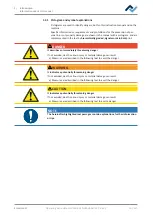
Pictogram and symbol explanations................................................................................................. 10
1.2.1.1

Prevailing term definitions in this instruction manual.................................................... 11

1.2.1.2

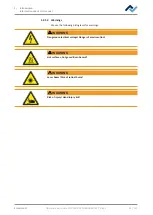
Warnings......................................................................................................................... 12

1.2.1.3

Binding info about safety shoes ..................................................................................... 13

1.2.1.4

Prohibition notices.......................................................................................................... 14

1.2.2

Target readers group ........................................................................................................................ 15

1.2.3

Copyright, liability............................................................................................................................. 15

Ersa GmbH

Operating instructions HR 550 XL EN 3BA00247-01 | Rev. 1

7 / 157

Содержание HR 550 XL

Страница 1: ...of the original operating manual 3BA00247 01 Serial No Ersa GmbH Leonhard Karl Str 24 97877 Wertheim www ersa de Rev 1 Printing date 30 03 2020 Phone 49 9342 800 136 Fax 49 9342 800 132 Mobile 49 171...

Страница 2: ......

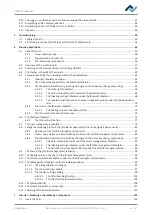
Страница 3: ...safety and accident prevention regulations 24 3 1 2 Fire protection 24 3 2 Subject related safety instructions 24 3 2 1 Dealing with electrical equipment 24 3 2 2 Dealing with process materials and s...

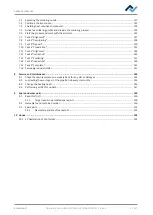
Страница 4: ...5 5 The Process Automation button row 75 6 6 The Archive tabulator 76 6 6 1 The Show chart button 77 6 7 The user management tabulator 79 6 8 Editing the soldering profile in the Profile management ta...

Страница 5: ...14 Task 8 Inspection 139 7 15 Task 9 Complete 141 7 16 Removing residual solder 141 8 Service and maintenance 143 8 1 Check the rework system on a weekly basis for any dirt or damages 144 8 2 Lubricat...

Страница 6: ......

Страница 7: ...1 2 Information about this manual 9 1 2 1 Pictogram and symbol explanations 10 1 2 1 1 Prevailing term definitions in this instruction manual 11 1 2 1 2 Warnings 12 1 2 1 3 Binding info about safety...

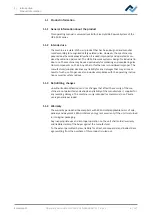
Страница 8: ...e as a result of such use Proper use also includes compliance with the operating instruc tions as well as safety notices 1 1 3 Retrofitting changes Unauthorized modifications and or changes that affec...

Страница 9: ...mproper operation of the machine Observe the operating instructions a Any person involved in the installation commissioning operation and or main tenance of the machine must have read and understood t...

Страница 10: ...not avoided death serious injury or material damage can result a Measures are described in the following text to avert the danger WARNING It indicates a potentially threatening danger If not avoided...

Страница 11: ...ed accordingly for multi shift operation Operating instructions the operating instructions contain references to the measures to be adopted or instructions to be followed by all means The operating in...

Страница 12: ...g pictograms for warnings WARNING Dangerous electrical voltage Danger of electrocution WARNING Hot surfaces hot gases Burn hazard WARNING Laser beam Risk of retinal burns WARNING Risk of injury Hand i...

Страница 13: ...afety shoes When working in areas which are marked with the symbol shown suitable safety shoes must be worn NOTE Wear protective goggles NOTE Disconnect power NOTE Read the operating instructions NOTE...

Страница 14: ...4 Prohibition notices We use the following pictograms for prohibition notices Prohibition in general Do not touch No fire and naked light Eating and drinking prohibited No smoking Ersa GmbH Operating...

Страница 15: ...to current conditions All the data published in these operating instructions including the information provided about products and procedures was identified by us to the best of our knowledge and abi...

Страница 16: ...1 Introduction Information about this manual Ersa GmbH Operating instructions HR 550 XL EN 3BA00247 01 Rev 1 16 157...

Страница 17: ...ient conditions 19 2 3 Connection data 19 2 4 Printed circuit boards and components 19 2 5 Heating system 20 2 6 Axis system 20 2 7 Pneumatics 20 2 8 Cameras 21 2 9 PC system requirements 21 Ersa GmbH...

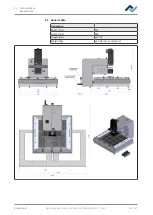
Страница 18: ...chnical data General data 2 1 General data Designation Width mm 757 Depth mm 934 Height mm ab 759 Weight kg ab 102 incl control unit Ersa GmbH Operating instructions HR 550 XL EN 3BA00247 01 Rev 1 18...

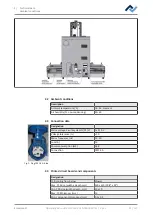
Страница 19: ...m N PE V 1 x 230 V Voltage tolerance 10 Mains frequency Hz 50 60 Fuse A 16 Power consumption kW 3 68 Connection CEE16 A 2 4 Printed circuit boards and components Designation PCB cooling from below Blo...

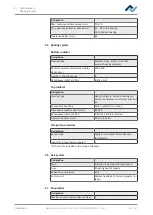
Страница 20: ...edium wave infrared with hot air Component handling Built in pipette motorised Dimensions width x depth mm 80 x 80 Rated power kW at 230 V 0 9 hot air and 0 9 infrared Aperture adapter mm 30 x 30 45 x...

Страница 21: ...place camera Designation Type Colour camera Resolution Mpixel 5 Interface GigE Lighting LED dimmable Laser pointer Laser Class 2 2 9 PC system requirements For the PC configuration required for your R...

Страница 22: ...2 Technical data PC system requirements Ersa GmbH Operating instructions HR 550 XL EN 3BA00247 01 Rev 1 22 157...

Страница 23: ...2 Dealing with process materials and substances 24 3 3 Safety instructions for certain operating phases 25 3 4 Safety instructions for maintenance service specific work troubleshooting 26 3 5 Safety...

Страница 24: ...r taken only by a skilled electrician or by properly trained people under the supervi sion and guidance of a skilled electrician in accordance with the electro technical rules a Before opening any hou...

Страница 25: ...operator must observe the processing instructions specified in the safety data sheets of the solder pastes and fluxes used NOTE Wear safety goggles Eye injury hazard When working on the pneumatic sys...

Страница 26: ...Commissioning must be performed by trained and qualified staff only a Inspect the machine for visible defects b Check all safety devices for proper operation c Wear suitable protective clothing for al...

Страница 27: ...traction system Solder fumes are hazardous to health For this reason a soldering fume extraction sys tem should always be used As regards the type of soldering fume extraction system we recommend usin...

Страница 28: ...3 For your safety Retrofitting and changes Ersa GmbH Operating instructions HR 550 XL EN 3BA00247 01 Rev 1 28 157...

Страница 29: ...azardous components 31 4 5 Scope of delivery 32 4 6 Available options 32 4 7 Unpacking and installing the Rework system 35 4 8 Connecting the machine 39 4 9 Insert the heating head 41 4 10 Screwing on...

Страница 30: ...achine CAUTION Risk of injury a To unpack always use proper tools b Use suitable protective clothing NOTE Disposal a Provide safe and environmentally friendly disposal of packaging materials NOTE Find...

Страница 31: ...place is advisable ESD Electrostatic Discharge The rework system can be smoothly integrated in such an environment Using one of the buttons on the front the user can for example connect an ESD strap T...

Страница 32: ...ble 2 0 m 315664 1 Nozzle 10 mm with silicone cup 8 mm 0HR5520 80100 1 Nozzle 5 mm with silicone cup 3 5 mm 0HR5520 35050 1 Baffle 30 x 30 mm 0HR5530 001 1 Baffle 45 x 45 mm 0HR5530 002 1 HR 550 XL in...

Страница 33: ...ure 0IR6500 37 AccuTC 2 0 thermocouple 0HR645 K type thermocouple wire with plug 0IR4510 02 The following devices can be connected to the HR 550 unit They can be controlled via the HR 550 unit Designa...

Страница 34: ...4 Transport installation storage disposal Available options Designation Item number Solder removal module Scavenger 0SC550 Ersa GmbH Operating instructions HR 550 XL EN 3BA00247 01 Rev 1 34 157...

Страница 35: ...lowing requirements The place of installation must be draught free Do not install the unit near ventilation ducts or air conditioning units A bright light pointed at the Rework system may lead to a ma...

Страница 36: ...kaging 2 g Take the accessories out of their cardboard box 1 and lay them aside h Release the power cable from its fastener and place it on the bottom heating DANGER Severe or fatal injury from fallin...

Страница 37: ...a Place the Rework system as far backwards as possible on the left side of the table WARNING Fire hazard hazard due to heat accumulation Personal or material damage is possible a Above behind and next...

Страница 38: ...tallation storage disposal Unpacking and installing the Rework system Any tempering colours on the heating head are due to manufacturing reasons Ersa GmbH Operating instructions HR 550 XL EN 3BA00247...

Страница 39: ...f the machine is in OFF position b Compare the local line voltage and the mains frequency with the specifications on the nameplate 6 of the machine c If the RPC camera is already preassembled plug the...

Страница 40: ...e used As regards the type of soldering fume extraction system we recommend using the Ersa Easy Arm with prefilter HEPA particle filter and ac tivated carbon filter The device is equipped with a suita...

Страница 41: ...e the arrow in the figure on the left Fig 7 User the heating head with its suspension bracket c Hold the heating head tight with both hands and keep the release lever pressed with a finger on the top...

Страница 42: ...om external forces When attaching and removing soldering nozzles the transport lock must be applied to the pipette to compensate for the resulting strain on the pipette retention mechanism Otherwise m...

Страница 43: ...ew it back to the transport lock should the Rework system be sub sequently carried or shipped c Use the Allen key to loosen the two fixing strips 4 but do not unscrew them d Pull the transport lock of...

Страница 44: ...k on the parts see the picture below 2 1 3 4 Fig 10 RPC camera single parts 1 RJ45 patch cable 2 0 m 3 Counter sunk screw V2A DIN 7991 2 RPC camera with adjustment 4 Telescopic rail with spacer plate...

Страница 45: ...mera with six screws 3 in the bores 5 at the left side of the Rework System see the following example picture Fig 12 Mounted RPC camera d Connect the Ethernet cable and the LED lighting cable to the R...

Страница 46: ...e and tighten with the lever 2 b Connect the AccuTC thermocouple without fixture item 0IR6500 37 3 to the socket TC1 c Mount the thermocouple 3 as shown Depending on their opening size air baffles can...

Страница 47: ...n Accu TC holder and an air baffle b Fit the back lugs of the air baffle 1 into the bottom plate of the heating head 2 from behind Then press the air baffle upwards on its front side Ersa GmbH Operati...

Страница 48: ...hine can be used again Only when reuse is not possible should these parts be recycled The machine can contain the following substances or devices Electronic and electrical equipment Computer electroni...

Страница 49: ...5 Commissioning 5 Commissioning 5 1 Setting up the PC 50 5 2 Performing functions Start Setup and Pixel Shift adjustment 52 Ersa GmbH Operating instructions HR 550 XL EN 3BA00247 01 Rev 1 49 157...

Страница 50: ...th administrator rights get logged in c Insert the USB stick with the operating instructions and software USB flash drive Rework 3BA00149 into a USB port of the PC d Copy the contents of the USB stick...

Страница 51: ...t Properties in the appearing context menu b Click on Configure c Select the Advanced tab If you use an Intel Ethernet card select the menu item named Jumbo xxx in the Settings menu The name may diffe...

Страница 52: ...inistrator changes the Password or creates a new Username do not forget the passwords entered or note them down and keep them in a safe place With regard to this please also read Chapter The user mana...

Страница 53: ...chive User administration Profile management Administration HRSoft 2 options Graph options Device options Force sensor parameters Firmware update System board update file Power board update file Satel...

Страница 54: ...el Shift adjustment e Then perform function Adjust pixel shift With regard to this please read the description under The Pixel shift adjustment button The process has now been completed Ersa GmbH Oper...

Страница 55: ...r management tabulator 79 6 8 Editing the soldering profile in the Profile management tab and changing it permanently 81 6 8 1 Overview of the Profile management tabulator 81 6 8 2 Create copy delete...

Страница 56: ...instructions chapter as well as the chapters which are relevant for the specific activity 6 1 2 Supplementary documents NOTE Additional documents Additional documentation or service instructions are...

Страница 57: ...nents become hot even during warm up to the process temperature Tinit Parts are particularly hot during the soldering process After the soldering process wait until the device and the PCB have cooled...

Страница 58: ...clockwise and counterclockwise Rotation angle and speed select able via key functions These keys are also located on the control unit 19 Bottom heating with 4 x 2 heating zones The area that can be r...

Страница 59: ...ey functions These keys are also located on the heating head 5 Switch to turn on off slow travel mode with the joystick When it is switched on the FINE DRIVE indicator lamp will light up There are two...

Страница 60: ...en LOGIN Close application Remember me V 1 1 5 3812 Username Password e Enter your Username and Password into the edit fields and press the enter key If you highlight the Remember me button your Usern...

Страница 61: ...the Archive tab to show the rework processes performed so far in all de tails for an analysis With regard to this please read Chapter The Archive tab ulator Use the Profile management tab create chang...

Страница 62: ...ment mode Drop height IRS Distance 50 mm L head Pipette 1 No automation Placement Heating head Heating head position Placement Inspection Soldering Inspection Desoldering Soldering Desoldering Synchro...

Страница 63: ...pter 6 Workflow bar for determining the process steps from the left to the right If any changes are made here to the process these will be applied but not saved If you switch from the Rework tabulator...

Страница 64: ...dering Profile Selection 3 field select a soldering profile from the list of saved soldering profiles Search for a soldering profile name in the Search input field The search will auto matically start...

Страница 65: ...regard to this please read Chapter The tab with the arrow button More under the Profile man agement tab 90 6 5 3 1 The three right tabulators The field 5 on the right contains the two Information and...

Страница 66: ...TC2 The currently measured temperature of the selec ted sensor is displayed in field 2 The infrared sensor IRS is not suitable for glossy reflective surfaces or very small boards Adaptor head used ad...

Страница 67: ...PCB at which the component is dropped onto the PCB Can only be changed if parameter Drop is selected Bottom right there is button Start with which the Rework process can be started Make sure you have...

Страница 68: ...ion Placement Inspection Soldering Inspection Soldering Desoldering Synchronize Process automation Manual Mode Time START REFERENCE Bottom If you want to change the heating settings specified in the s...

Страница 69: ...Highlight a heating zone by clicking on it and overwrite the value Methods to highlight several heating zones so as to change them all to the same value Use the mouse to draw a rectangle over the heat...

Страница 70: ...ration Manual mode Start Reference Soldering Desoldering Image processing Search Heater config Information Contrast component Contrast board Placement Inspection Soldering Inspection Desoldering Solde...

Страница 71: ...tings should be configured in advance in the Profile management tabulator Possible only if the user is logged in as Administrator With regard to this please read the The tab with the arrow button More...

Страница 72: ...Inspection Desoldering Soldering Desoldering Synchronize Process automation The following buttons are available Soldering In the chart the blue heating curve for soldering is marked The blue heating c...

Страница 73: ...highlight the TL temperature with this Cooling ventilation will start after the plateau phase and run until the T5 point set temperature is reached At the end of the plateau phase the heaters are swi...

Страница 74: ...the re work process Make sure you have made all settings correctly before starting the rework process How to perform the soldering process is described by way of ex ample in the Tutorial Soldering or...

Страница 75: ...tion of the arranged component with the Re work System optical instruments Soldering Soldering a positioned component Inspection Final check of the soldering result with the optical instruments of the...

Страница 76: ...The search will automatically start after entering the first character Button View chart The highlighted chart will be displayed For more informa tion see below in Chapter View chart Charts that have...

Страница 77: ...file is displayed on screen immediately after export In CSV format comma separated values e g for further processing in Mi crosoft Excel In HRS2 format The storage path is C program data Ersa GmbH HR...

Страница 78: ...ing process in the Change all zones function has been switched off the single heating phases T1 T2 can be clicked on and shown Device info tab Display of basic information about the device and softwar...

Страница 79: ...es which this user has been assigned to are displayed on the bottom right First name Creation date Last name Style Role Username First name Last name Username User group Password Repeat password Relat...

Страница 80: ...he user at any time To do this click on the button with the cur rent user name in the top right corner and call up function Logout The latter will open dialog Login into which you should enter Name an...

Страница 81: ...he following areas Combined Rework Archive User administration Profile management Administration Manual mode Soldering Desoldering Name Placement Profile settings Search Heater config Information Boar...

Страница 82: ...tor Rework tabulator For a description of the Rework tabu lator please read the Rework tabulator overview 62 chapter You can access the tabulators Archive User administration Profile manage ment Admin...

Страница 83: ...bended once indicates a heating up curve with one bend bended twice indicates a heating up curve with two bends soak zone indicates a heating phase with reduced heat from T1 to T2 for the activation o...

Страница 84: ...appear at the end of the profile list Change the profile based on your specific needs With regard to this please also read the The Information tabulator under the User management tabulator 85 chapter...

Страница 85: ...l settings correctly before starting the rework process How to perform the soldering process is described by way of ex ample in the Tutorial Soldering or unsoldering a component The correct soldering...

Страница 86: ...case of high mass or sensitive compon ents If you want you may rename the components Control sensor Selection of the temperature sensor that controls the solder ing process based on its temperature me...

Страница 87: ...sor or Drop The component on the PCB id dis carded Drop height For soldering Height over the PCB at which the component on the PCB is discarded It may be changed on if the Drop parameter is selected T...

Страница 88: ...ing curve to the values of the soldering one The dis played heating settings are valid for the highlighted soldering curve The parameters in tab Heater config Change all zones if this button is select...

Страница 89: ...ing zones so as to change them all to the same value Use the mouse to draw a rectangle over the heating zones Click on the right hand or bottom blue side fields Switch off on the lower heating with th...

Страница 90: ...ill be displayed in grey Contrast component If the Red and green overlap information button is en abled adjustment of the contrast value for the component shown in red Contrast board If the Red and gr...

Страница 91: ...ssign This one has an open pipe char acter c Click on the pipe character The pipe character is now closed d Click on Confirm A user has been assigned to the soldering profile Also use dialog Assign us...

Страница 92: ...ighted in green in the chart The desoldering red heating curve can be changed and tab Heater con figcan be set for desoldering Combined The heating curves of the soldering and desoldering temperature...

Страница 93: ...click on the relevant temperature Enter the desired temperature or use the keys Arrow up and Arrow down in order to change the temperature Change the heating power In the heating phase below click on...

Страница 94: ...the other from the left to the right Desoldering Placement Inspection Soldering Inspection Process automation Desoldering Unsolder a component Placement Placing a component in the soldering position T...

Страница 95: ...er Temperature display Wide angle optic pixel shift y axis Save Select Mode MES mode Tracking mode Normal mode Create backup Database restore Software version The software version of HRSoft2 Languages...

Страница 96: ...word password for network access protection Connection test Click on button Test connection When the connection to the database has been established a checkmark will appear Button Test connection clic...

Страница 97: ...ckness TC3 TC4 TC5 TC6 TC7 TC8 TC infrared coil Inner IR emitter Outer IR emitter Fan Speed You may access the following parameters In table Graph options determine which colours the measured curves i...

Страница 98: ...select your Rework system Force sensor parameters Set the contact sensors of the placing head pipette Only change values if the res ulting effects are known Changing these values may cause the pipett...

Страница 99: ...m also run the function associated with button Adjust pixel shift here in this dialog With regard to this please read Chapter The Pixel shift adjust ment button Adjust pixel shift Process Adjust pixel...

Страница 100: ...rmware updates will appear on the bell icon Click on the bell icon and start the update which will be run automatically Amtel update file only execute if specified by the Ersa service Xmos update file...

Страница 101: ...up the Rework system after changing the heating head or relocat ing the system also run the function associated with the Adjust pixel shift button in the Device options dialog With regard to this plea...

Страница 102: ...eady and go on to the next work step This can be done either by pressing the green illuminated button on the control unit or by clicking on the Next button at the top of the window The suction pipette...

Страница 103: ...eam b Do not point the laser beam at other people Reflecting surfaces under the laser generate reflections c Class 2 laser according to DIN EN 60825 1 2008 5 P 1 mW 650 nm a The position laser is on C...

Страница 104: ...administration Profile management Administration HRSoft 2 options Graph options Device options Back Next Zero Point Teach In Tray Table Teach In Vision Box Teach In a Wait for this window to close b...

Страница 105: ...he system also run the function associated with the Start device setup but ton in the Device options dialog With regard to this please read Chapter The Start teaching button CAUTION Risk of burns from...

Страница 106: ...to turn on off slow travel mode with the joystick When it is switched on the FINE DRIVE indicator lamp will light up There are two motion modes in Fine Drive 1 Continuous slow motion when fully pressi...

Страница 107: ...ep d Push the lever in to switch to the Visionbox optical features e Go on to the next work step f Click on button Take image g Go on to the next work step h Slide the Visionbox in The pixel shift is...

Страница 108: ...unction description The Management tabulator with three dialog windows The pixel shift has been fully adjusted and the result saved Ersa GmbH Operating instructions HR 550 XL EN 3BA00247 01 Rev 1 108...

Страница 109: ...beam b Do not point the laser beam at other people Reflecting surfaces under the laser generate reflections c Class 2 laser according to DIN EN 60825 1 2008 5 P 1 mW 650 nm 2 No function 3 Move the he...

Страница 110: ...ncing the Rework system 9 Heating head approaching fixed positions Opens a submenu with further buttons Park position Placement position 1 Buttons 60 55 50 30 move the heating head to the selected hei...

Страница 111: ...ialog will open which will show extensive status information about the various Rework System components Fig 22 Starting page of the System Status filed example in English The starting page of the info...

Страница 112: ...ra is active Right column State of the optional RPC camera components when the camera is active The bell icon indicates whether there are firmware updates for the Rework System The number in the circl...

Страница 113: ...way back c Enter tab Administration and call up dialog Device options Click on the Move to transport position button The heating head is moved to the lowest position Do not lift the Rework system by t...

Страница 114: ...6 Function description Switching off the Rework System Ersa GmbH Operating instructions HR 550 XL EN 3BA00247 01 Rev 1 114 157...

Страница 115: ...soldering profile and prepare the soldering process 124 7 6 Start the process and work with the assistant 125 7 7 Task 1 Alignment 127 7 8 Task 2 Desoldering 128 7 9 Task 3 Deposit 130 7 10 Task 4 Pre...

Страница 116: ...be placed in an electrostatic protected area ESD electrostatic discharge The HR 550 can be easily integrated in environments of this kind Using one of the front buttons the user can connect for examp...

Страница 117: ...ting level l Tighten the PCB holder 8 m Move the PCB in the X direction to the desired soldering position so that the bottom and top heaters can be optimally used n Tighten both knurled screws 6 o Che...

Страница 118: ...andle of the transport lock 4 Two fixing strips each bolted twice a 5 Plastic clamping piece screwed twice Not needed for nozzle change Store the clamping piece and any associated screws so as to be a...

Страница 119: ...a Move the pipette about 1 cm out of the heating head see the following pic ture 3 Fig 26 The extended pipette 3 in the position for changing the nozzle The picture shows the pipette without the nozz...

Страница 120: ...ockwise wave motion to indicate that it has entered the programming mode b Now change the angle degree press the right hand key once to switch to the next higher level To switch to the next lower leve...

Страница 121: ...on the pipette axis e Manually screw the desired soldering nozzle onto the pipette and very slightly tighten it always by hand f Loosen the two fixing strips of the transport lock but do not unscrew...

Страница 122: ...Slide the thermocouple into the holder 1 e Fit the holder 1 in such a way that the end of the thermocouple 7 can be placed very close to the component f Straighten the end of the thermocouple so that...

Страница 123: ...r for shielding purposes b To avoid material damage when installing air baffles make sure that the air baffle does not touch the pipette and the soldering nozzle c Fit the back lugs of the air baffle...

Страница 124: ...me Placement Profile settings Search Heater config Information Board Component Control sensor Adaptor head Lens pipette Dip mode Placement mode Drop height IRS Distance 50 mm L head Pipette 1 No autom...

Страница 125: ...Use the soldering fume extraction system Solder fumes are hazardous to health For this reason a soldering fume extraction sys tem should always be used As regards the type of soldering fume extractio...

Страница 126: ...Profile settings Username Process Temperatures Control sensor Adaptor head Heating head Lens pipette Next Back Max Chart Temperature TL TP Heating head position The info line above the diagram describ...

Страница 127: ...t suitable for glossy and reflective sur faces b Fit the holder of the temperature sensor in such a way that the end of the ther mocouple can be placed very close to the component Shape the end of the...

Страница 128: ...hould always be used As regards the type of soldering fume extraction system we recommend using the Ersa Easy Arm with prefilter HEPA particle filter and ac tivated carbon filter The device is equippe...

Страница 129: ...be zoomed with the controller on the right of the cam era image or with the mouse wheel RPC camera light intensity controls the camera lighting Auto exposure When activated the brightness of the imag...

Страница 130: ...have cooled down and reached non hazardous tem peratures a Distribute a small amount of viscous non volatile flux material on the residual solder points b Remove any residual solder with a suitable to...

Страница 131: ...de apply flux material gel in the dip template and place the dip template into the other component tray Then the component is taken from the component tray and dipped in the flux ma terial of the dip...

Страница 132: ...oldering or desoldering a component Task 4 Preparation Fig 32 Component covered in solder paste in the print template on the component tray Ersa GmbH Operating instructions HR 550 XL EN 3BA00247 01 Re...

Страница 133: ...ontroller at the bottom on the right you may adjust the vision box zoom First correct the component rotation using the relevant rotary button With re gard to this please also read the Overview of the...

Страница 134: ...ponent Contrast board Split optics Next Back Smaller Bigger Fig 34 Split screen view with simultaneous display of the four corners of a large component b If necessary even in this case adjust the angl...

Страница 135: ...Darker b You can use the lever to switch between normal view and the telephoto lens of the Vision box With regard to this please also read Chapter Overview of the machine parts no 11 c For example in...

Страница 136: ...reen PCB lighting Automatic brightness When activated the RPC camera image is automatically adjusted after changing the camera lighting brightness or ambient light Darker Brighter Checks the RPC camer...

Страница 137: ...hould always be used As regards the type of soldering fume extraction system we recommend using the Ersa Easy Arm with prefilter HEPA particle filter and ac tivated carbon filter The device is equippe...

Страница 138: ...value of 8 b With the right controller you may adjust the camera zoom RPC camera light intensity Camera illumination controller Auto exposure If activated the brightness of the image is automatically...

Страница 139: ...tness Brighter b You may use the normal view telephoto toggling lever of the vision box With regard to this please also read the Overview of the machine partschapter No 11 c For instance in case of la...

Страница 140: ...the green PCB illumination Automatic brightness If activated the image of the RPC camera is automatic ally adjusted as the camera illumination intensity or ambient light is changed Darker Brighter To...

Страница 141: ...ot even during warm up to the process temperature Tinit Parts are particularly hot during the soldering process After the soldering process wait until the device and the PCB have cooled down and reach...

Страница 142: ...7 Tutorial Soldering or desoldering a component Removing residual solder Ersa GmbH Operating instructions HR 550 XL EN 3BA00247 01 Rev 1 142 157...

Страница 143: ...work system on a weekly basis for any dirt or damages 144 8 2 Lubricating the worm gear of the pipette hub every six months 145 8 3 Change the heating head 146 8 4 Performing a HRSoft 2 update 147 Ers...

Страница 144: ...Remove the vision box b Clean the glass plates with a lint free cloth and a commercially available glass cleaner Component trays a Clean the component trays with a lint free cloth In case of heavy di...

Страница 145: ...uired material 2 Allen keys Lubricating grease Kl ber Micolube GL 261 Fig 38 1 inspection flap a Switch off the Rework System b Remove one screw from the inspection opening with the Allen key and loos...

Страница 146: ...figure No 1 Fig 39 Unlock and remove the heating head e Hold the heating head tight with both hands and keep the release lever pressed with a finger on the top of the heating head In the upper area pu...

Страница 147: ...grams line d Uninstall the HRSoft 2 program in the Apps Features program list Install the new HRSoft 2 version a In the C ProgramData ErsaGmbH HRSoft 2 Firmware directory launch the setup exe file Fol...

Страница 148: ...make the fol lowing settings d Select controller QoS e Select the optional field Port based under Quality of Service f Highlight ports 7 and 8 under Port Priority g Select menu item High priority for...

Страница 149: ...rts 9 1 Read this first 150 9 1 1 Target readers permitted spare parts 150 9 2 Nameplate and machine number 150 9 3 Spare parts 151 9 3 1 Nameplate and machine number 152 Ersa GmbH Operating instructi...

Страница 150: ...ed protective equipment replace it with new items d Use spare parts replacement parts and wear parts exclusively authorized by the machine manufacturer e Thoroughly clean the machine before starting w...

Страница 151: ...pply 3ET00370 2 way magnet valve on off 3PT00049 Rework powerboard 297445 RW powerboard heating circuit 6 10 356605 Rework controllerboard 285856 RW control board HR 550 XL 367007 Stepper motor contro...

Страница 152: ...ways specify the machine number This number is prin ted on the nameplate see illustration above The nameplate contains other import ant information about the machine such as machine type electric powe...

Страница 153: ...9 Spare and wear parts Spare parts Ersa GmbH Operating instructions HR 550 XL EN 3BA00247 01 Rev 1 153 157...

Страница 154: ...10 Annex 10 Annex 10 1 EC Declaration of Conformity 155 Ersa GmbH Operating instructions HR 550 XL EN 3BA00247 01 Rev 1 154 157...

Страница 155: ...10 Annex EC Declaration of Conformity 10 1 EC Declaration of Conformity CE Declaration of Conformity HR 550 XL Ersa GmbH Operating instructions HR 550 XL EN 3BA00247 01 Rev 1 155 157...

Страница 156: ...10 Annex EC Declaration of Conformity Ersa GmbH Operating instructions HR 550 XL EN 3BA00247 01 Rev 1 156 157...

Страница 157: ......

Отзывы:

Похожие инструкции для HR 550 XL