


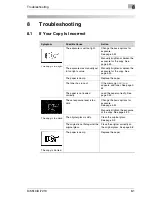


Troubleshooting
8
Di5510/Di7210
8-3
8.2
Your System Is Not Working Correctly
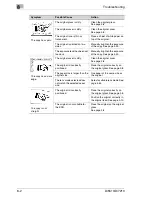
Symptom
Possible Cause
Action
Nothing is shown in the
display.
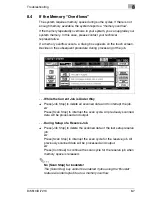
The energy saving function
is enabled.
Press any key to close the
energy saving function.
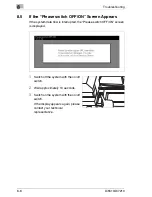
The system is switched off.
Switch the system on.
The main switch is at
position 0 (OFF).
Ensure that the main switch
is set to position I (ON).
The power plug is not in the
outlet.
Plug the power plug into the
outlet.
A cycle does not start when
the [Start] key on the control
panel is pressed.
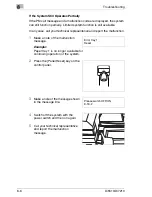
Not all doors are closed on
the system or finisher.
Close all doors on the
system or finisher.
No matching paper size is
loaded.
Load a matching paper size.
The copy counter is at “0”.
Set the number of copies.
The E.K.C. password was
not input.
Input your E.K.C. password.
The copy limit has been
exceeded.
Talk to the system
administrator.
The basic options are not
displayed.
Call up the basic options.
The energy saving key is
pressed.
Exit energy saving mode.
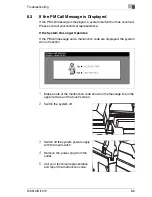
A malfunction has occurred
in the system.
Note any message shown on
the display.
The system will not switch
on.
The power plug is not in the
outlet.
Plug the power plug into the
outlet.
The main switch is at
position 0 (OFF).
Ensure that the main switch
is set to position I (ON).
The building circuit breaker
is activated.
Switch on the circuit breaker.
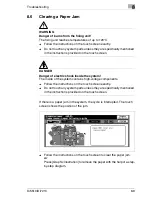
Copying cannot be
continued after a paper jam.
There is another paper jam.
Clear all paper jams that you
can find.
The basics menu display is
different from that shown in
the manual.
The system administrator
has changed settings.
Talk to the system
administrator.
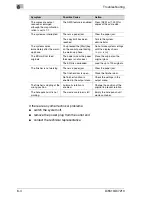
The system regularly reports
a paper jam.
Labels or OHP
transparencies were printed
previously.
Check whether there are
labels stuck to the reported
paper jam position. Use the
bypass tray only to process
special paper.
The paper has not been
loaded correctly.
Load the paper correctly.
See page 2-43.
Содержание Di5510
Страница 1: ...Di5510 Di7210 Advanced Information...
Страница 2: ......
Страница 28: ...1 Introduction 1 16 Di5510 Di7210...
Страница 90: ...2 Getting to Know Your System 2 62 Di5510 Di7210 9 Close the finisher door...
Страница 96: ...2 Getting to Know Your System 2 68 Di5510 Di7210...
Страница 148: ...3 Initial Steps 3 52 Di5510 Di7210...
Страница 236: ...4 Basic Functions 4 88 Di5510 Di7210...
Страница 346: ...6 Network functions 6 48 Di5510 Di7210 4 Click Back to return to the Scan Transmission Setting window...
Страница 352: ...6 Network functions 6 54 Di5510 Di7210 3 Configure settings as required...
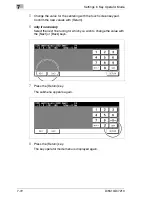
Страница 387: ...Settings in Key Operator Mode 7 Di5510 Di7210 7 17 7 Press the Return key The key operator mode menu is displayed again...
Страница 427: ...Settings in Key Operator Mode 7 Di5510 Di7210 7 57 7 Press the Return key The key operator mode menu is displayed again...
Страница 434: ...7 Settings in Key Operator Mode 7 64 Di5510 Di7210 8 Press the Return key The key operator mode menu is displayed again...
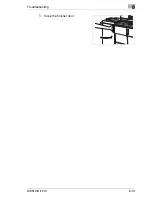
Страница 455: ...Troubleshooting 8 Di5510 Di7210 8 13 5 Close the finisher door...
Страница 457: ...Troubleshooting 8 Di5510 Di7210 8 15 5 Close the finisher door...
Страница 458: ...8 Troubleshooting 8 16 Di5510 Di7210...


