


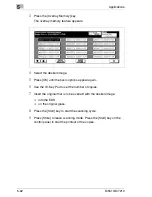


Applications
5
Di5510/Di7210
5-51
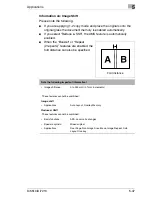
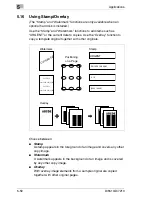
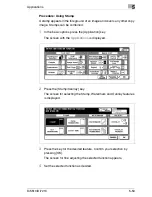
Information on: Stamp/Overlay
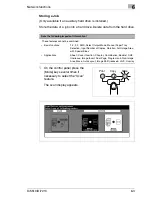
Please note the following:
G
Stamps can be combined.
G
Textual watermarks are printed diagonally across the middle of the
page.
G
Numerical watermarks are printed repeatedly in the background of the
image.
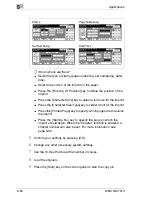
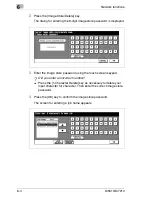
G
When using “Stamp”, “Set Numbering”, “Page Numbering” and “Date
& Time”, nine settings are available for setting up the printout.
G
The “Stamp”, “Set Numbering” and “Date & Time” functions allow the
information to be printed on all sides or on the cover only.
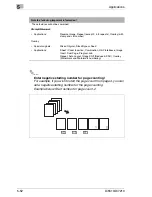
G
The imprint can be as follows with the “Page Numbering” feature:
H
on all pages
H
in combination with Sheet/Cover Insertion:
[Front & back: print on]
Front cover and back cover are printed with a page number
[Front: print off, back: print on]
Page number is printed only on the back
[Front & back: print off]
No page number on front cover or back cover
H
in combination with inserts:
[Print ON]
Page number is printed
[Print OFF]
Page number is not printed but is counted
[Skip Page]
Page number is not printed or counted
H
in combination with blank insertion:
[Print OFF]
Page number is not printed but is counted
[Skip Page]
Page number is not printed or counted
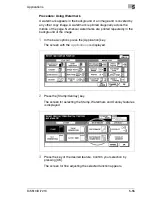
G
When using the “Overlay” feature, the originals have to be scanned
first.
Содержание Di5510
Страница 1: ...Di5510 Di7210 Advanced Information...
Страница 2: ......
Страница 28: ...1 Introduction 1 16 Di5510 Di7210...
Страница 90: ...2 Getting to Know Your System 2 62 Di5510 Di7210 9 Close the finisher door...
Страница 96: ...2 Getting to Know Your System 2 68 Di5510 Di7210...
Страница 148: ...3 Initial Steps 3 52 Di5510 Di7210...
Страница 236: ...4 Basic Functions 4 88 Di5510 Di7210...
Страница 346: ...6 Network functions 6 48 Di5510 Di7210 4 Click Back to return to the Scan Transmission Setting window...
Страница 352: ...6 Network functions 6 54 Di5510 Di7210 3 Configure settings as required...
Страница 387: ...Settings in Key Operator Mode 7 Di5510 Di7210 7 17 7 Press the Return key The key operator mode menu is displayed again...
Страница 427: ...Settings in Key Operator Mode 7 Di5510 Di7210 7 57 7 Press the Return key The key operator mode menu is displayed again...
Страница 434: ...7 Settings in Key Operator Mode 7 64 Di5510 Di7210 8 Press the Return key The key operator mode menu is displayed again...
Страница 455: ...Troubleshooting 8 Di5510 Di7210 8 13 5 Close the finisher door...
Страница 457: ...Troubleshooting 8 Di5510 Di7210 8 15 5 Close the finisher door...
Страница 458: ...8 Troubleshooting 8 16 Di5510 Di7210...


